Set up personalization
Estimated duration: 15-30 minutes
This tutorial demonstrates how to personalize the customer experience using the Prepr GraphQL API. Follow the step-by-step guide below to set up personalization for your web application.
Introduction
Deliver a personalized customer experience for your website or app visitors by using built-in Prepr features. Let's look at an everyday use case: a visitor on your website sees personalized content based on their clicking behavior. For example:
- Visitor 1 visits our bake shop website to find easy recipes. Let's classify them as a beginner baker. Then, when they visit the page below they see personalized content for beginner bakers.
- Visitor 2 looks for state-of-the-art kitchen equipment to replace the aging equipment in their bakery. Let's classify them as a pro baker. Then, when they visit the page below they see personalized content for pro bakers.
- Visitor 3 visits our bake shop website for the first time, so when they go to the page below, they see the generic variant of the page.
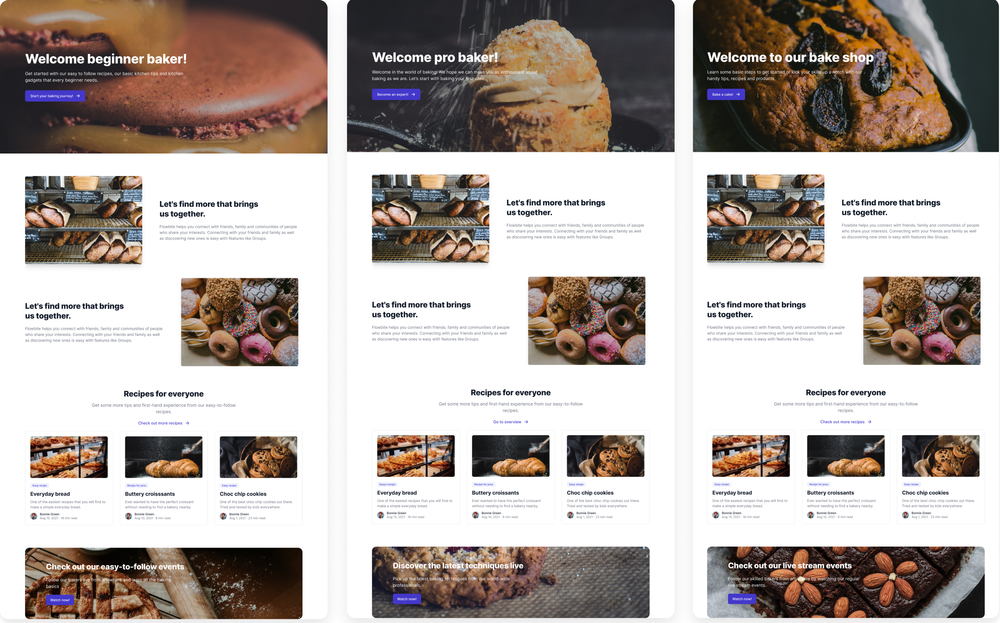
In the above example, the front end selects which variant of the page to render depending on the type of visitor, in our case, a beginner baker or a pro baker.
The marketing team can then use an analytics tool like Google Analytics to measure the click-through rate for each personalized page and determine how well they perform against the non-personalized page.
The example above is just one method for personalization. You could also personalize based on other characteristics such as age, gender, membership status, etc. In these cases, a visitor's Customer Id is assigned to a corresponding segment.
You could even personalize based on criteria outside of the web app, for example, when a user visits your web app from a social media link. In this case you set up the segment to match a UTM tag on the redirect link. Check out one of our front-end app complete guides for more details.
To set up personalized pages in Prepr, you need to complete the following steps:
Step 1: Set up segments. Set up segments based on specific visitor interaction on the content. These segments are the groups of visitors for whom you want to deliver a personalized experience.
Step 2: Add personalization to the front end. This is a one-time update to the code which means that any updates to personalized content will automatically be applicable without further code changes.
Step 3: Connect analytics to the front end. Using your preferred analytics tool, measure and compare click-through-rates for each of the personalized variants.
Prerequisites
To implement personalization for the above example, you need to have the following set up in Prepr beforehand:
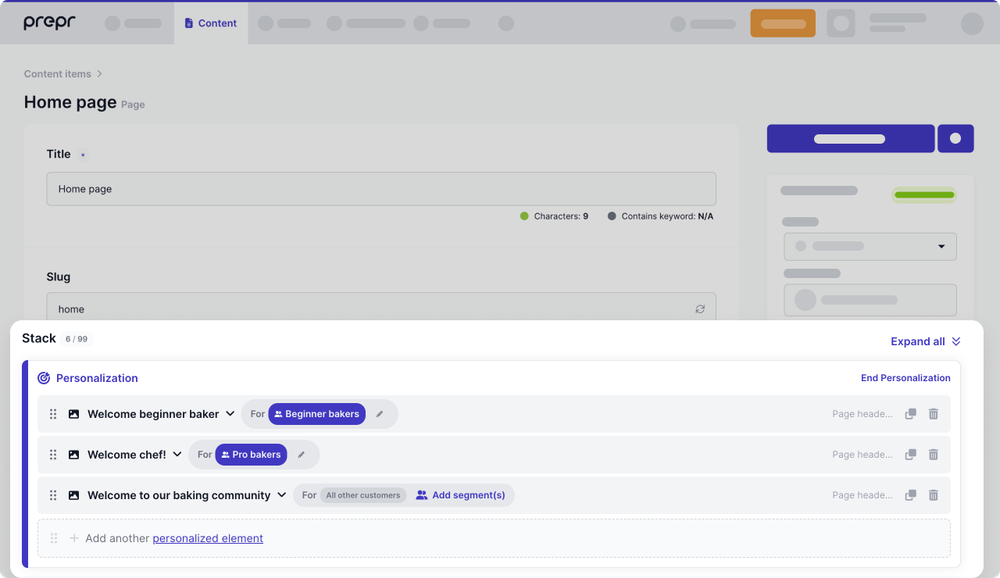
We will make use of the Home Page with personalization content item from the demo data. Take note that the personalized content is defined in a Stack field. Check out the personalized page example for more details on how to define and set up a Stack field.
Step 1: Set up segments
Before implementing personalization you need to choose different target segments for your web app. In this example we have two segments: Beginner bakers and Pro bakers. If you’re using preloaded demo data in your Prepr environment as mentioned above in the Prerequisites section, these are available in your Prepr environment. So, you only need to assign customers to the corresponding segment based on Prepr data as follows:
- Go to the Segments tab and click on each segment to make an update.
- Update a segment by adding a condition to track when users viewed specific Prepr content items. For more details, check out the Customer segments page.
By completing this step, you will have successfully grouped your web app visitors based on their clicking behavior.
Step 2: Add personalization to the front end
In this step we look at how to do the following:
- Add tracking code to track visitors
- Retrieve the variants using the API
- Add HTML attributes to the page header component
Add tracking code to track visitors
In the previous step, you set up the segments based on visitor interaction on Prepr data. To be able to track a visitor's interaction on Prepr data, you need to add some tracking code to the front-end app.
The Prepr tracking code is a lightweight piece of javascript to capture events on Prepr data:
- Go to Settings > Tracking code.
- Click Copy code to get the Prepr tracking code and add it to the
<head>section of your web app.
![]()
- Add a custom HTML meta tag to content pages to start tracking views.
To start tracking views on content items, add the following meta tag to the <head> section of content pages. Use the content item Id as the value for the content property.
<meta property="prepr:id" content="16c63a1e-e837-4951-bd9a-b933a8d14b2f"/>
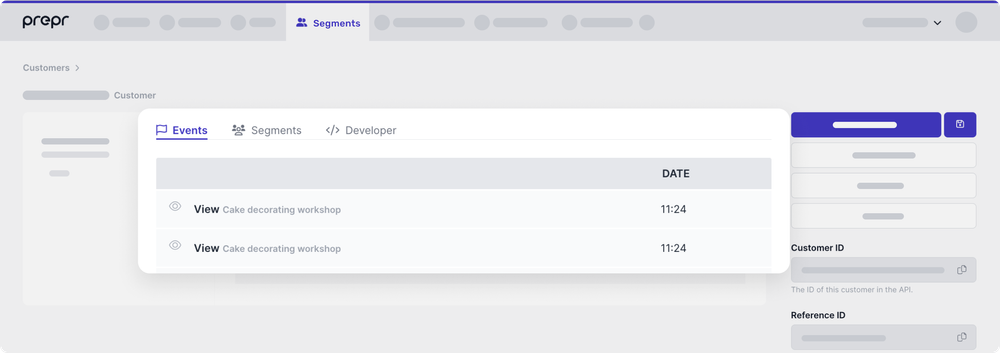
You can test if the implementation works by visiting a content page on your web app. Then, check the customer in Prepr to see if Prepr registered a view event.
- Go to the Segments tab.
- Open the latest customer at the top of the list.
- Check if Prepr captured the page view.
View the data capturing guide for all tracking options.
Your web app can now track your visitors' events.
Retrieve variants using the API
Now it's time to retrieve the Home page with personalization content item including the page header variants.
Copy the sample code below into your front-end application.
query{
   Page (id: "6b9aab64-4972-4049-810f-333fc89bf87c") {
    title
        stack {
            ... on PageHeader {
                heading
                image {
                    name
                }
                text
                cta_label
                _context {
                    kind
                    variant_id
                    group_id
                }
            }
            __typename
        }
    }
}
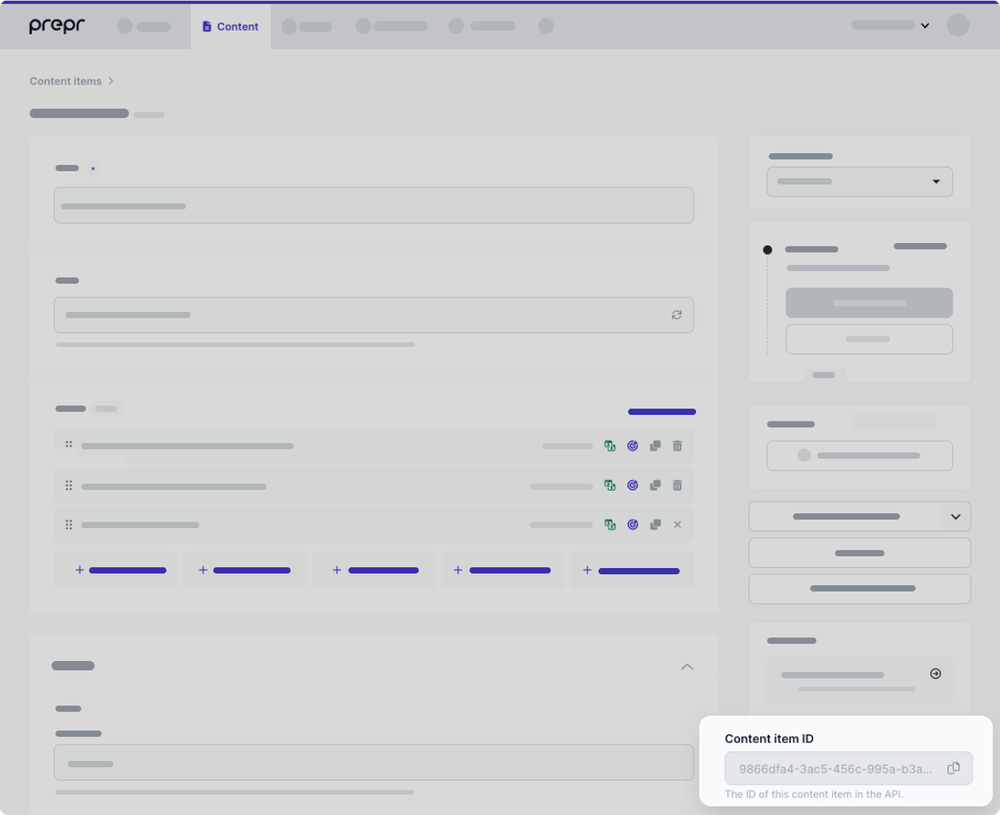
Update the id string of the query with the Content item ID of the Home page with personalization. See the image below on where to find the Content item ID on the content item page.
To retrieve the page content, call the API using the query above and pass a Prepr Customer ID as a header as shown below. The Prepr Customer ID is required to determine which segment a visitor belongs to and as a result which variant a visitor gets. Get a customer Id from one of the segments that you set up previously.
--header 'Prepr-Customer-Id: <YOUR-CUSTOMER-ID>'
Tip
Follow the Connecting front-end apps guide to learn more about retrieving content items in a specific framework.
As a response to your API request, Prepr sends the variant to be displayed. Your app then needs to build its response based on this variant. If you don't specify a customer Id in the header or the customer Id is for a visitor that does not belong to either segment, then the query response looks like the example below.
{
    "data": {
        "Page": {
            "title": "Home page",
            "stack": [
                {
                    "heading": "Welcome to the bake shop",
                    "image": [
                        {
                            "name": "welcome"
                        }
                    ],
                    "text": "Learn some basic steps to get started or kick your skills up a notch with our handy tips, recipes and products.",
                    "cta_label": "Let's get baking!",
                    "_context": {
                        "kind": "PERSONALIZATION",
                        "variant_id": "ALL_OTHER_USERS",
                        "group_id": "2b8f2165-b303-494f-b2b2-f813c90382f9"
                    },
                    "__typename": "PageHeader"
                }
            ]
        }
    }
}
If the customer Id in the header matches a visitor that belongs to one of the segments, then the query response looks like the example below.
{
    "data": {
        "Page": {
            "title": "Home page",
            "stack": [
                {
                    "heading": "Welcome beginner baker!",
                    "image": [
                        {
                            "name": "welcome beginner"
                        }
                    ],
                    "text": "Get started with our easy to follow recipes, our basic kitchen tips and kitchen gadgets that every beginner needs.",
                    "cta_label": "Let's start our baking journey!",
                    "_context": {
                        "kind": "PERSONALIZATION",
                        "variant_id": "BEGINNER-BAKERS",
                        "group_id": "2b8f2165-b303-494f-b2b2-f813c90382f9"
                    },
                    "__typename": "PageHeader"
                }
            ]
        }
    }
}
Tip
You can do a test run of the personalization in Prepr before launching it on your live website:
- Open the API Explorer as described here.
- Copy and paste the GraphQL query above into the Operations pane.
- Run the query. You'll get the page header for All other users because you didn't send a customer Id.
- Under the Header section, enter Prepr-Customer-Id with a Customer ID value in one of the segments. On the Segments screen, find the Id on the right when you edit a specific customer.
- Re-run the query. You'll now get one of the personalized page headers.
Add HTML attributes to the page header
To track visitor interactions for personalization and get accurate reporting results, we need to add attributes to the page header. In our example, we have a Page header with some specific text and a call to action link for each variant, so we want to report on the following types of visitor interactions:
- Impressions: How many visitors looked at the page header for each variant.
- Clicks: How many visitors clicked the CTA link for each variant.
We can determine the click-through rate based on these two events, which will show how well each variant performed. Because the above interactions need to be per variant, we also need a custom variable to identify the variant.
See an example code snippet to include the HTML attributes below:
<!-- Page header -->
<div
  id="{{__typename}}_{{group_id}}"
  personalized-variant="{{ variant_id }}"
  ...
>
<!-- Call to action link in the page header -->
  <a
    href="#"
    id="cta_link_{{__typename}}_{{group_id}}"
    personalized-variant="{{ variant_id }}"
    ...
  >Learn more</a>
</div>
In the above example, we set the Ids dynamically by using the following fields returned in the query response:
__typename- The element type, for example, PageHeader.group_id- A unique Id to identify a specific personalization group. A personalization group is created every time a content editor clicks the personalization icon in the content item. This is useful to identify all elements that have personalization enabled.variant_id- This returns a value of the segment for the variant, for example, BEGINNER-BAKERS or PRO-BAKERS. This value is ALL_OTHER_USERS for the non-personalized variant.
Using the query response above as an example the Ids get the following values:
id= "PageHeader_2b8f2165-b303-494f-b2b2-f813c90382f9"personalized-variant= "BEGINNER-BAKERS"
That’s it. You have integrated personalization into your website. Now, you can show each visitor a personalized header based on their clicking behavior.
The next step is to set up your analytics tool to measure the click-through rate to see how well the personalized pages perform for each segment.
Step 3: Connect analytics to the front end
Prepr Personalization works with any analytics tool. If you already have your analytics tool set up to measure visitor interactions on your web app, ignore this step.
- If not already done, work with the marketing team to connect GA4 and GTM to your web app by following the GA4 and GTM setup process.
Once completed, the analytics tool is connected to your front end. The rest of the analytics setup is ordinarily done by the marketing team and you can find more details in the personalization guide for marketers.
After some time the marketing team will be able to use the reports to determine how well the personalized variants perform and make content updates, if necessary.
Congratulations, you have successfully set up personalization on your web app.
Check out the personalization for marketers doc to get a full picture on the steps needed to personalize a website.
Other use cases
This guide explains just one use case for personalization. Below we list a few more common options.
Segments from external CRM/CDP systems
It is possible to personalize Prepr content based on segments maintained in other CDP/CRM systems or segments based on UTM tags (for instance from an ad campaign). This means that customer data doesn't have to be imported into Prepr. In this case, you need to reference these external segments from within Prepr using the segment unique identifier from that system or the UTM tag.
Your personalization flow will look like this:
-
Create a new segment in Prepr and set the ID value to the segment unique identifier copied from your CRM/CDP system or the UTM tag.
-
Create and personalize a stack field. See Step 2 from the instructions above.
-
Retrieve personalized content using the API as shown in Step 3 with one difference — you must pass the
Prepr-Segmentsheader instead ofPrepr-Customer-Id. For more information, refer to our API documentation.
Note
You do not need to add tracking code to the front end in this case because the segments are based on outside criteria and not the visitor interaction on Prepr data.
- If the segment is based on external customer data, ensure that your front end is connected to the external CRM/CDP system for data retrieval.
Want to learn more?
Check out the following chapters:
Schedule a free consultation
Do you want to get started with personalization but still have questions or want a demo? Book a free call with a Prepr solution engineer: