Quick start guide
Estimated duration: 15-30 minutes
Introduction
Prepr allows you to develop a dynamic, data-driven, web application with ease. This tutorial explains how to get started with Prepr. We will cover all the basics: modeling content types, adding content and images and retrieving content using the API. Follow the step-by-step guide below.
Use case
This tutorial explains how to manage articles and author profiles in Prepr and retrieve that content using the GraphQL API. For example, to create a blog. You can apply these principles to all kinds of situations.
Step 1: Create an environment
If you haven't already done so, go to https://signup.prepr.io/ (opens in a new tab) and sign up for a Prepr account.
-
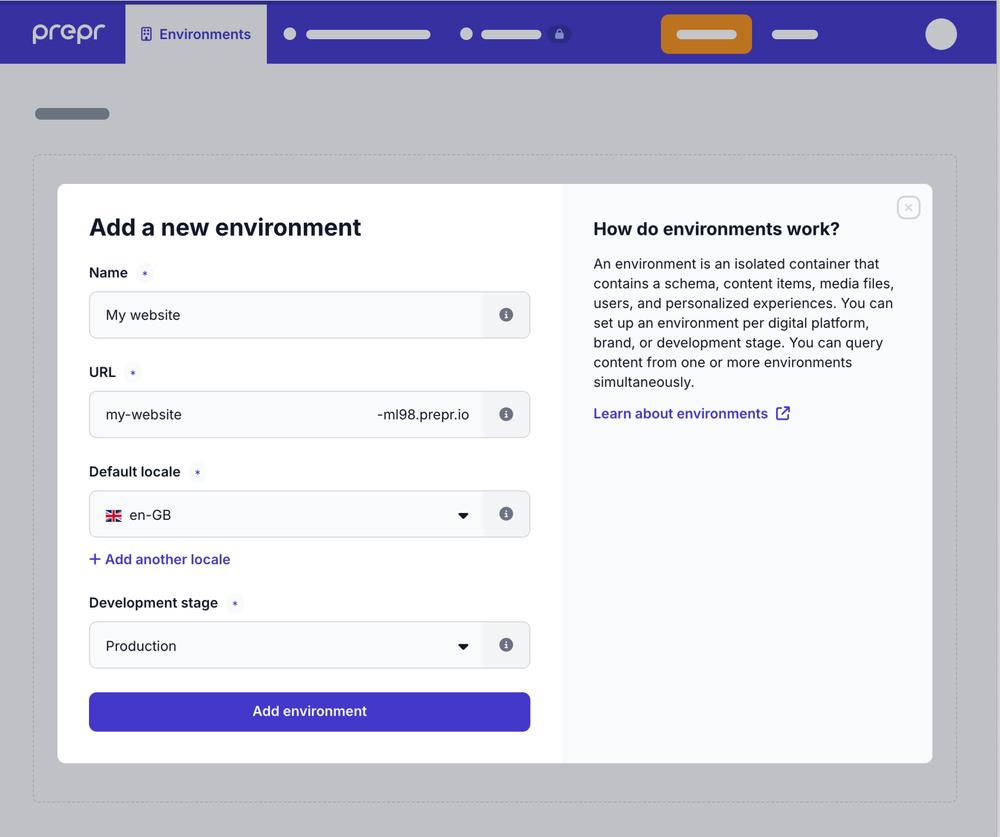
After you sign up, you will be prompted to add an environment. Enter a Name and choose the Default locale and Development stage.
-
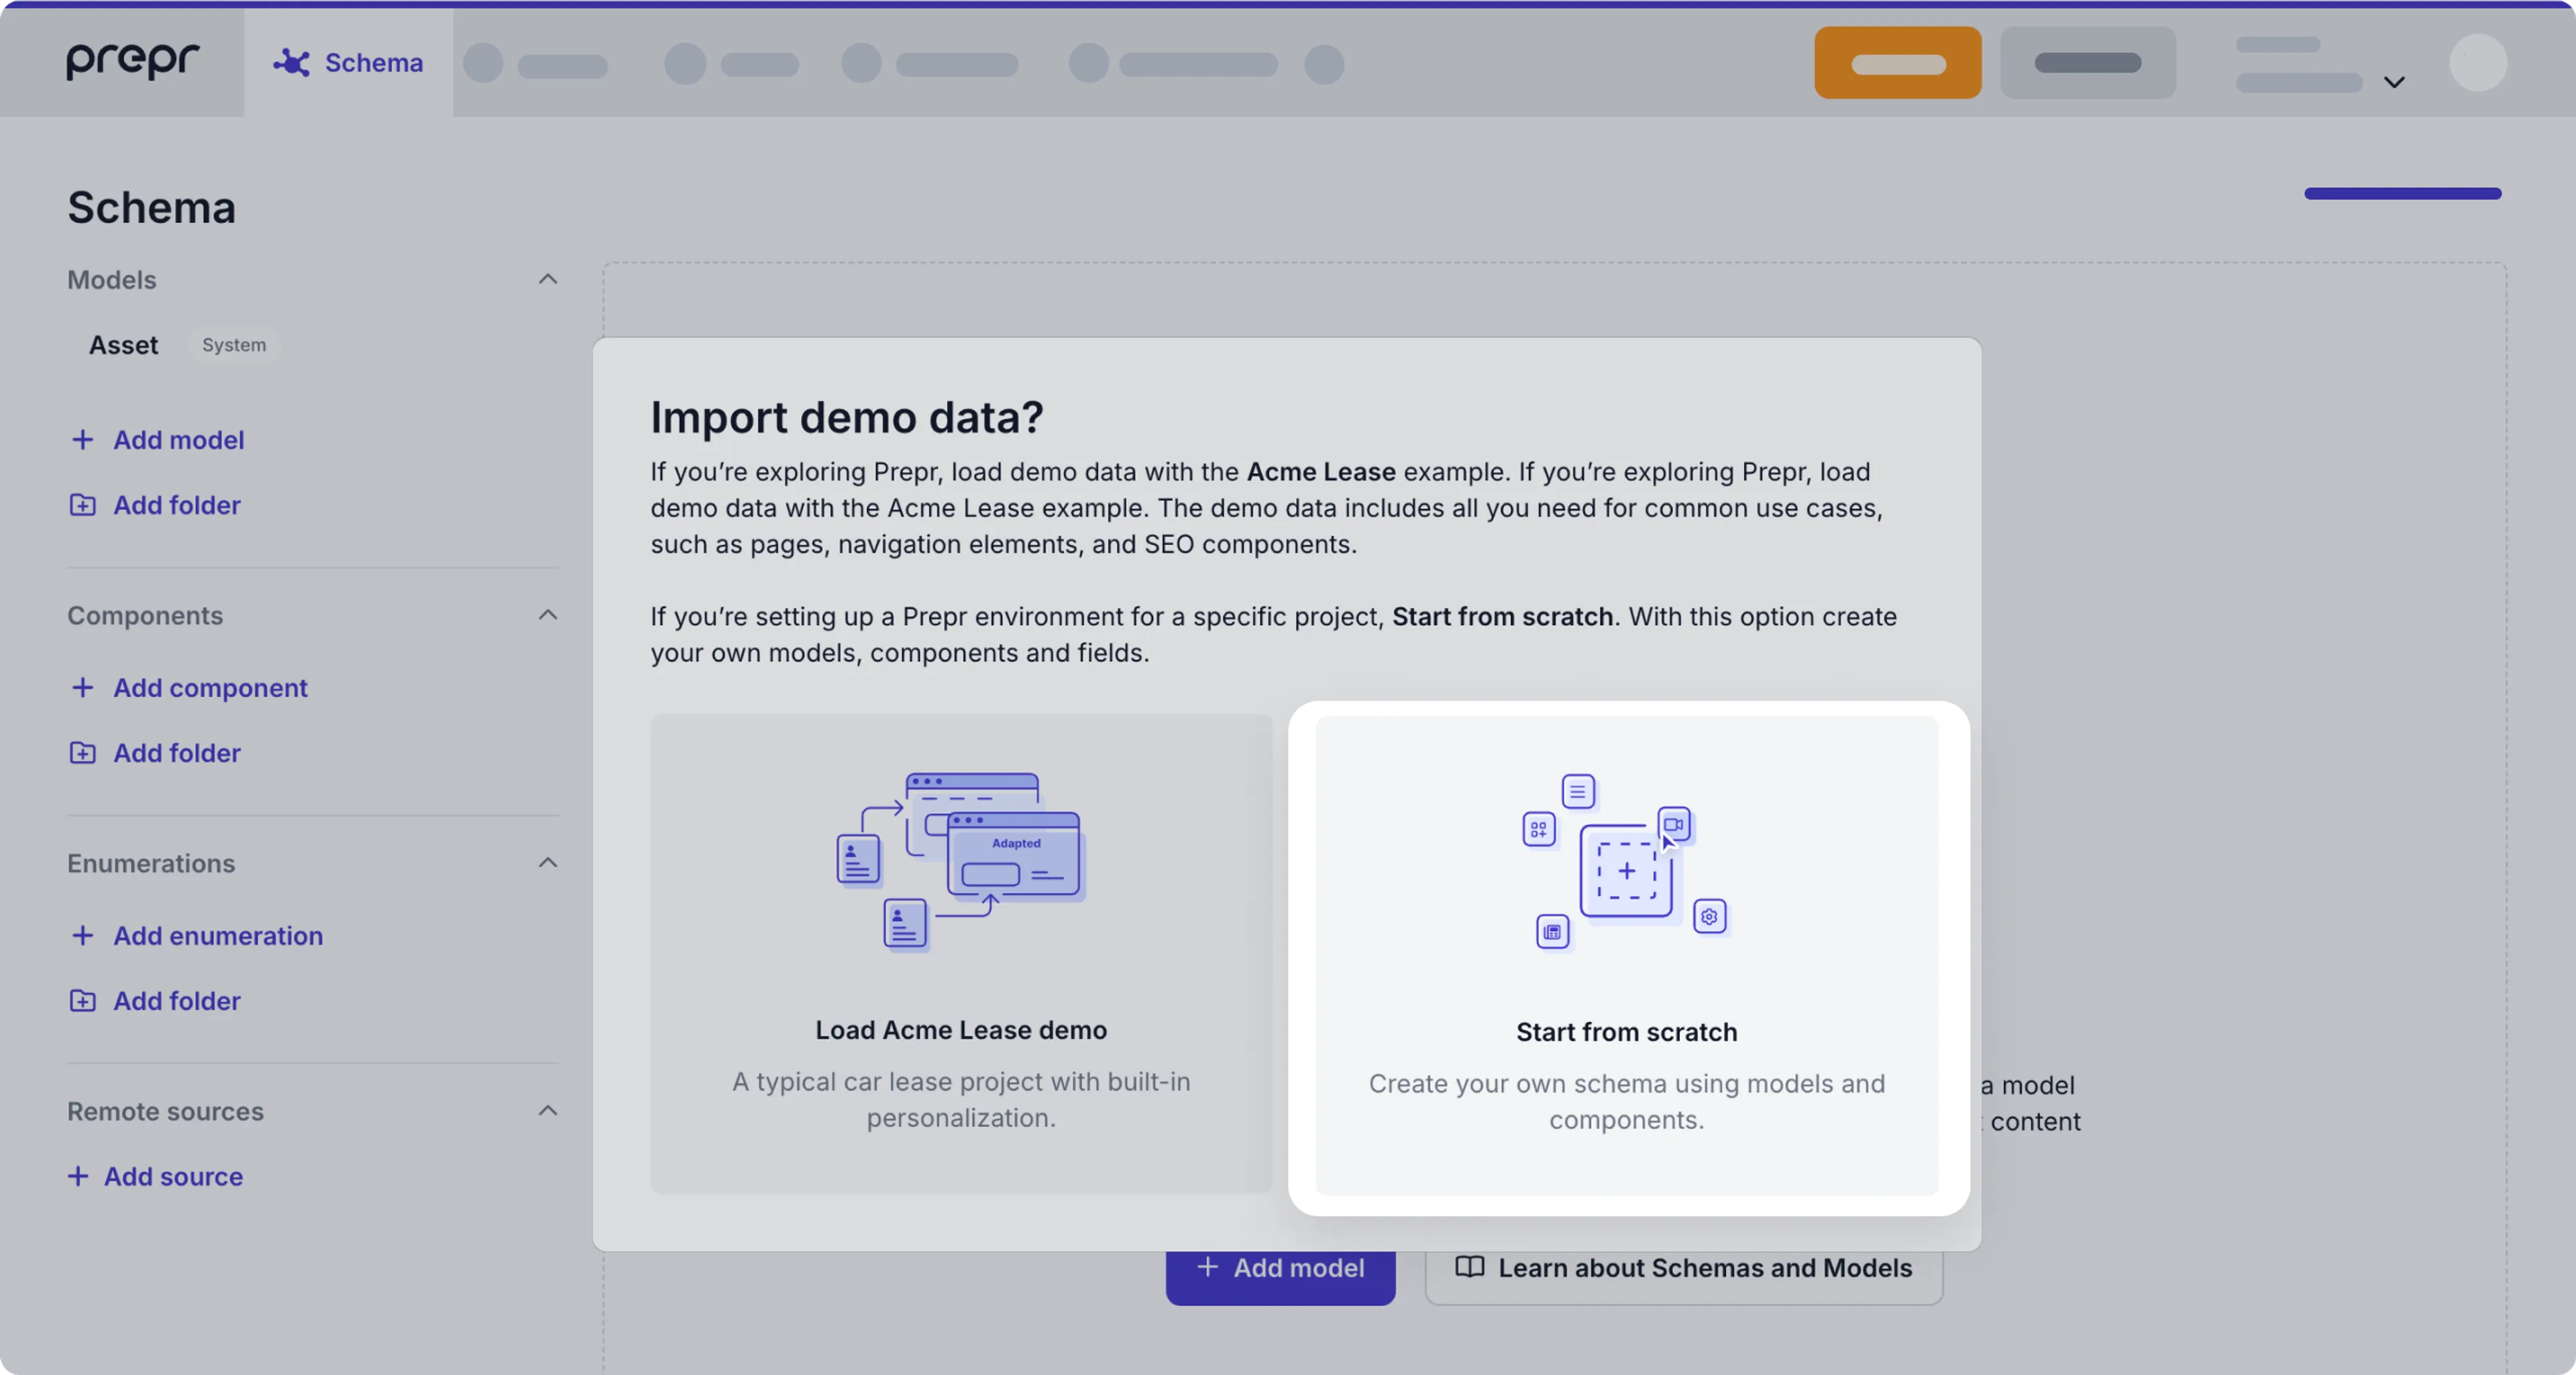
On the next screen, you will be prompted to either load demo data or to start from scratch. While importing demo data can help you explore Prepr features with preset schema and content items, for the purpose of this tutorial we recommend starting from scratch to experience the whole setup process yourself. To get a clean environment, click Start from scratch.
That’s it. You’ve created your first environment in Prepr. In the next step, you can add models and fields for our blog use case.
Step 2: Create content models
A headless CMS allows you to define a structure for your content according to your needs. We call that content modeling. For this example, you need an Article model and a Person model.
Let’s create these models in Prepr:
- Click the Schema tab to open the Schema Editor.
- Then, click the + Add model button.
- Choose Start from scratch, click Next, choose Multi-item model, and click Next.
- Enter Person in the Display name field and click Next and Save. Check out the Models doc for more details on additional options.
-
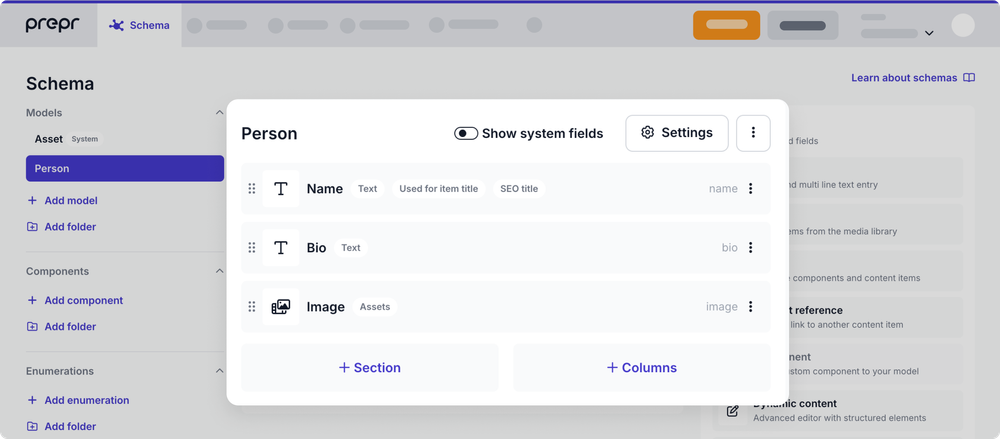
Drag and drop the Text field type, from the list on the right into your model.
a. Enter Name in the Display name field and click Save. -
Drag and drop another Text field type, from the list on the right into your model.
a. Enter Bio in the Display name field.
b. Click the Settings tab.
c. Select Text area and click Save. -
Drag and drop the Assets field type, from the list on the right into your model.
a. Choose the Multi-asset field option.
b. Enter Image in the Display name and click Save.
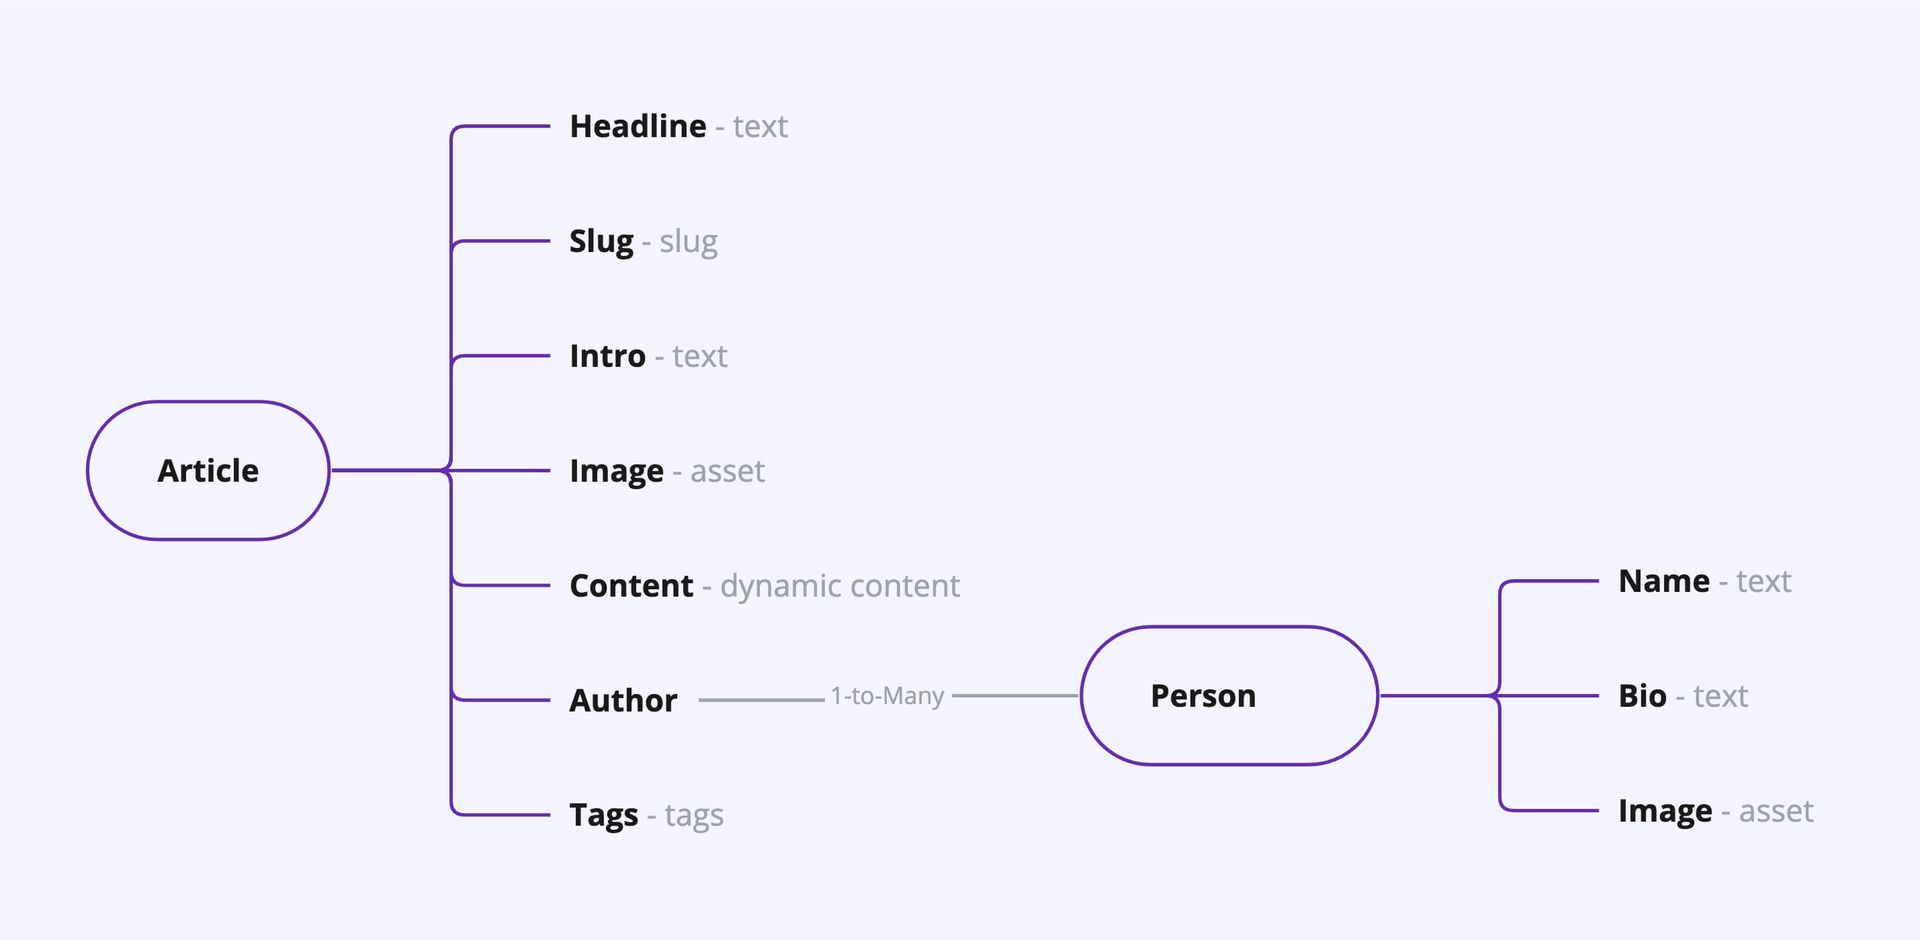
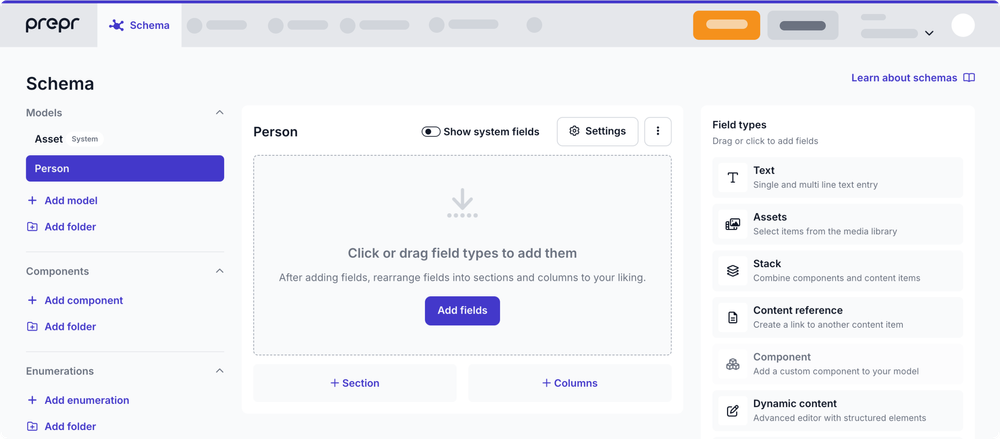
Your Person model should now look like this:
Now you can add the Article model.
- Click the + Add model button on the left.
- Choose Start from scratch, click Next, choose Multi-item model, and click Next.
- Enter Article in the Display name field, click Next and Save. Check out the Models doc for more details on additional options.
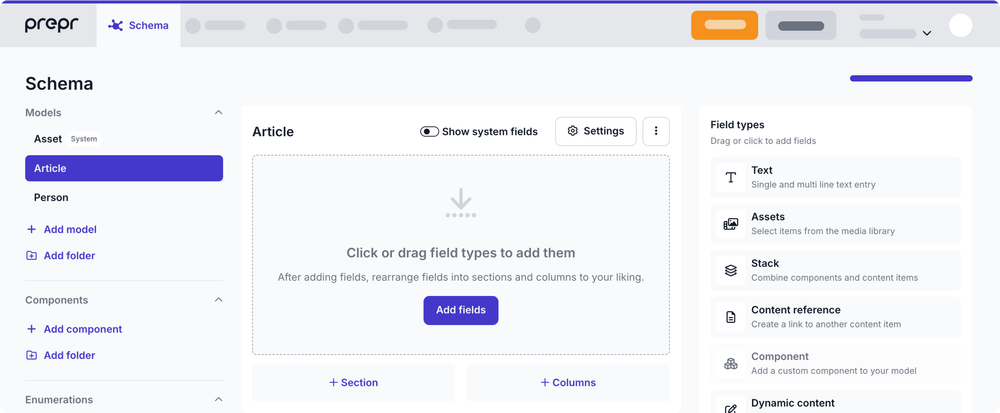
Your model should look something like this:
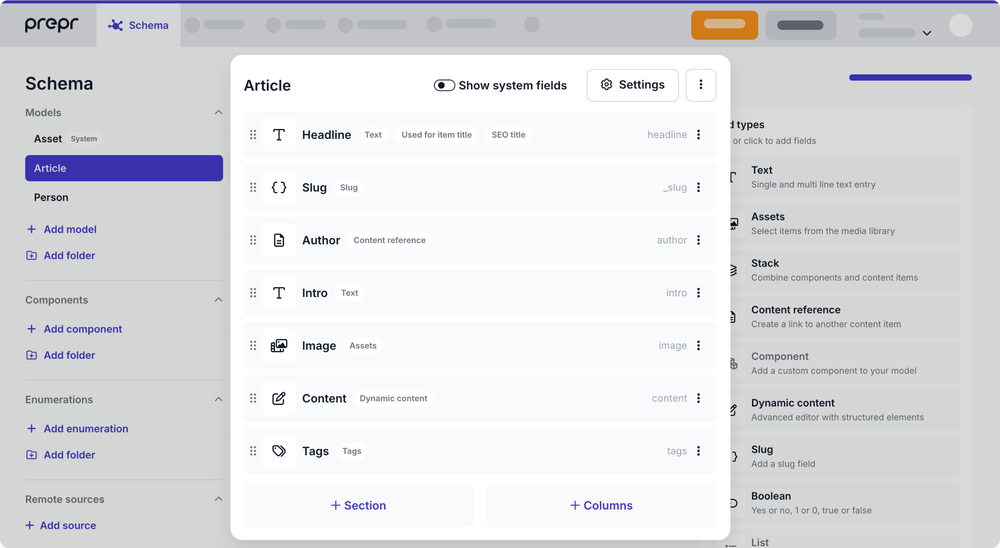
And add the fields:
-
Drag and drop the Text field type, from the list on the right into your model.
a. Enter Headline in the Display name field and click Save. -
Drag and drop another Slug field type, from the list on the right into your model.
a. Click headline in the box below to fill the Slug template with{headline}.
b. Click Save.
Now we’re going to add the author field. This is not a text field, but a reference to the Person model you created earlier. A reference field allows you to link to other content items, as in this case to a Person.
- Drag and drop the Content reference field type, from the list on the right into your model.
a. Enter Author in the Display name field.
b. Select the Person model and click Save.
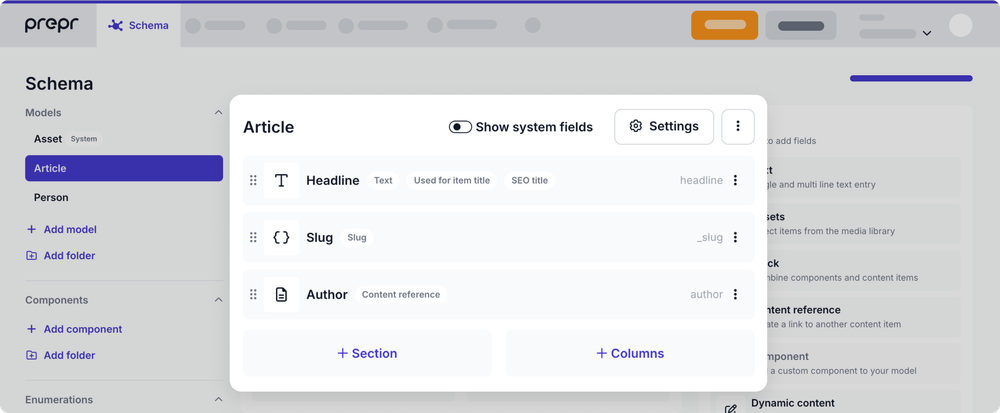
- Next, add the rest of the fields below in the same way as described above:
- Intro - Text field
- Image - Assets field
- Content - Dynamic content field
- Tags - Tags field
See an overview of all field types. Your model should look like the image below.
Step 3: Create content items
Now that you've created the models, you can add content items. Start by adding a Person:
- Go to the Content tab, click the Add item button and choose Person.
- Fill out the Name and Bio fields.
- Drag and drop an image into the Image field or click it to add an image from your local storage.
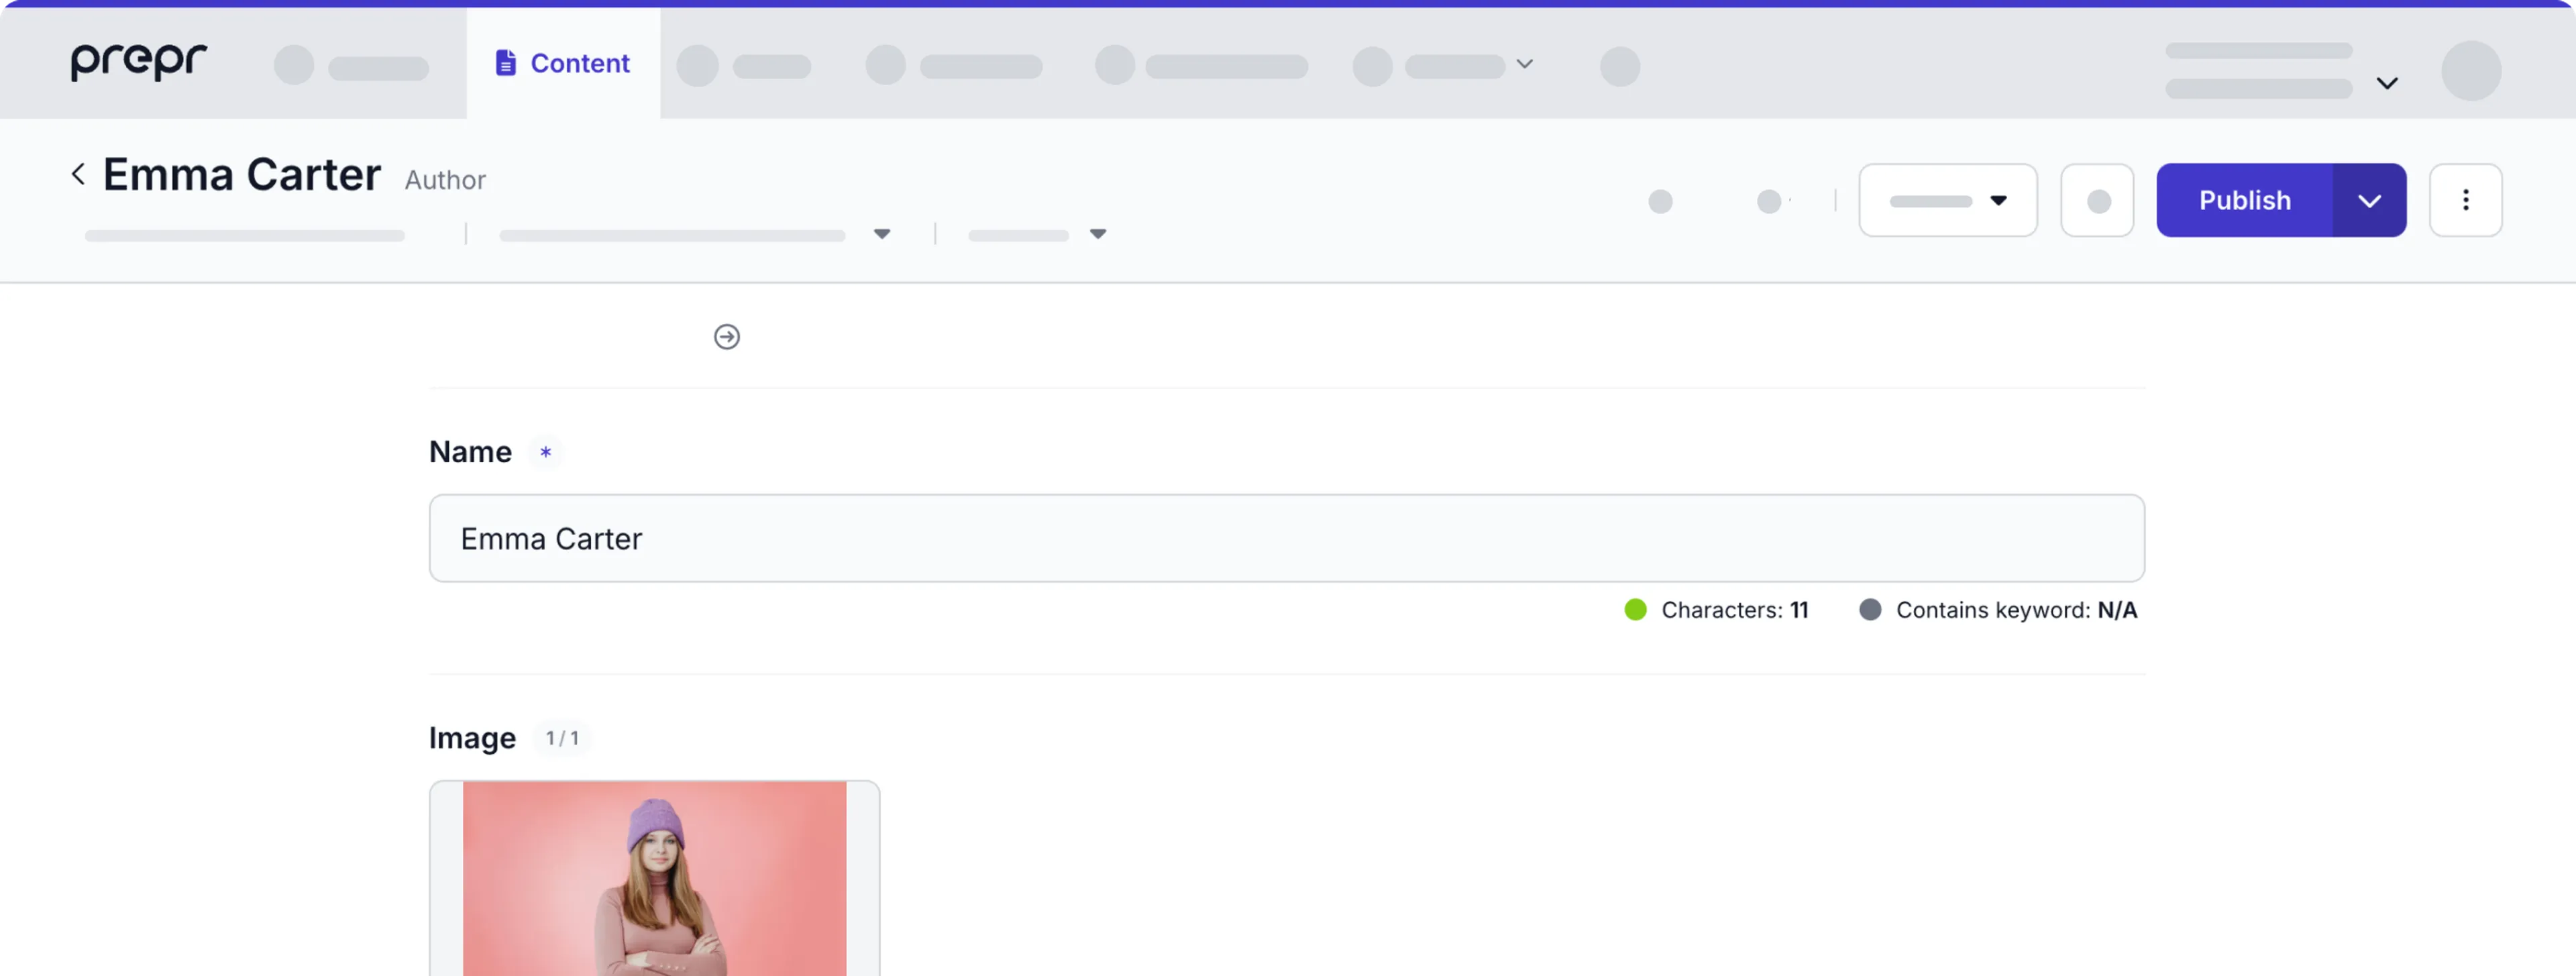
- Click the Publish dropdown and select the Publish and close option.
Now, add an article:
- Click the Add item button again.
- This time, select Article.
- Enter a Headline. You will notice the slug field automatically being populated. Copy this slug value to retrieve your article in Step 5.
- Click the + Person link to choose and add a person to the Author field.
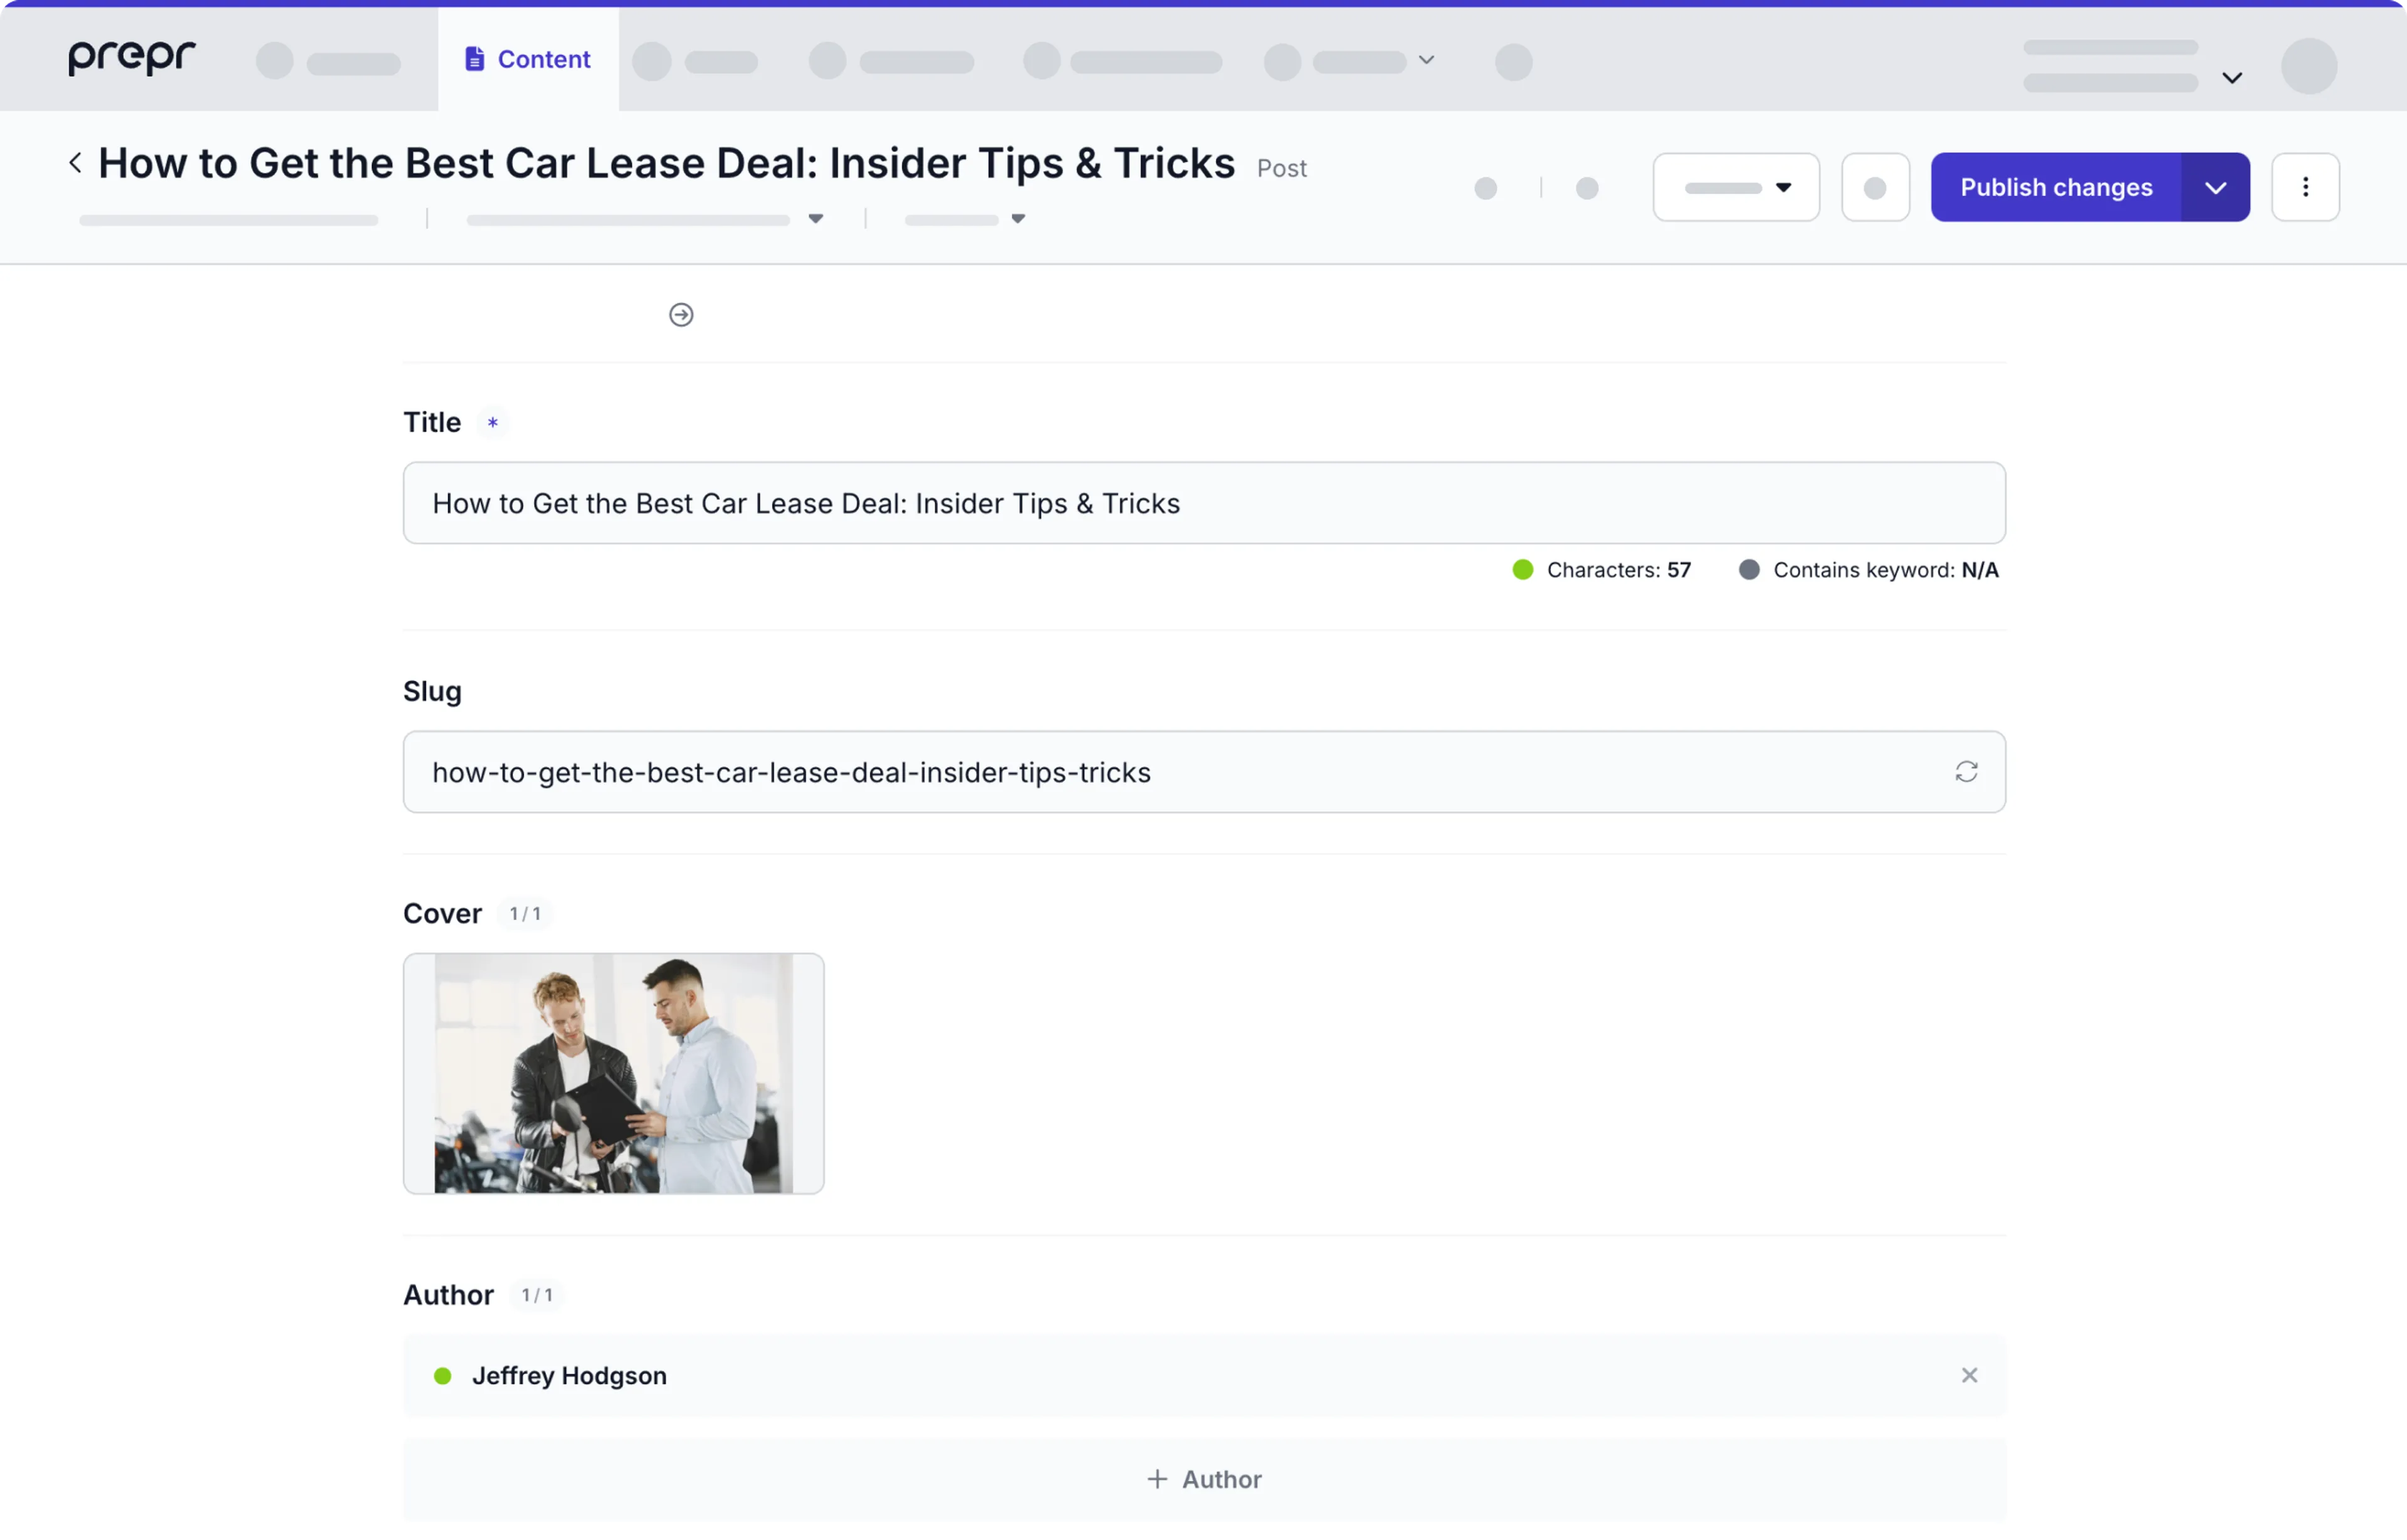
Now fill in the remaining fields.
-
Add some text and images to the Content field.
-
Add some tags in the Tags field. Add tags by selecting an existing tag in the list, or adding a new tag and clicking Enter.
-
Click the Publish dropdown and select the Publish and close option.
The next step is to retrieve the content items from the API so you can display the content in your web application.
Step 4: Retrieve articles from the API
The easiest way to experience content retrieval through the API is to use the API explorer:
- Go to Settings → Access tokens.
- Click to open the GraphQL Published token details.
- Open the API explorer by clicking Open API Explorer.

Make sure you see a green dot and your access token at the end of the url. If you cannot connect, please contact support.
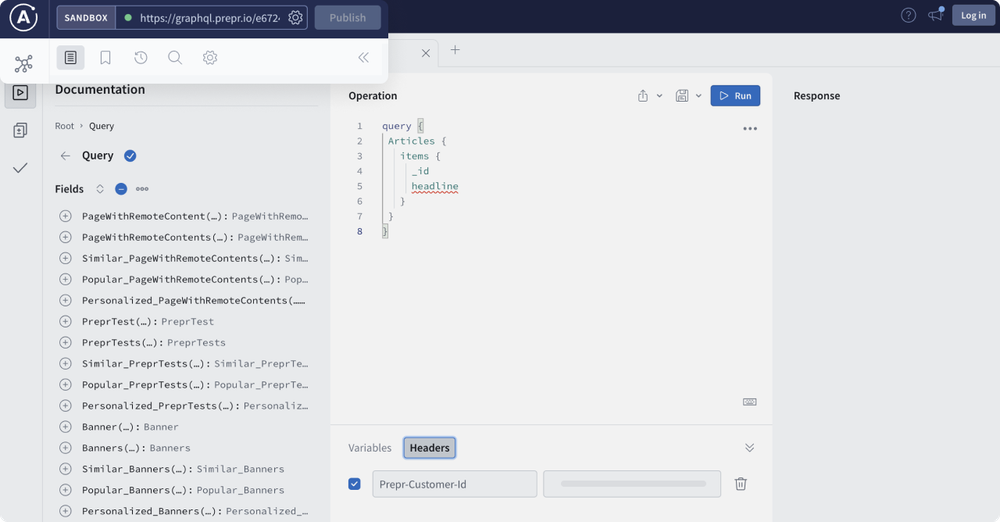
With the explorer, you can easily create and test API queries. Let’s create a query to retrieve a list of all articles:
- Add the following query
query {
 Articles {
   items {
     _id
     headline
   }
 }
}
Note that you can retrieve the ID for all content items using the system field _id. You can recognize system fields by the underscore in front of the field name. Check out all system fields for more information.
- Click Run to execute the query
The result should look something like this:
{
 "data": {
   "Articles": {
     "items": [
       {
         "_id": "4fcad70d-2beb-4886-bd8d-1753020bf315",
         "headline": "The best things about summer"
       }
     ]
   }
 }
}
As you can see, the response includes a list of all the items. At the moment, there is only one article, which is listed including its ID and headline. Let's expand the query so that you retrieve the other fields as well.
query {
 Articles(
   where: {
     _publish_on_gt : "2022-06-15T09:00:00+00:00"
   }
 )
 {
   items {
     _id
     _slug
     _publish_on
     author {
         _id
         name
         image {
           url(width:800)
         }
     }
     headline
     image {
       url(width: 1000)
     }
     intro
     tags {
         body
       }
     }
   }
 }
}
In the query above, we added a condition to get all articles published on or after June 15th, 2022. This query includes the following fields that we want to see in the result:
- _slug field
- _publish_on field to retrieve the publication date
- author field to retrieve reference fields (learn more)
- image field to retrieve assets (learn more)
- content field to retrieve a dynamic content field (learn more)
- tags field to retrieve tags (learn more)
Check out the documentation for all field types and how to retrieve multiple content items for more information.
- Run the query.
The response should look something like this:
{
 "data": {
   "Articles": {
     "items": [
       {
         "_id": "4fcad70d-2beb-4886-bd8d-1753020bf315",
         "_slug": "the-best-thing-about-summer",
         "_publish_on": "2022-06-22T09:03:00+00:00",
         "author": [
           {
             "_id": "dadfa61b-01ab-46c1-9f73-973781747d12",
             "name": "Sarah Sanders",
             "image": [
               {
                 "url": "https://20pv1slddapc.b-cdn.net/w_1920/s3-star-bj/b597e490-5a57-4803-8274-9933026418c1.jpg"
               }
             ]
           }
         ],
         "headline": "The best things about summer",
         "image": [
           {
             "url": "https://20pv1slddapc.b-cdn.net/w_1000/s3-star-bj/59bb86b5-d8ba-41aa-9620-a84cb9415534.jpg"
           }
         ],
         "intro": "Lorem ipsum dolor sit amet, consectetur adipiscing elit, sed do eiusmod tempor incididunt ut labore et dolore magna aliqua. Ut enim ad minim veniam, quis nostrud exercitation ullamco laboris nisi ut aliquip ex ea commodo consequat.",
         "tags": [
           {
             "body": "Summer"
           },
           {
             "body": "Ocean"
           }
         ]
       }
     ]
   }
 }
}
And voila, a JSON response containing all the data from your content items.
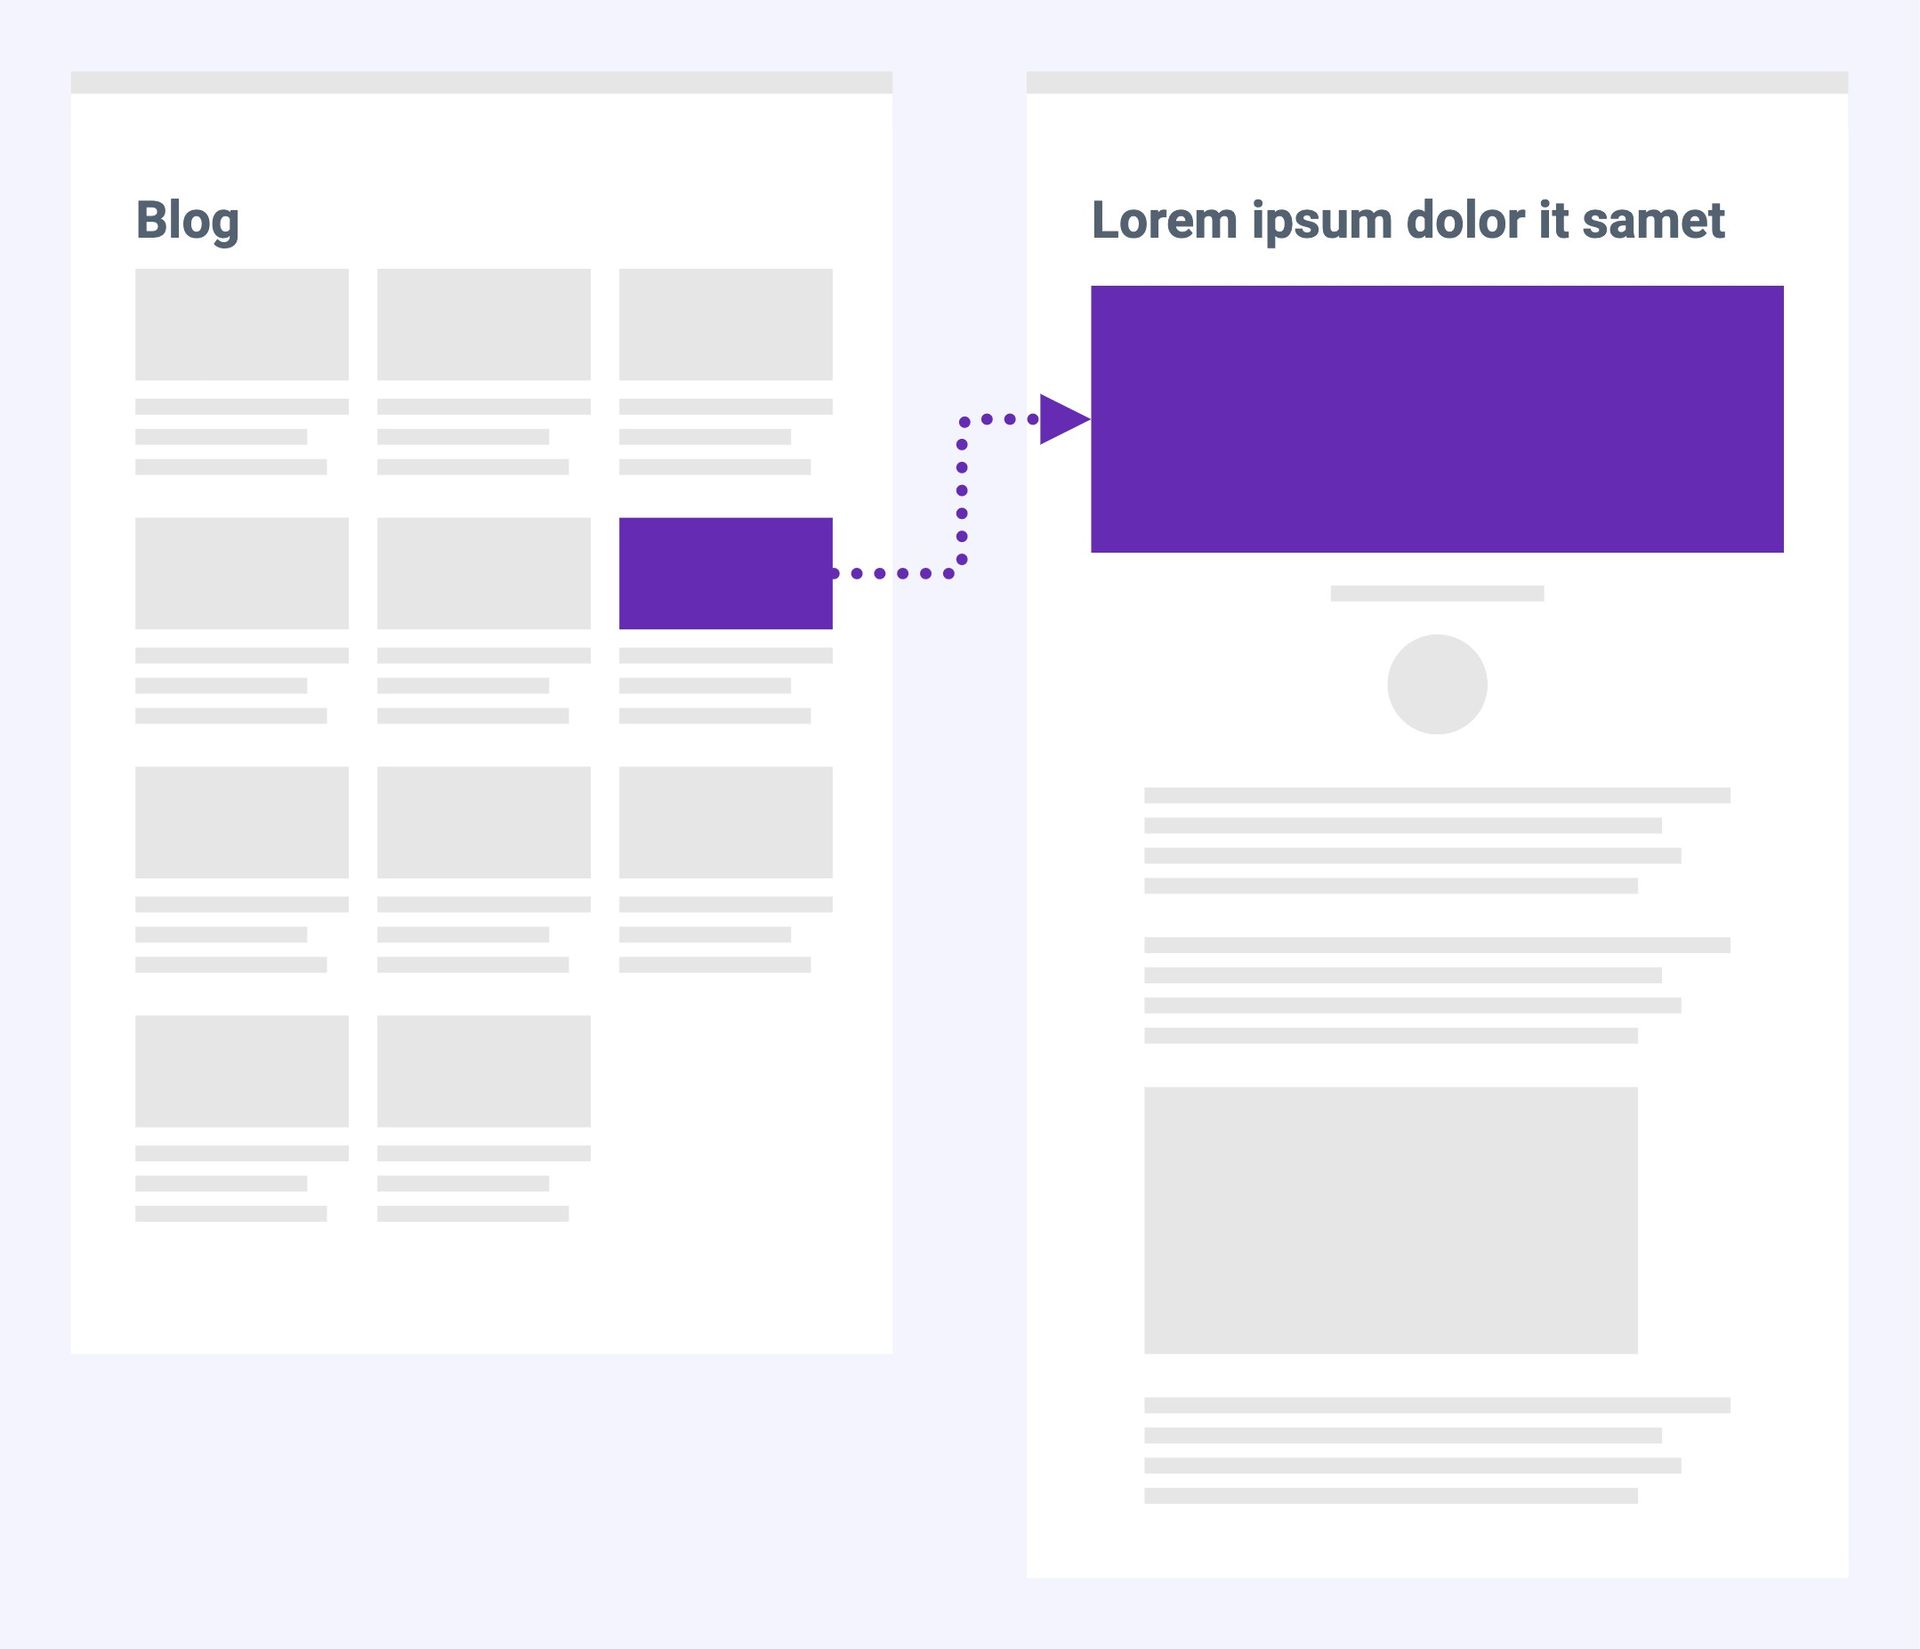
We just queried a list of articles that you can use to show on a blog overview page. On that page, you give each item a unique URL based on the slug—for example:
https://yourdomain.com/articles/the-best-things-about-summerStep 5: Retrieve a single article from the API
You want to show the whole article when a visitor clicks the link. Retrieving a single content item can be done using the below query. Replace the slug value with the value that you copied in Step 3.
query {
 Article(
   slug: "the-best-thing-about-summer"
 ) {
   _id
   headline
 }
}
In the query above, we specify a condition to return an item with the matching slug. Update the slug value in quotes to match the slug of the article that you created.
When you run this query you get the following result:
{
 "data": {
   "Article": {
     "_id": "4fcad70d-2beb-4886-bd8d-1753020bf315",
     "headline": "The best things about summer"
   }
 }
}
The last thing you need to know is how to retrieve the article content. Expand the query like this:
query {
  Article(
    slug: "the-best-thing-about-summer"
  ) {
    _id
    headline
    author {
      _id
      name
      image {
        url(width:800)
      }
    }
    intro
    image {
      url(width: 1000)
    }
    content {
      ... on Text {
        format
        body
      }
      ... on Assets {
        items {
          url(width:600)
        }
      }
    }
    tags {
      body
    }
  }
}
You've already seen most of the fields when you retrieved the article list. The content field is new. The preceding query shows how to retrieve a dynamic content field. Per element type, you fetch the information. In this case, for text elements and assets only, however, there are many more element types. Check out the dynamic content field documentation for all the details.
Here’s the result:
{
 "data": {
   "Article": {
     "_id": "4fcad70d-2beb-4886-bd8d-1753020bf315",
     "headline": "The best things about summer",
     "author": [
       {
         "_id": "dadfa61b-01ab-46c1-9f73-973781747d12",
         "name": "Sarah Sanders",
         "image": [
           {
             "url": "https://20pv1slddapc.b-cdn.net/w_1920/s3-star-bj/b597e490-5a57-4803-8274-9933026418c1.jpg"
           }
         ]
       }
     ],
     "intro": "Lorem ipsum dolor sit amet, consectetur adipiscing elit, sed do eiusmod tempor incididunt ut labore et dolore magna aliqua. Ut enim ad minim veniam, quis nostrud exercitation ullamco laboris nisi ut aliquip ex ea commodo consequat.",
     "image": [
       {
         "url": "https://20pv1slddapc.b-cdn.net/w_1000/s3-star-bj/59bb86b5-d8ba-41aa-9620-a84cb9415534.jpg"
       }
     ],
     "content": [
       {
         "format": null,
         "body": "<p>Lorem ipsum dolor sit amet, consectetur adipiscing elit, sed do eiusmod tempor incididunt ut labore et dolore magna aliqua. Ut enim ad minim veniam, quis nostrud exercitation ullamco laboris nisi ut aliquip ex ea commodo consequat.</p>"
       },
       {
         "format": "H3",
         "body": "Excepteur sint occaecat cupidatat non proiden"
       },
       {
         "format": null,
         "body": "<p>Lorem ipsum dolor sit amet, consectetur adipiscing elit, sed do eiusmod tempor incididunt ut labore et dolore magna aliqua. Ut enim ad minim veniam, quis nostrud exercitation ullamco laboris nisi ut aliquip ex ea commodo consequat.</p>"
       },
       {
         "items": [
           {
             "url": "https://20pv1slddapc.b-cdn.net/w_600/s3-star-bj/edb193d4-c356-4147-9437-8ec2c1c3d06c.jpg"
           },
           {
             "url": "https://20pv1slddapc.b-cdn.net/w_600/s3-star-bj/6267be51-dbcb-4cf3-8093-f5b9a60e5cee.jpg"
           }
         ]
       },
       {
         "format": null,
         "body": "<p>Lorem ipsum dolor sit amet, consectetur adipiscing elit, sed do eiusmod tempor incididunt ut labore et dolore magna aliqua. Ut enim ad minim veniam, quis nostrud exercitation ullamco laboris nisi ut aliquip ex ea commodo consequat.</p>"
       }
     ],
     "tags": [
       {
         "body": "Summer"
       },
       {
         "body": "Ocean"
       }
     ]
   }
 }
}
See the documentation to learn more about fetching single content items.
Congratulations, you have completed your first steps with Prepr. From modeling and creating content items to retrieving content using the API. With that, you have mastered the basics of Prepr.
Step 6: Connect your front end
The next step is to connect your web application. We have guides for all major front-end frameworks to quickly get you up and running.
Want to learn more?
Of course, there is much more to explore. For example, with Prepr, you can perform A/B testing, present recommendations and personalize the customer experience. For more advanced topics, please refer to the rest of the documentation, or contact one of our specialists.
Check out the following chapters:
Schedule a free consultation
Do you want to get started but still have questions or want a demo?
Schedule a free call (opens in a new tab) with a Prepr solution engineer.
During the consultation we can provide recommendations on topics like:
- Content modeling for the desired use case
- Working with multiple environments, websites and languages
- Creating personalized experiences for your website visitors
- A/B testing and other optimization strategies
Was this article helpful?
We’d love to learn from your feedback