Setting up personalization
Estimated duration: 15-30 minutes
This guide demonstrates how to set up personalization and the related metrics in your web application using the Prepr GraphQL API.
This guide highlights a typical developer setup for personalization. Check out the marketers doc for more details on how to add adaptive content to the content item.
Introduction
Prepr lets you create personalized experiences with Adaptive content. With Adaptive content, content editors can make different versions of content for various visitor segments. You can then show the right content to each visitor based on their segment giving them a personalized experience. By doing the one-time setup detailed below, Prepr can track and measure the visitor interactions for each adaptive content element.
Use case
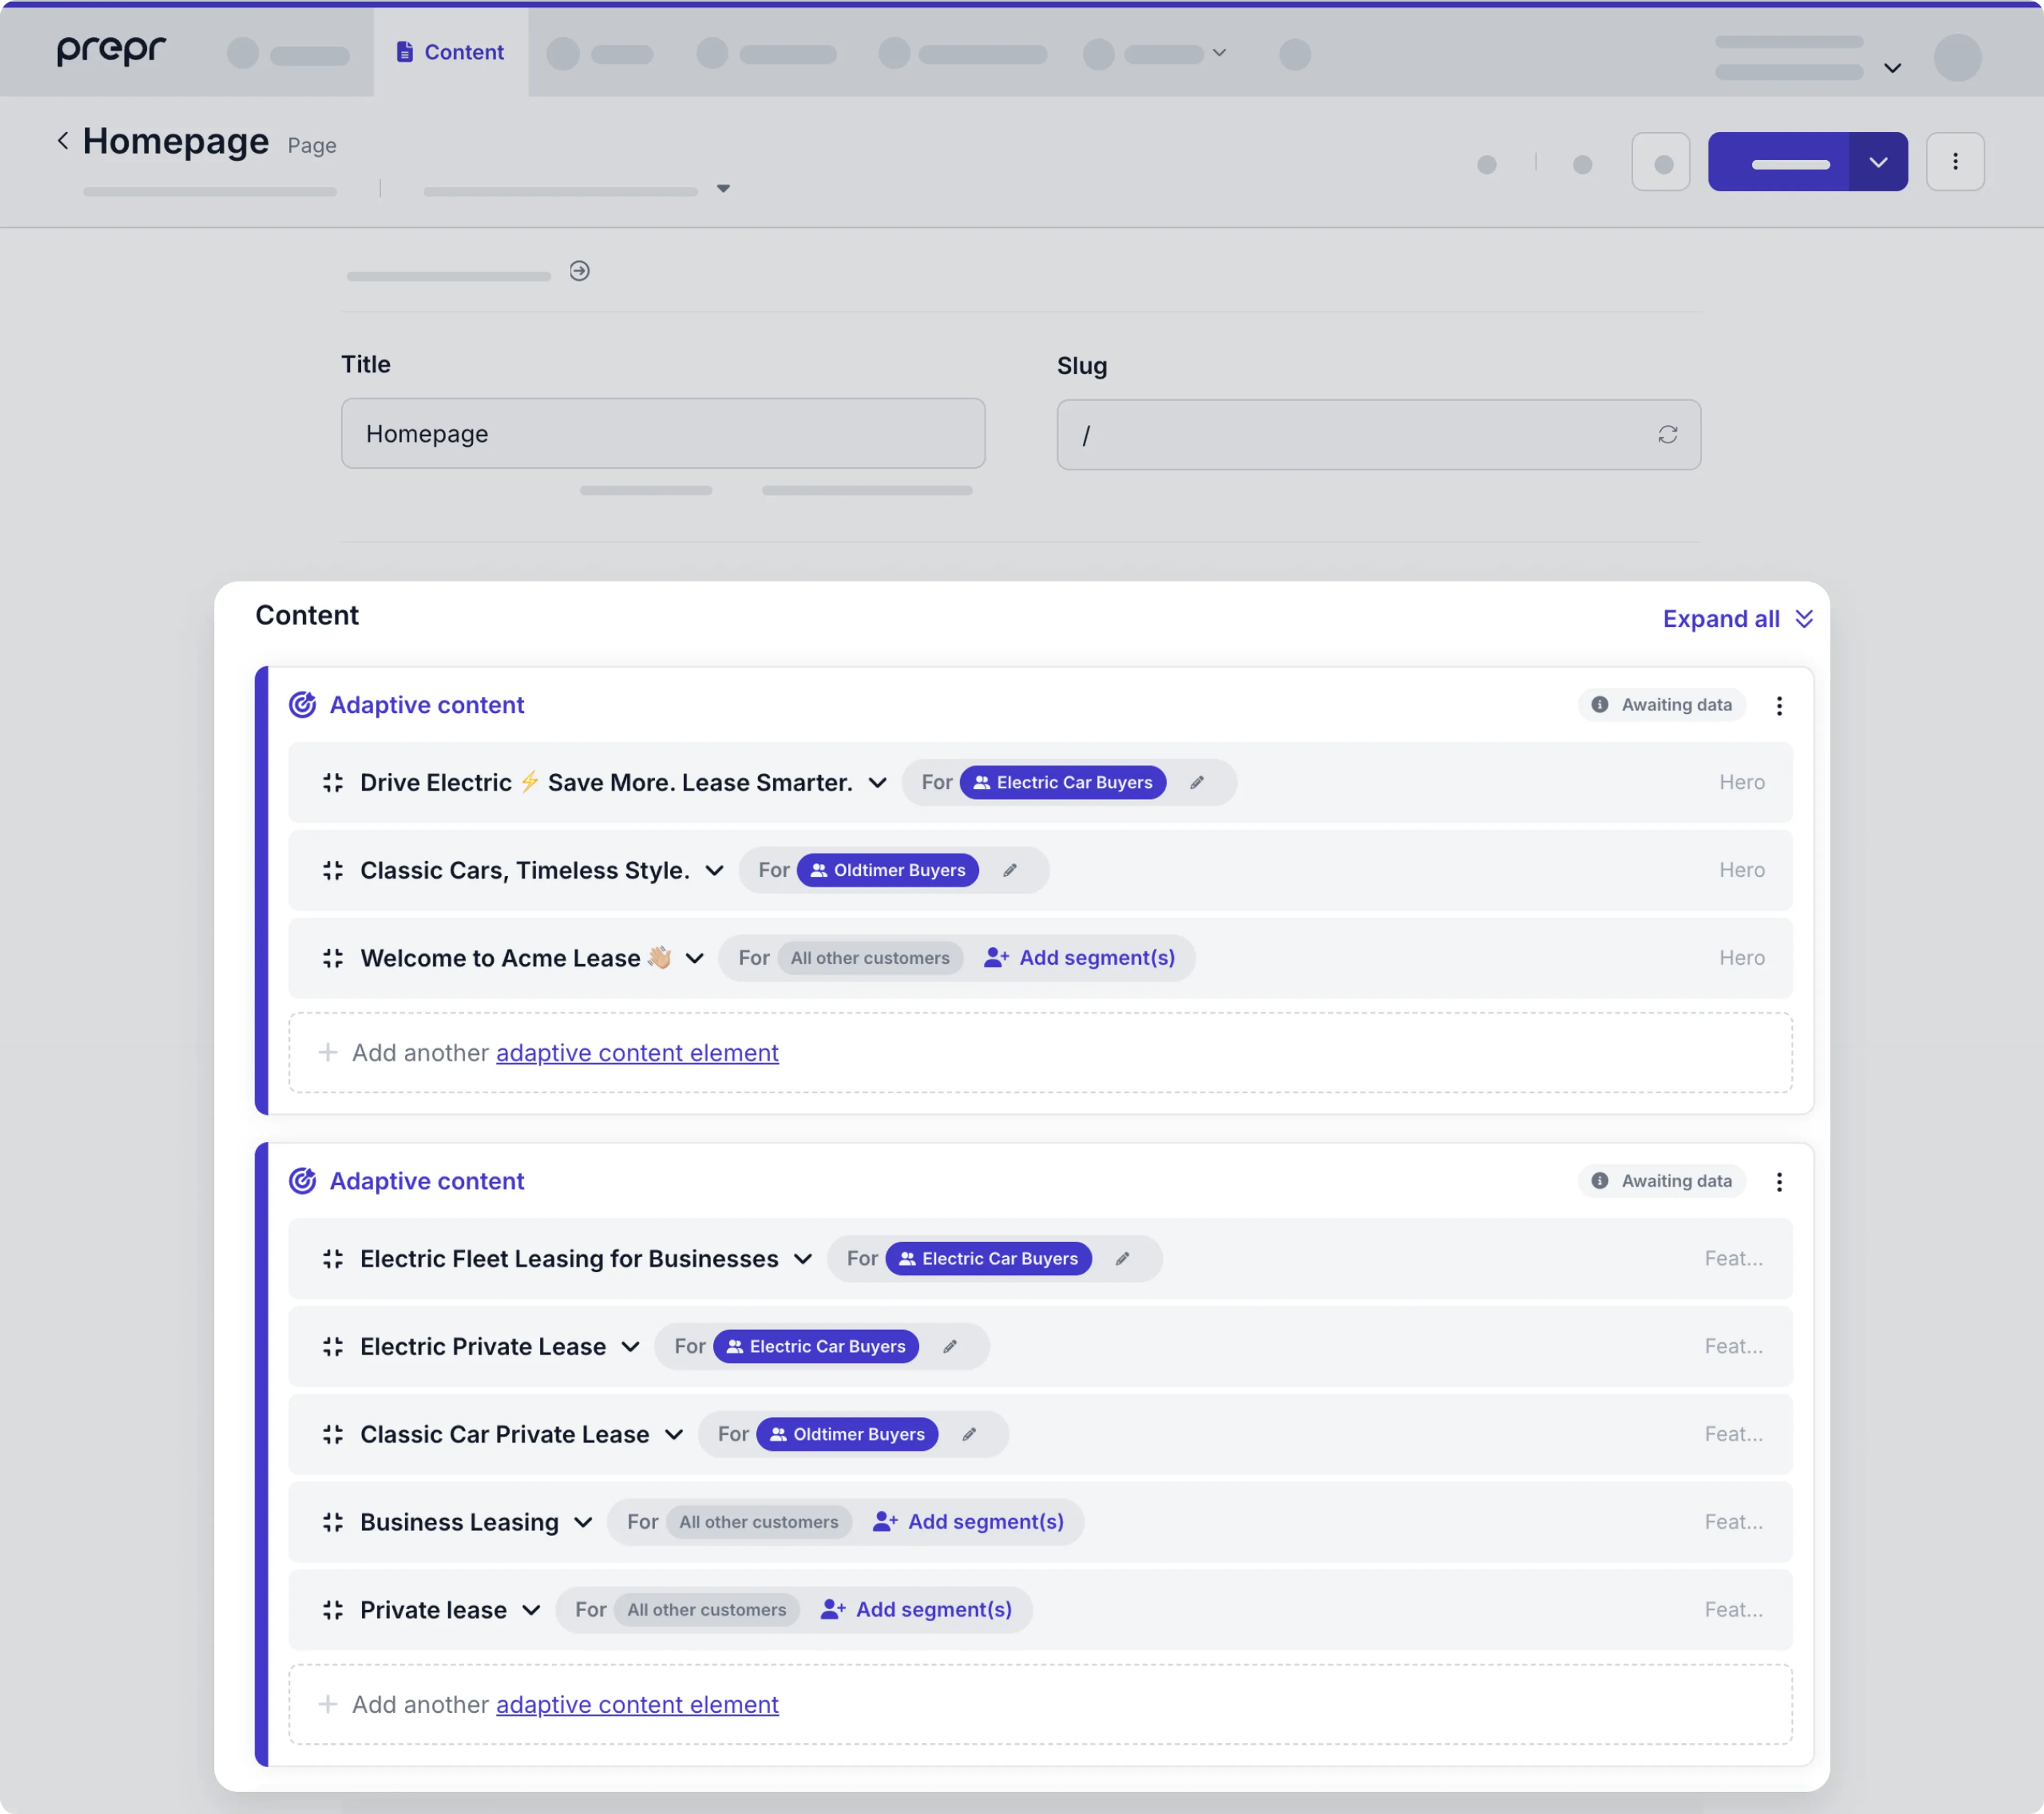
Let’s look at an everyday use case. The marketing team wants to increase conversions for their car leasing website. They’ve decided to group their visitors by those who want to lease electric cars. Based on this segment they add adaptive content to the home page to target these visitors.
General website visitors
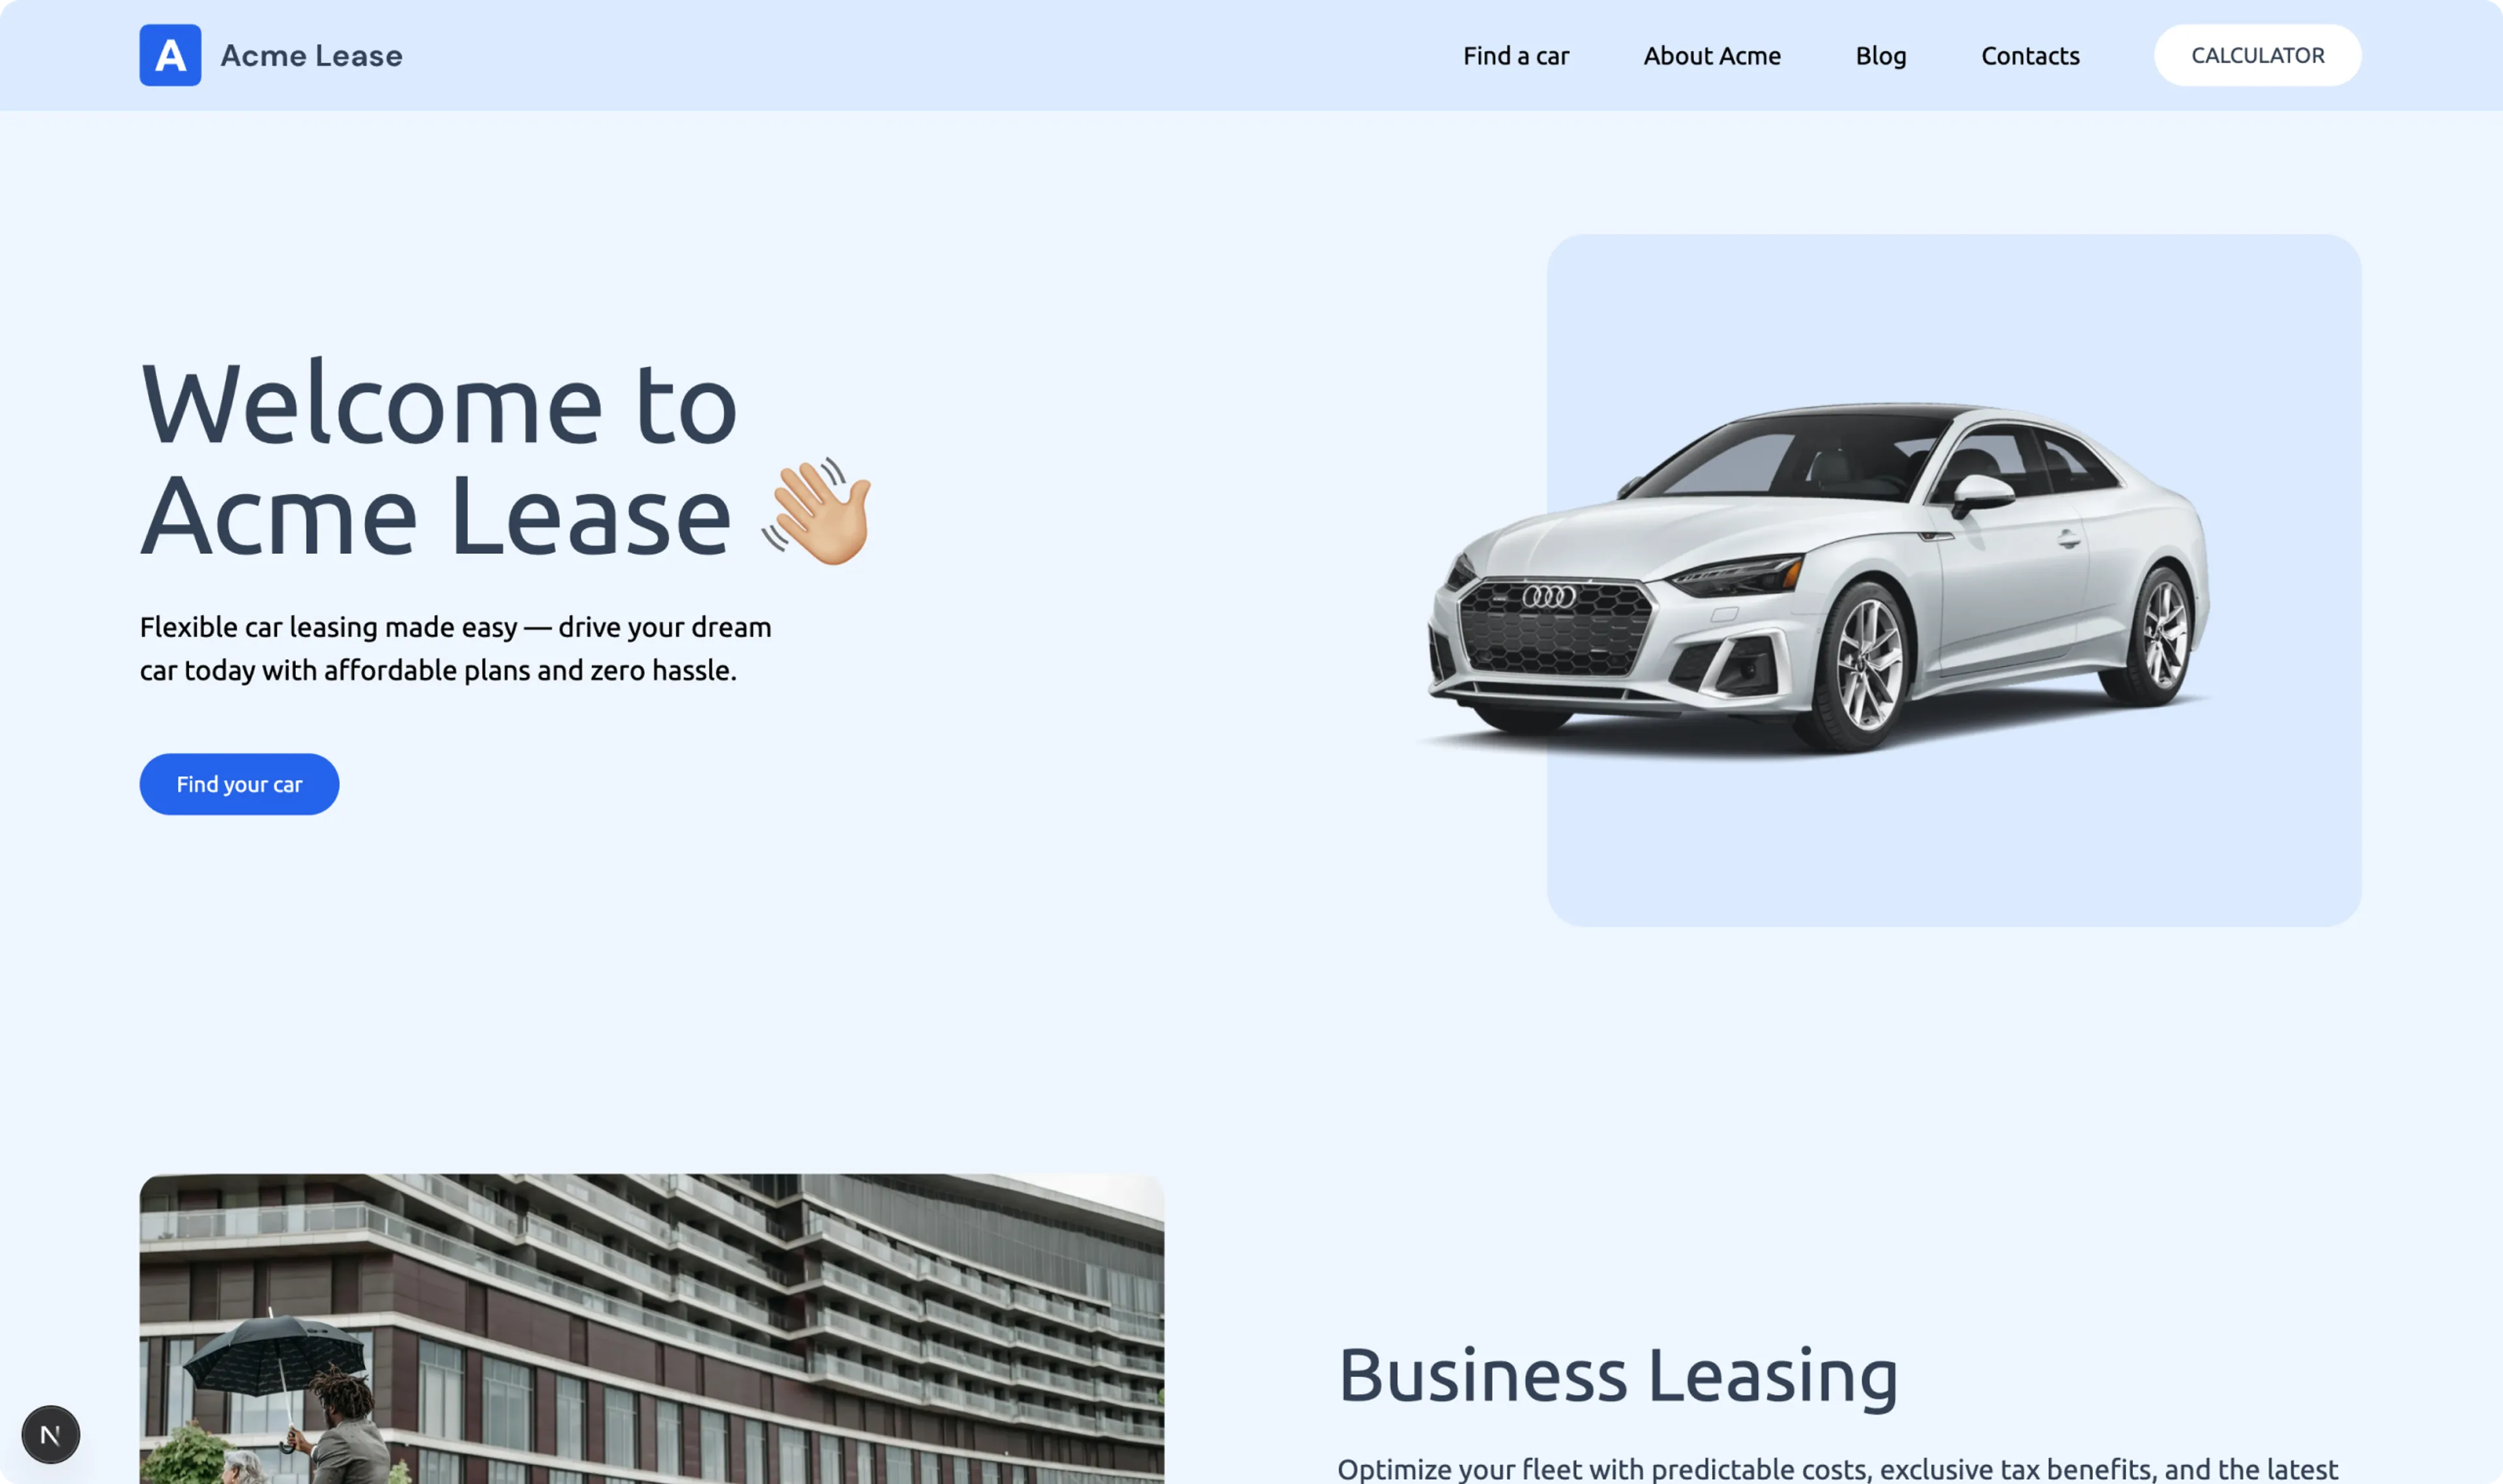
When visitors navigate to the Acme Lease home page, they see a generic page like in the image below.
Visitors interested in leasing an electric car
When a visitor searches for an electric lease car and clicks an Acme Lease ad, they are directed to the electric lease landing page on the Acme Lease website.
If they visit the home page again later, they’ll see content focused on electric lease cars instead of the generic home page above.
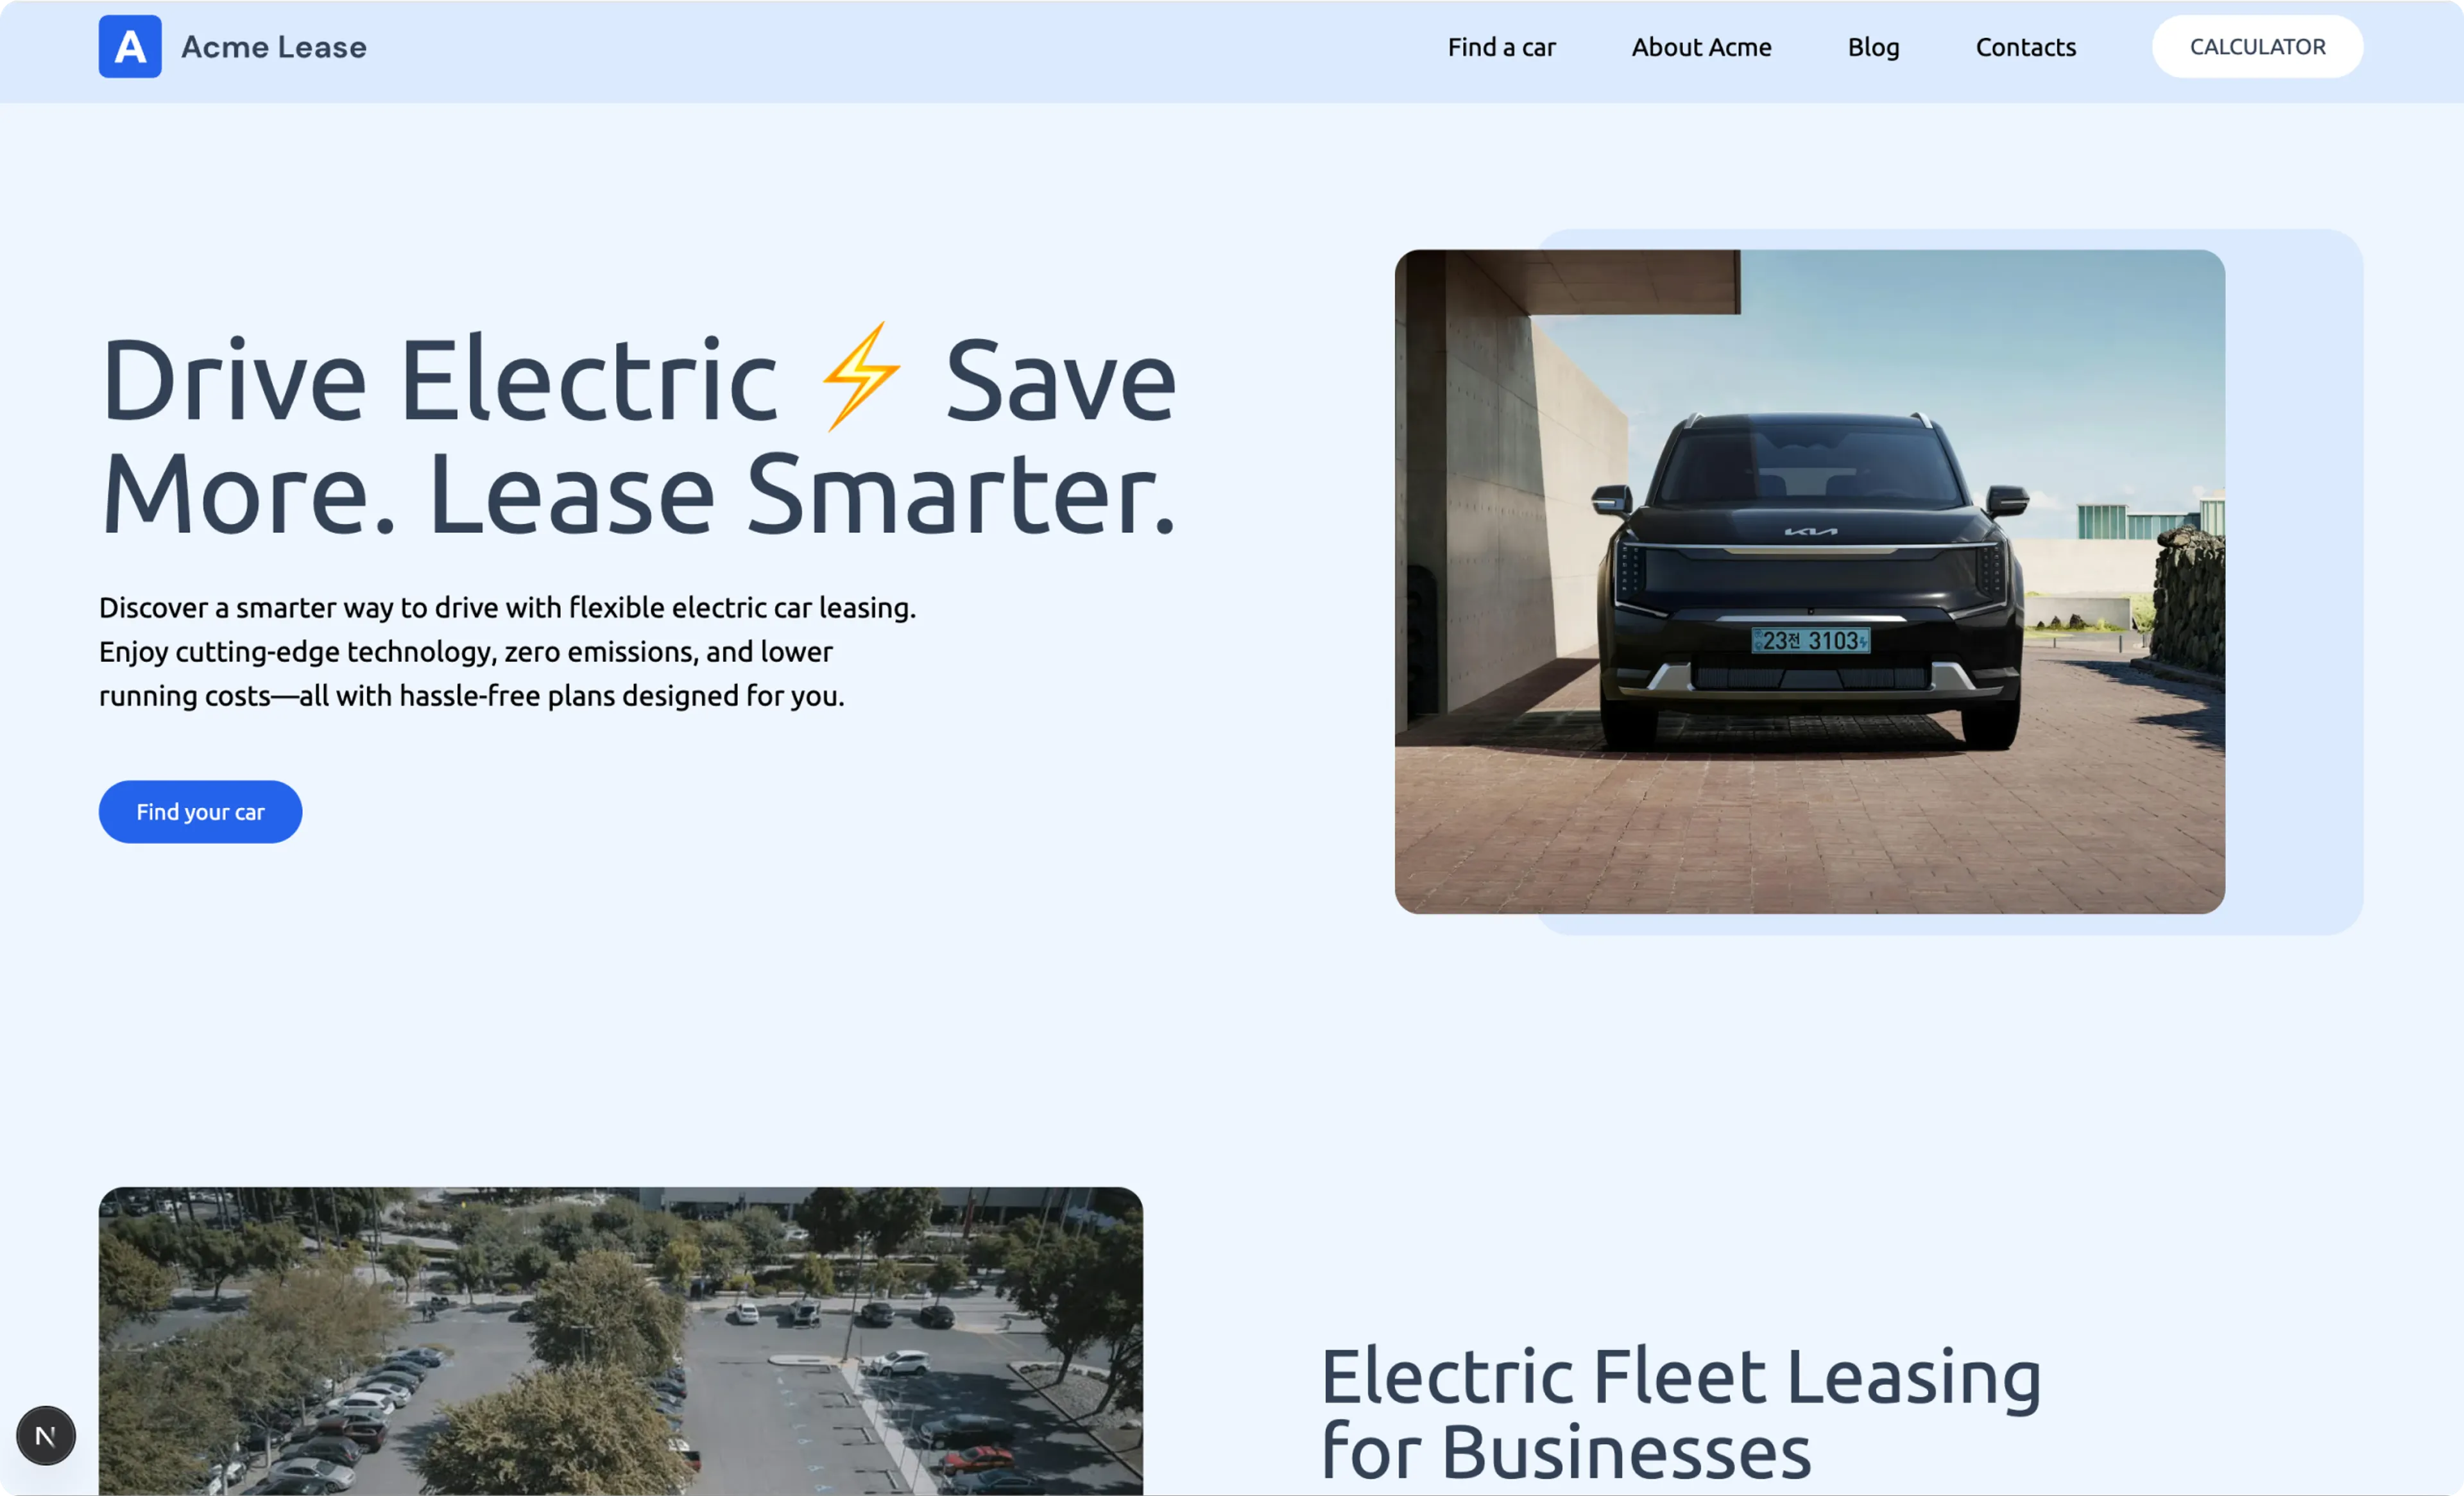
For this use case, the front-end application is set up to track each visitor’s behavior based on their interests. When they view the Electric Lease Landing Page, Prepr places them in the Electric Car Buyers segment.
The marketing team can then evaluate metrics in Prepr to measure conversions based on their goals for the adaptive content and determine how well the content performs.
Prerequisites
To implement adaptive content for the above example, you need to have the following set up in Prepr:
This guide uses the Home Page content item from the Acme Lease demo data and the adaptive content is in a stack field (in our example, this is called Content).
Set up personalization in your front end
Before setting up personalization in your front end, make sure the following items are in place:
- Segments. If you’ve loaded the Acme Lease demo content, then the Electric Car Buyers segment is available with a condition to check when the Electric lease landing page is viewed.
- Enable Prepr tracking and add the content item meta tag to track visitors when they view pages.
Additional meta tags
- If you’re using an external identity provider, you can track the external ID’s by adding the visitor ID meta tag. You can also trigger an event to make sure that known visitors are updated with their external ID
- If you’re using GTM to collect events for reporting in a tool like GA4, enable the tracking code to send events to GTM.
Now you’re ready to set up personalization in the following steps:
- Identify visitors and link each visitor to a variant.
- Retrieve adaptive content using the API.
- Track impressions and conversions.
Identify visitors
To make sure each web app visitor sees the correct adaptive content when they view a personalized page, Prepr CMS identifies them by a Prepr Customer ID. Based on this value, Prepr can determine which segment the visitor belongs to and therefore the related personalized content.
How you set this ID depends on whether your visitor is authenticated via an external identity provider or is an anonymous guest.
- Without an identity provider: Use the
__prepr_uidcookie value. If a visitor is new and the cookie doesn’t exist yet, you must generate an ID to ensure tracking works on the very first page visit. - With an identity provider: Use the unique ID provided by your identity provider as the Prepr Customer ID.
Without an identity provider
If you’re implementing a Next.js project, you can skip the manual set up below and simply install and use the Prepr Next.js package.
The Prepr Next.js package manages the __prepr_uid cookie and retrieves the Customer ID for you.
Follow the steps below to generate and store a Prepr Customer ID for each visitor:
- Check if the
__prepr_uidcookie is set. - If it’s the visitor’s first time (no cookie set), generate a random UUID.
- Set the
__prepr_uidcookie value to the generated ID. - Pass this ID to the web app as a global variable. This way, you can use it for the Prepr Customer ID.
This solution can best be implemented in the middleware of your web app where you have access to reading and setting cookies and can store a global variable. See the following example on how to set this up in the Next.js middleware.
import type { NextRequest } from 'next/server'
import { NextResponse } from 'next/server'
import { headers } from 'next/headers'

export function proxy(request: NextRequest) {
  //Get the cookie to check if it exists
  let prepr_uid = request.cookies.get('__prepr_uid')?.value

  let newResponse = NextResponse.next()

  // If the cookie doesn't exist yet, generate a random ID
  if (!prepr_uid) {
    prepr_uid = crypto.randomUUID()
    newResponse.cookies.set('__prepr_uid', prepr_uid, {
      maxAge: 1 * 365 * 24 * 60, // Set for one year
    })
  }

  // Create a global variable to make it available to the
  // rest of the web app
  newResponse.headers.set('Prepr-Customer-Id', prepr_uid)

  return newResponse
}
Now that the global variable is set, we can later retrieve the Prepr Customer ID with this helper function:
import { headers } from 'next/headers'

export function getPreprCustomerId() {
  return headers().get('Prepr-Customer-Id')
}
For some frameworks, you could use the Session ID instead of the __prepr_uid cookie in your front end and use
this value as the Prepr Customer ID to be sent to Prepr.
See the example code snippet below.
$prepr_customer_id = Session::getId();In this case, make the session persistent by setting the cookie’s lifetime parameter to something like 90 days.
This means that you get the same session ID even when a visitor visits the site multiple times.
With an identity provider
Follow these steps to ensure every visitor has a valid ID assigned in your web app’s middleware:
-
Get external ID from your Identity Provider.
-
Fallback to
__prepr_uidcookie logic, if no external ID exists. -
Make this ID available to the web app as a global variable.
See the below example middleware code snippet to check and set the external ID from an identity provider.
import type { NextRequest } from 'next/server'
import { NextResponse } from 'next/server'

export function proxy(request: NextRequest) {
  // 1. Try to get the ID from your external Identity Provider
  // (e.g., from a session token or auth cookie)
  const externalId = request.cookies.get('external_auth_id')?.value

  // 2. Fallback to the Prepr cookie
  let prepr_uid = request.cookies.get('__prepr_uid')?.value
  let newResponse = NextResponse.next()

  let finalId: string

  if (externalId) {
    // IDP takes priority
    finalId = externalId
  } else {
    // Use existing cookie or generate a new one for anonymous users
    if (!prepr_uid) {
      prepr_uid = crypto.randomUUID()
      newResponse.cookies.set('__prepr_uid', prepr_uid, {
        maxAge: 1 * 365 * 24 * 60 * 60, // 1 year
      })
    }
    finalId = prepr_uid
  }

  // 3. Make the ID available as a global header for the API calls
  newResponse.headers.set('Prepr-Customer-Id', finalId)

  return newResponse
}
Now that the global variable is set, you can use a helper function to retrieve the correct ID:
import { headers } from 'next/headers'

export function getPreprCustomerId() {
  return headers().get('Prepr-Customer-Id')
}
Now that the ID for the visitor is available you can continue the next step to retrieve the adaptive content.
Retrieve adaptive content using the API
Now it’s time to retrieve the Home page content item including the adaptive content elements.
Copy the sample code below into your front-end application.
query GetPageBySlug {
    Page(slug: "/") {
        title
        _id
        content {
            __typename
            ... on Hero {
                _id
                sub_heading
                image {
                    url(preset: "Hero", width: 2000)
                    height
                    width
                }
                _context {
                    variant_key
                    variant_id
                }
                heading
                buttons {
                    button_type
                    text
                    external_url
                    link {
                        ... on Category {
                            _slug
                        }
                        ... on Page {
                            _slug
                        }
                        ... on Post {
                            _slug
                        }
                    }
                }
            }
            ... on Feature {
                _id
                heading
                sub_heading
                button {
                    button_type
                    text
                    external_url
                    link {
                        ... on Category {
                            _slug
                        }
                        ... on Page {
                            _slug
                        }
                        ... on Post {
                            _slug
                        }
                    }
                }
                _context {
                    variant_key
                }
                image_position
                image {
                    url(width: 870, height: 570)
                }
            }
        }
    }
}
To retrieve the page content, call the API using the query above and pass an ID for the visitor in the header.
The Prepr-Customer-Id header is required to determine which segment a visitor belongs to and as a result which variant a visitor gets.
HTML
--header 'Prepr-Customer-Id: <YOUR-VISITOR-ID>' Follow the Connecting front-end apps guide to learn more about retrieving content items in a specific framework.
As a response to your API request, Prepr sends the variant to be displayed. Your app then needs to build its response based on this variant. If you don’t specify an ID for the visitor in the header or the ID is for a visitor that does not belong to either segment, then the query response looks like the example below.
{
  "data": {
    "Page": {
      "title": "Homepage",
      "_id": "e0e89d7b-3642-4d19-bb48-6f0cd4a0ca08",
      "content": [
        {
          "__typename": "Hero",
          "_id": "846393bd-dbd0-45f3-8c26-7308c67e8ec7",
          "sub_heading": "Flexible car leasing made easy — drive your dream car today with affordable plans and zero hassle.",
          "image": {
            "url": "https://demo-patterns.stream.prepr.io/7enl9dd5j9u1/w_2000/img-1.png",
            "height": 520,
            "width": 1120
          },
          "_context": {
            "variant_key": "eyJpIjoiZTBlODlkN2ItMzY0Mi00ZDE5LWJiNDgtNmYwY2Q0YTBjYTA4IiwiZSI6IjhpZGJsOHYwNDRvIiwidiI6IjRkMmZlNWQxLTQxODktNDkwNS1hYWU4LWI5YmU3MTljM2YxOSIsImsiOiJBTExfT1RIRVJfVVNFUlMifQ==",
            "variant_id": "ALL_OTHER_USERS"
          },
          "heading": "Welcome to AcmeLease",
          "buttons": [
            {
              "button_type": "PRIMARY",
              "text": "Find your car",
              "external_url": "/products",
              "link": null
            },
            {
              "button_type": "SECONDARY",
              "text": "Request a Quote",
              "external_url": "/contact",
              "link": null
            }
          ]
        },
        {
          "__typename": "Feature",
          "_id": "3176a1a9-568f-4fba-b9a8-4f7303aa2eec",
          "heading": "Business Leasing",
          "sub_heading": "Optimize your fleet with predictable costs, exclusive tax benefits, and the latest vehicle models. Whether you’re scaling up or refining your mobility strategy, we provide hassle-free leasing solutions so you can focus on growing your business—while we handle everything else.",
          "button": {
            "button_type": "PRIMARY",
            "text": "Learn more",
            "external_url": null,
            "link": {
              "_slug": "electric-lease"
            }
          },
          "_context": {
            "variant_key": "eyJpIjoiZTBlODlkN2ItMzY0Mi00ZDE5LWJiNDgtNmYwY2Q0YTBjYTA4IiwiZSI6Ijg1djZuNHAybnBrIiwidiI6ImFlNGI1NGEwLWUwMWEtNDZlNi04MzRiLTBmMjIxODBlZmU3NiIsImsiOiJBTExfT1RIRVJfVVNFUlMifQ=="
          },
          "image_position": "LEFT",
          "image": {
            "url": "https://demo-patterns.stream.prepr.io/3ahzddb2yuru/w_870,h_570,fx_00,fy_100/pexels-pavel-danilyuk-8425052.jpg"
          }
        },
        {
          "__typename": "Feature",
          "_id": "9e04bb7d-266a-4c54-aed7-2849c9369bb1",
          "heading": "Private lease",
          "sub_heading": "Drive a new car hassle-free with fixed monthly payments. Enjoy flexibility, no ownership worries, and full control over your budget.",
          "button": {
            "button_type": "PRIMARY",
            "text": "Learn more",
            "external_url": null,
            "link": {
              "_slug": "oldtimers"
            }
          },
          "_context": {
            "variant_key": "eyJpIjoiZTBlODlkN2ItMzY0Mi00ZDE5LWJiNDgtNmYwY2Q0YTBjYTA4IiwiZSI6Ijg1djZuNHAybnBrIiwidiI6ImU4MTFiOWY2LTk0YjUtNDY2Mi1hYzdiLWM4ZjliYzc5Y2I5MyIsImsiOiJBTExfT1RIRVJfVVNFUlMifQ=="
          },
          "image_position": "RIGHT",
          "image": {
            "url": "https://demo-patterns.stream.prepr.io/1bfnsywm13mg/w_870,h_570/pexels-ketut-subiyanto-4247821.jpg"
          }
        }
      ]
    }
  }
}
If the ID in the header is for a visitor that belongs to the Electric Lease Buyers segment, then the query response looks like the example below.
{
  "data": {
    "Page": {
      "title": "Homepage",
      "_id": "e0e89d7b-3642-4d19-bb48-6f0cd4a0ca08",
      "content": [
        {
          "__typename": "Hero",
          "_id": "8def39fd-37ed-4c6c-a307-16150591c4a1",
          "sub_heading": "Discover a smarter way to drive with flexible electric car leasing. Enjoy cutting-edge technology, zero emissions, and lower running costs—all with hassle-free plans designed for you.",
          "image": {
            "url": "https://demo-patterns.stream.prepr.io/c4tq51jd2vw/w_2000,ex_1065,ey_0,ew_4576,eh_3661/pexels-hyundaimotorgroup-17395382.jpg",
            "height": 3661,
            "width": 6522
          },
          "_context": {
            "variant_key": "eyJpIjoiZTBlODlkN2ItMzY0Mi00ZDE5LWJiNDgtNmYwY2Q0YTBjYTA4IiwiZSI6IjhpZGJsOHYwNDRvIiwidiI6ImVkYzgwYWViLWMxNmQtNGY0Ni1iMjNkLWJkYzcwODI2N2RkYSIsImsiOiJFTEVDVFJJQy1DQVItQlVZRVJTIn0=",
            "variant_id": "ELECTRIC-CAR-BUYERS"
          },
          "heading": "Drive electric ⚡ Save more. Lease smarter.",
          "buttons": [
            {
              "button_type": "PRIMARY",
              "text": "Find your car",
              "external_url": "/products?category=electric-cars",
              "link": null
            },
            {
              "button_type": "SECONDARY",
              "text": "Request a Quote",
              "external_url": "/contact",
              "link": null
            }
          ]
        },
        {
          "__typename": "Feature",
          "_id": "99b11181-2e2b-4abf-bc37-6e72ed0fb463",
          "heading": "Electric Private Lease",
          "sub_heading": "Drive electric with affordable monthly rates, zero emissions, and no unexpected costs. Enjoy the latest EV models with a hassle-free private lease, including maintenance and road tax—just charge and go!",
          "button": {
            "button_type": "PRIMARY",
            "text": "Learn more",
            "external_url": null,
            "link": {
              "_slug": "electric-lease"
            }
          },
          "_context": {
            "variant_key": "eyJpIjoiZTBlODlkN2ItMzY0Mi00ZDE5LWJiNDgtNmYwY2Q0YTBjYTA4IiwiZSI6Ijg1djZuNHAybnBrIiwidiI6IjBmY2Y4NGEzLTYyNmMtNGExMy05NzMzLThlMmNjMTNlOWY4MCIsImsiOiJFTEVDVFJJQy1DQVItQlVZRVJTIn0="
          },
          "image_position": "RIGHT",
          "image": {
            "url": "https://demo-patterns.stream.prepr.io/4r4fu0i0b868/w_870,h_570,fx_48,fy_53/pexels-kindelmedia-9800029.jpg"
          }
        }
      ]
    }
  }
}
Check out the Manage adaptive content settings doc on how to enable the option to retrieve all matching variants.
Take note of the following important context fields:
kind- This returns a value ofPERSONALIZATIONwhen adaptive content is enabled for this element in the Stack.variant_id- This returns a value of the segment for the variant, for example, ELECTRIC-CAR-BUYERS. This value is ALL_OTHER_USERS for the variant not assigned to any specific segment.variant_key= A unique ID for the variant. You will use this field value in the next step to indicate which components need to be tracked for impressions.
You can do a test run with the adaptive content in Prepr before launching it on your live website:
- Open the API Explorer as described here.
- Copy and paste the GraphQL query above into the Operations pane.
- Run the query. You’ll get the section header for
ALL_OTHER_USERSbecause you didn’t send an ID for the visitor. - To find a visitor ID, on the Segments screen, open one of the segments and click to open any of the visitors in the list of visitors at the bottom of the page.
- In the visitor detail page, click the to open the drop down and choose the Copy reference ID or the Copy visitor ID options.
- Under the Header section, enter Prepr-Customer-Id and paste the value you copied.
- Re-run the query. You’ll now get one of the section headers with adaptive content.
Record custom events
Collaborate with the marketing team to determine which custom events you need to record, if needed. Typically, they need to reference custom events in the conditions of either segments or goals.
See example code below to record a custom event in Prepr whenever a visitor requests a quote.
export default function QuoteRequestButton() {
    const quoteRequest = () => {
        window.prepr('event',  'QuoteRequest')
    }

    return (
        <button onClick={quoteRequest}>
            Request a quote
        </button>
    )
}
Check out the Recording custom events guide for more details.
Track impressions and conversions
To track visitor interactions with adaptive content and get accurate metrics, you need to add Prepr-specific HTML attributes to the page elements with adaptive content. When you add these attributes, the tracking pixel automatically tracks impressions and your chosen conversion events in the adaptive content.
Collaborate with the marketing team to choose the elements and corresponding events that indicate direct conversions in the adaptive content. They would usually identify these as micro-conversions.
The elements you choose to measure direct conversions in the adaptive content is separate from any goals that a marketer defines in Prepr. The goals are measured automatically based on how the marketing team defines them and links them to the A/B test they create.
For the example in this guide, there’s a hero section with some specific text and a call-to-action button for each variant. This means you can report on the following types of visitor interactions:
- Impressions: How many visitors viewed the hero section for each variant.
- Clicks: How many visitors clicked the CTA button for each variant.
Prepr determines the conversion rate and other related metrics based on these events and shows you which variant performed best.
Follow the steps below to track impressions and conversion events:
-
To start collecting impressions, add the HTML attribute
data-prepr-variant-keyto the Hero section. The impression is then recorded when the Hero element scrolls into view. -
Set the
data-prepr-variant-keyvalue to the_context.variant_keyvalue returned in the API query response. -
To start collecting clicks, add the HTML attribute
data-prepr-variant-eventto the CTA button. The click is recorded when the CTA button element is clicked.... return ( /* Set the HTML attribute with the matching data-prepr-variant-key to collect impressions for the whole section */ <section className="bg-primary-50" data-prepr-variant-key={item._context?.variant_key}> <div className="mx-auto max-w-8xl p-spacing flex flex-col items-center md:flex-row gap-8 py-10 lg:py-20"> <div className="basis-6/12"> <h1 className="text-mb-5xl lg:text-7xl text-secondary-700 font-medium break-words text-balance">{item.heading}</h1> <p className="text-mb-lg text-secondary-500 lg:text-lg mt-4 lg:mt-6 text-balance">{item.sub_heading}</p> <div className="flex gap-4 mt-8 xl:mt-10"> <div> {/* Set the HTML attribute to collect click events on the link */} <Link href='#' data-prepr-variant-event><Button>Find your car</Button></Link> </div> </div> </div> </div> </section> ) ...Example code snippet with HTML attributes to track impressions and clicks
If you want to track a conversion other than a click event, e.g. a quote request, then set your data-prepr-variant-event to the custom event.
For example: data-prepr-variant-event="QuoteRequest".
That’s it. You’ve set up adaptive content in your website. Now, you can show each visitor a personalized hero section based on their clicking behavior.
As visitors interact with your web app, data will be collected and metrics will be visible in the adaptive content group. Go to the Home page content item to see the metrics.
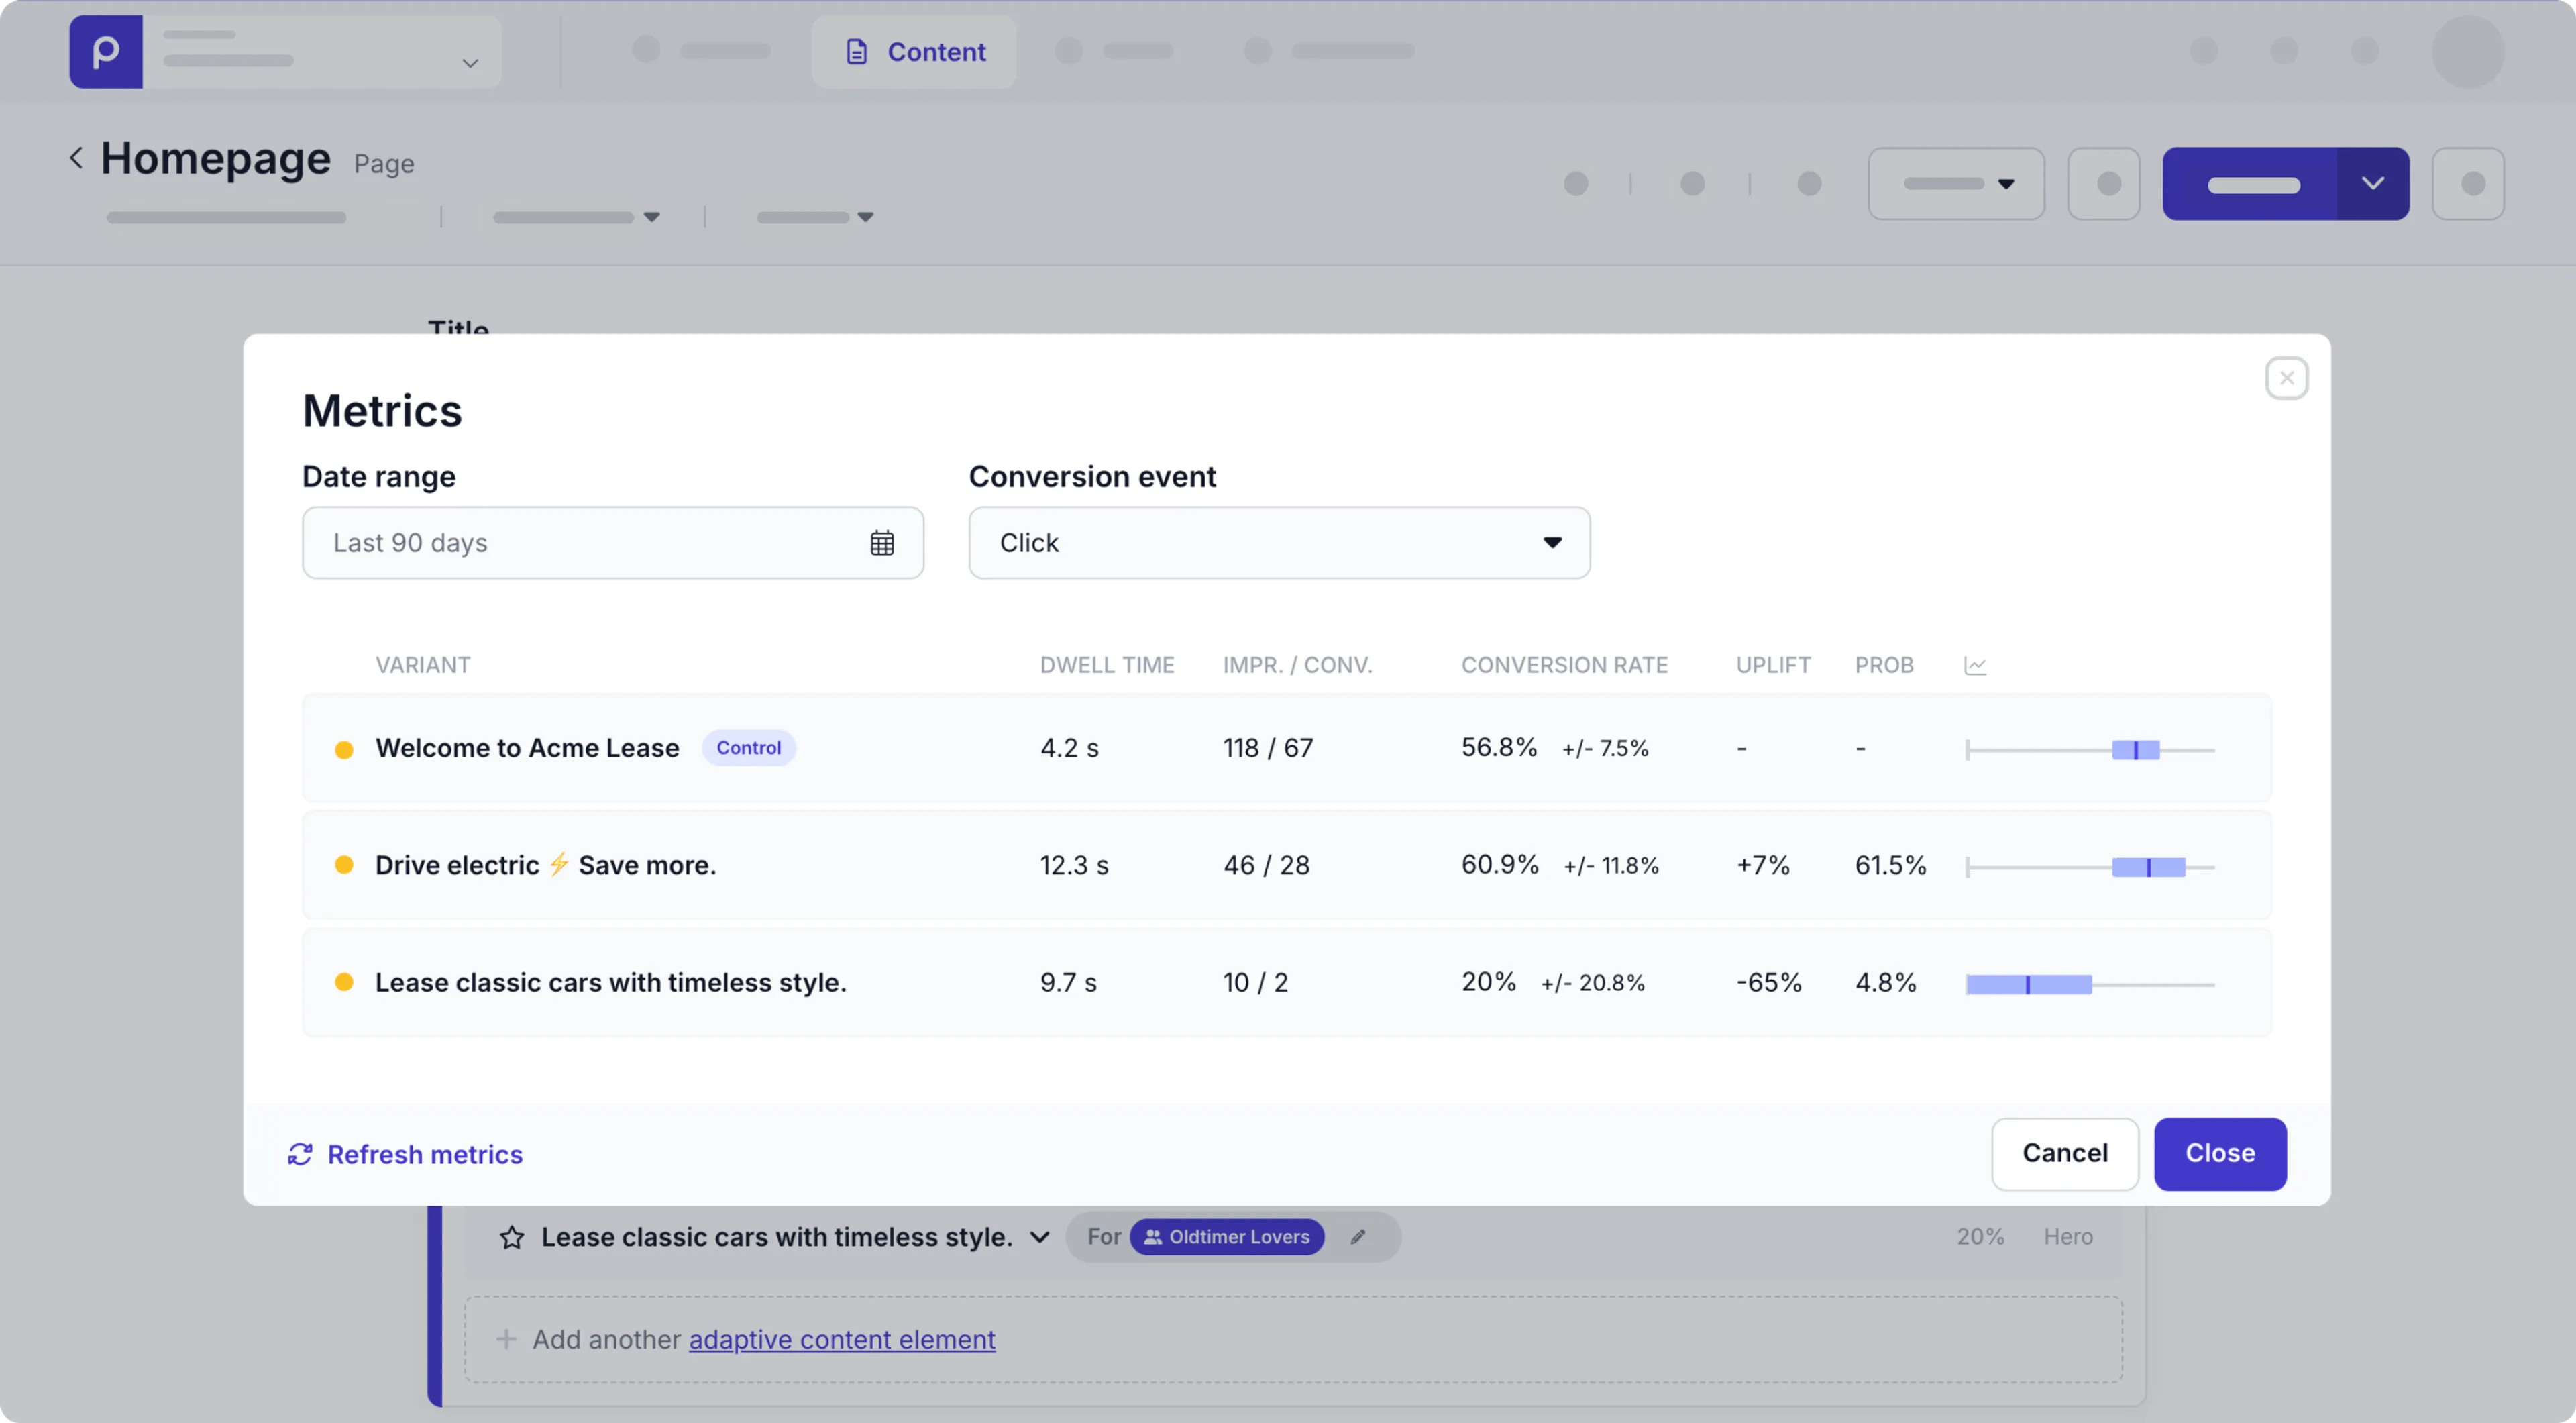
After some time the marketing team will be able to evaluate metrics to determine how well the variants with adaptive content perform and adjust the content, if necessary.
Congratulations, you have successfully set up adaptive content on your web app.
Check out the marketers’ adaptive content guide to get a full picture on the steps needed to add adaptive content to your website.
Other use cases
Other than segments based on visitor behavior, you can set up personalization for other criteria.
Segments from external CRM/CDP systems
It’s possible to set up adaptive content based on segments maintained in other CDP/CRM systems. In this case, you need to reference these external segments from within Prepr using the segment unique identifier from that system.
To set up personalization for external segments, follow the steps below.
-
Create a new segment in Prepr and set the ID value to the segment unique identifier copied from your CRM/CDP system.
-
Retrieve adaptive content using the API with one difference — pass the
Prepr-Segmentsheader instead of thePrepr-Customer-Id. For more information, refer to our API documentation. -
If the segment is based on external visitor profile data, ensure that your front end is connected to the external CRM/CDP/visitor identification system for data retrieval.
Want to learn more?
Check out the following chapters:
Schedule a free consultation
Do you want to get started with adaptive content but still have questions or want a demo?
Schedule a free call with a Prepr solution engineer.