Make your Nuxt project dynamic
This guide shows you how to connect an existing Nuxt project to Prepr to retrieve and show Acme Lease demo content.
Connect your Nuxt website to Prepr
The steps below continue from the previous section, Set up a Nuxt project. If you don’t yet have a Nuxt website with static pages, follow the steps in this section first. Otherwise, let’s get started.
Install Apollo Client
Apollo Client is an integration tool that helps to retrieve CMS data with GraphQL. The instructions below show you how to install Apollo Client so that you can add GraphQL queries to request data from the Prepr API.
-
Stop the localhost website server (
CTRL-C) if it’s running and execute the following command in the terminal:npm i -D @nuxtjs/apollo@next -
Once done, create a file called
apollo.tsin a newpluginsfolder. Copy the following code to this file to set up the connection to the GraphQL API. Check out the Nuxt documentation for more details about Nuxt plugins../plugins/apollo.tsimport { createHttpLink, from, ApolloLink } from "@apollo/client/core"; import { onError } from "@apollo/client/link/error"; import { setContext } from "@apollo/client/link/context"; export default defineNuxtPlugin((nuxtApp) => { const runtimeConfig = useRuntimeConfig(); const { $apollo } = useNuxtApp(); let preprEndpoint = runtimeConfig.public.PREPR_GRAPHQL_URL; const authLink = setContext(async (_, from) => { return {} }); const httpLink = authLink.concat( createHttpLink({ uri: `${preprEndpoint}` }) ); const customLink = new ApolloLink((operation, forward) => { return forward(operation).map((data) => { return data }) }) const errorLink = onError((err) => { nuxtApp.hook("apollo:error", (error) => { // Handle different error cases }); }); // Set custom links in the apollo client (in this case, the default apollo client ) $apollo.defaultClient.setLink(from([errorLink, httpLink])); nuxtApp.hook("apollo:error", (error) => { }); }); -
Next, add the Apollo module and set the GraphQL API endpoint in the
nuxt.config.ts../nuxt.config.tsimport tailwindcss from "@tailwindcss/vite"; // https://nuxt.com/docs/api/configuration/nuxt-config export default defineNuxtConfig({ compatibilityDate: '2024-11-01', devtools: { enabled: true }, modules: ['@nuxtjs/apollo'], css: ['~/assets/css/main.css'], vite: { plugins: [ tailwindcss(), ], }, runtimeConfig: { public: { PREPR_GRAPHQL_URL: process.env.PREPR_GRAPHQL_URL as string, }, }, plugins: [ { src: './plugins/apollo.ts', mode: 'client' }, ], apollo: { clients: { default: { httpEndpoint: process.env.PREPR_GRAPHQL_URL as string, // must be present but will be overridden in plugin }, }, } });
This client will be used to make API requests to endpoints provided by the Prepr CMS across your Nuxt application.
-
We recommend using environment variables to store sensitive information like access tokens. To add environment variables, create a
.envfile in the root directory of your project and add the access token like this:./.envPREPR_GRAPHQL_URL=<YOUR-PREPR-GRAPHQL-URL> -
Replace the placeholder value
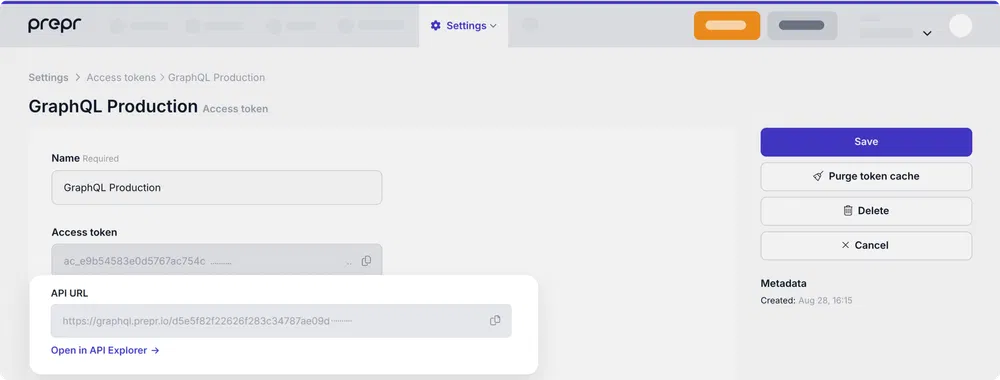
<YOUR-PREPR-GRAPHQL-URL>with the API URL of an access token from Prepr. Get an access token by logging into your Prepr account:
a. Click the icon and choose the Access tokens option to view all the access tokens.
b. Click to open the GraphQL Production access token, and copy the API URL to only retrieve published content items on your site for now. c. Paste the copied API URL in your.envfile.
Use the GraphQL Production access token to request published content items for your live app and use the GraphQL Preview token to make a preview of unpublished content items for your content editors.
-
Execute the following command to restart the server and refresh your page in the browser.
npm run dev
If your website runs without errors, then the setup above was done correctly. Now that Apollo Client is installed, you can retrieve content from Prepr. Before we create a query to retrieve content, let’s follow some best practices for TypeScript and install a GraphQL code generator.
Add a GraphQL query
Once Apollo Client is installed and set up to connect to the Prepr GraphQL API, you can add a query to get the content for your home page from Prepr.
If you’re using preloaded demo data in your Prepr environment as mentioned in the Prerequisites, you should have a Homepage content item like in the images below. The Homepage has all the elements of the page in a Stack field. The stack makes it easy for an editor to set up their page content in a flexible structure for the front end.
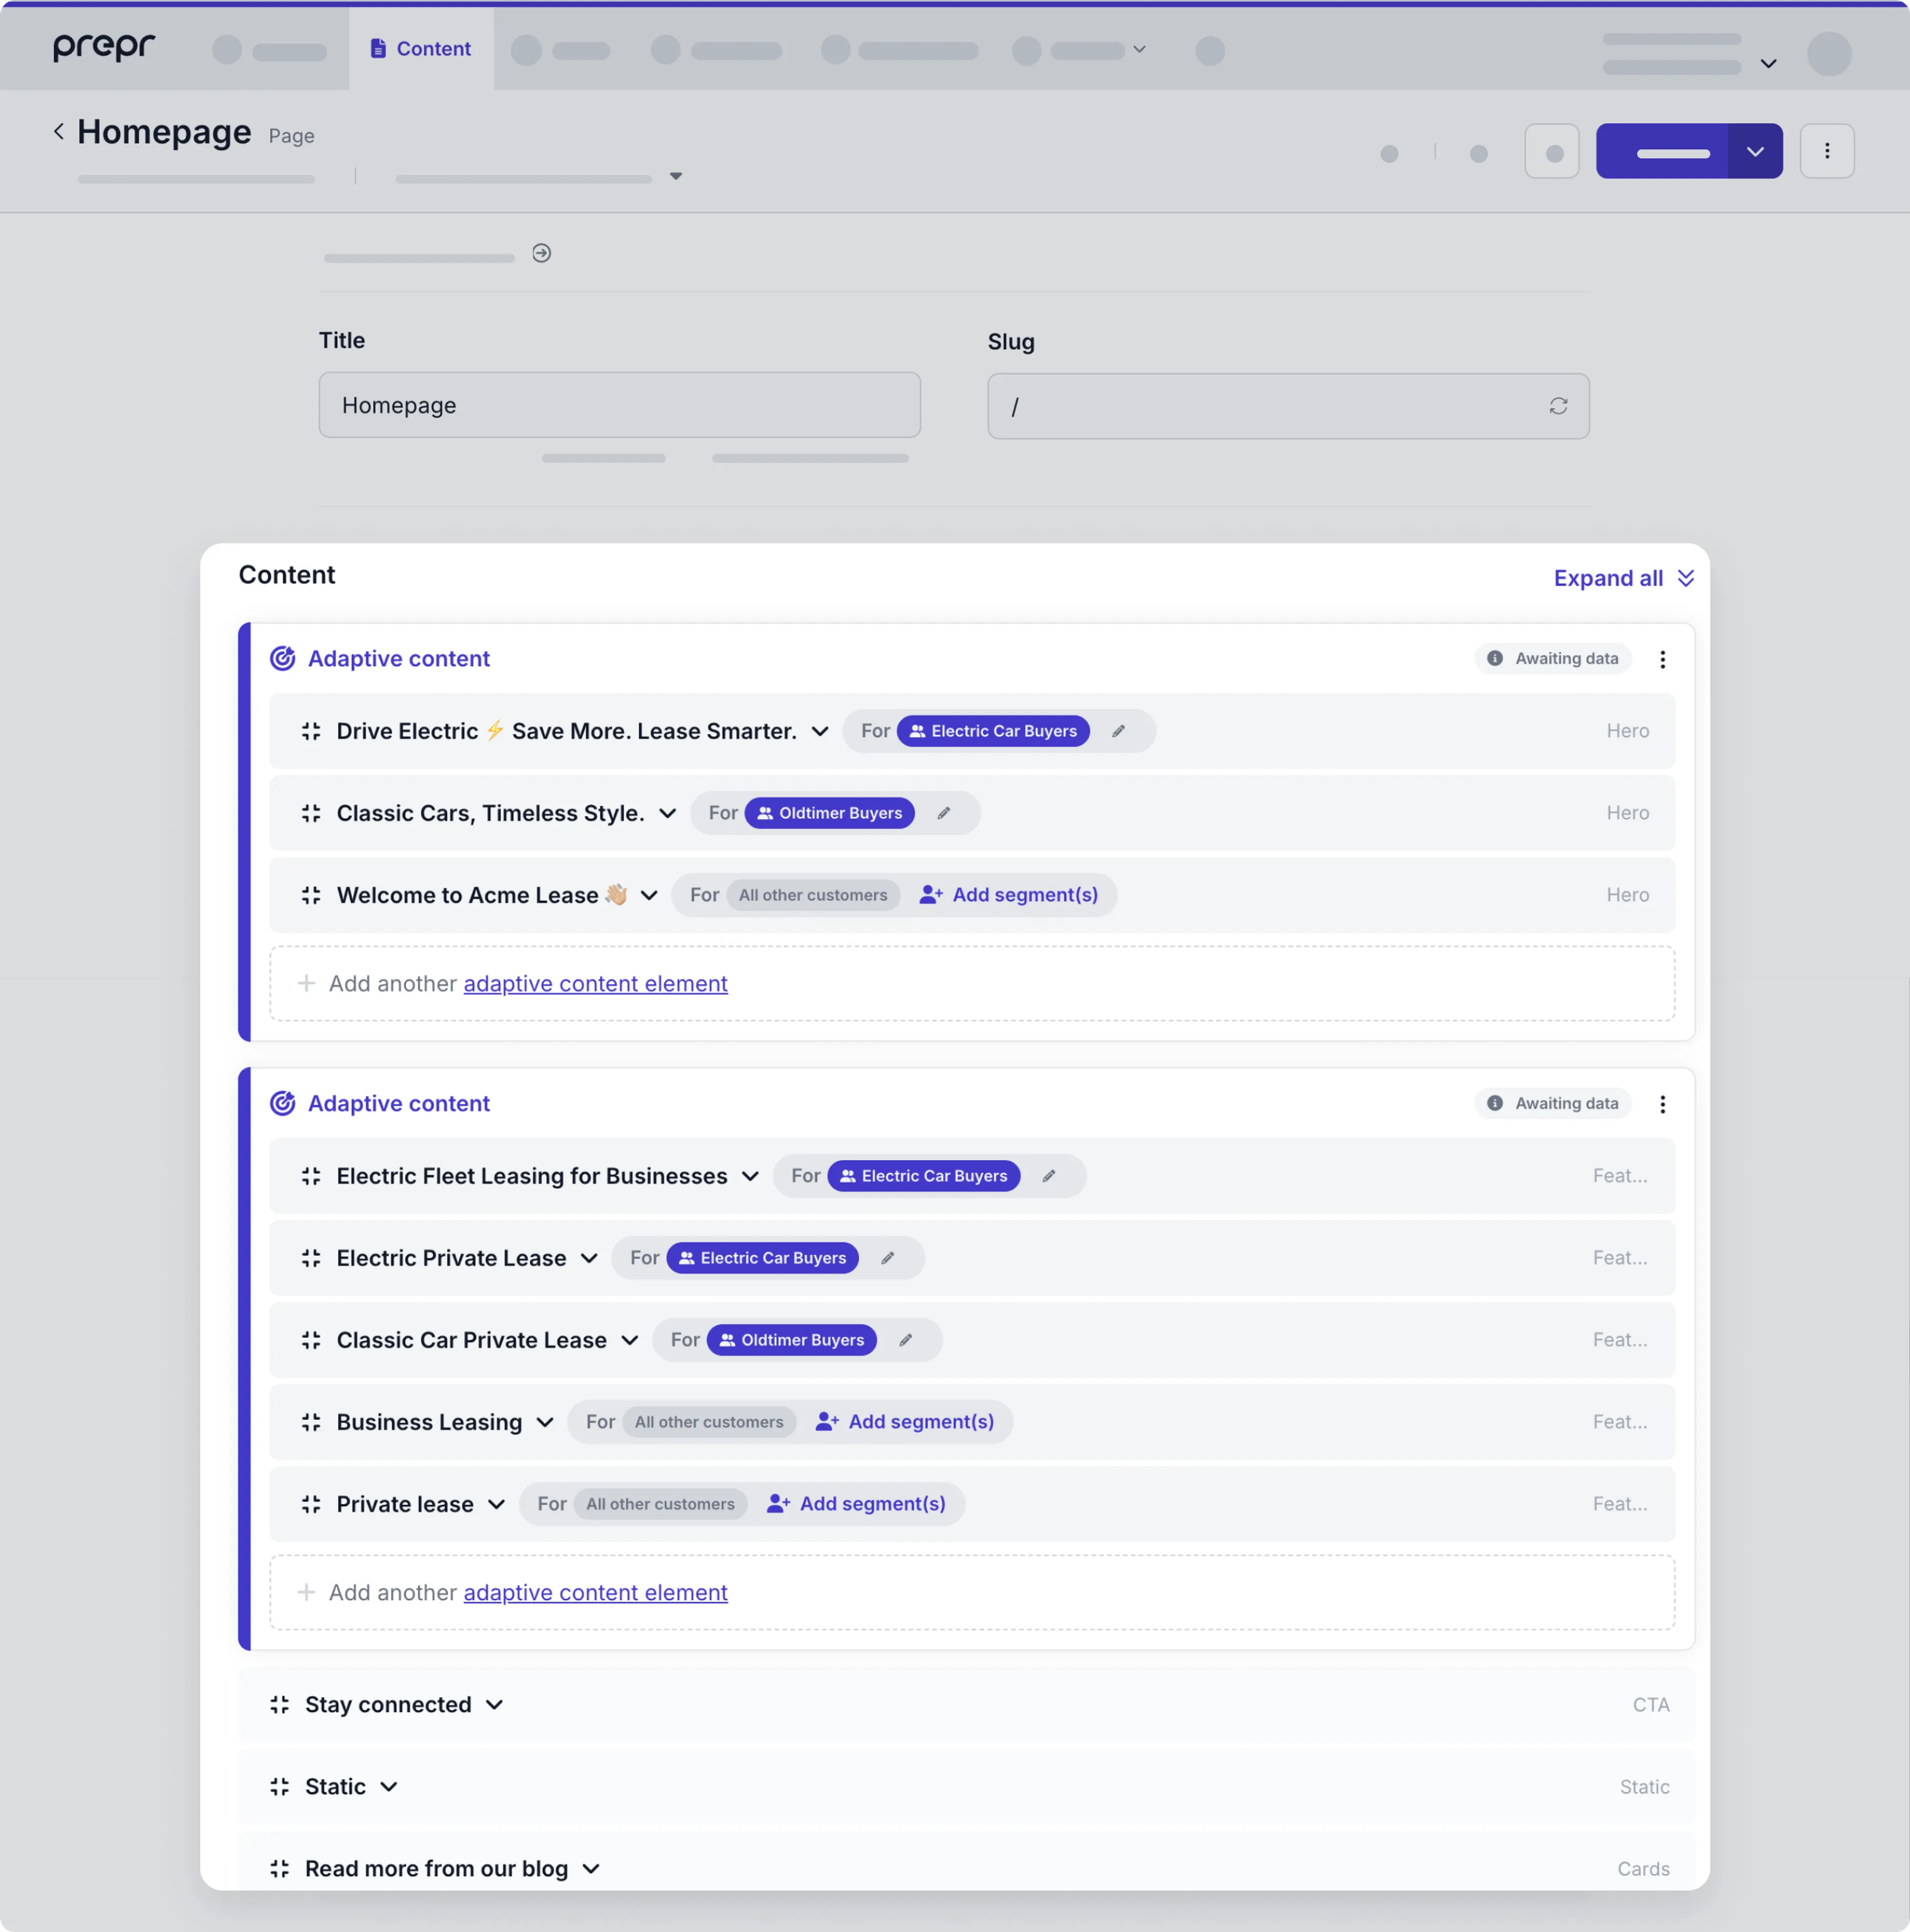
You can see that the hero and feature sections are in adaptive content blocks. We’ll explain that in more detail in the upcoming personalization chapter.
Follow the steps below to add a query to retrieve the id, title, slug, and a stack containing the hero and feature sections with their own fields:
-
Create a
queriesfolder in the root directory of your project and create a file namedget-page-by-slug.js. -
Add the following query to this file to retrieve a page by its slug:
You’ll notice that we’ve included fragments in our query. Fragments in GraphQL are a way to define a set of fields that can be reused.
export const GetPageBySlug = gql`
query GetPageBySlug($slug: String) {
    Page(slug: $slug) {
        title
        _id
        content {
            __typename
            ... on Hero {
                _id
                sub_heading
                image {
                    url(preset: "Hero", width: 2000)
                    height
                    width
                }
                _context {
                    variant_key
                }
                heading
                buttons {
                    button_type
                    text
                    external_url
                    link {
                        ... on Category {
                            _slug
                        }
                        ... on Page {
                            _slug
                        }
                        ... on Post {
                            _slug
                        }
                    }
                }
            }
            ... on Feature {
                _id
                heading
                sub_heading
                button {
                    button_type
                    text
                    external_url
                    link {
                        ... on Category {
                            _slug
                        }
                        ... on Page {
                            _slug
                        }
                        ... on Post {
                            _slug
                        }
                    }
                }
                _context {
                    variant_key
                }
                image_position
                image {
                    url(width: 870, height: 570)
                }
            }
        }
    }
}`;
You can create and test GraphQL queries using the Apollo explorer from Prepr. Open the API Explorer from the Homepage content item or from your access token page.
Fetch page content
Construct the page by following the steps below.
-
First, test the query by adding a script to the
index.vuepage. This script imports the query you just created, executes the query with a slug value and prints the query results to the console../pages/[...slug]/index.vue<template> <div> <hero-section :data="{ heading: 'Acme Lease', sub_heading: 'A car leasing company', image: { url: 'https://img.icons8.com/?size=100&id=112935&format=png&color=FFFFFF' } }" > </hero-section> <feature-section :data="{ heading: 'Business section', sub_heading: 'All about business', image_position: 'LEFT', button: { text: 'Click me', button_type: 'primary' }, image: { url: 'https://img.icons8.com/?size=100&id=112935&format=png&color=FFFFFF' } }" > </feature-section> <feature-section :data="{ heading: 'Another Business section', sub_heading: 'All about other business', image_position: 'RIGHT', button: { text: 'Click me', button_type: 'primary' }, image: { url: 'https://img.icons8.com/?size=100&id=112935&format=png&color=FFFFFF' } }" > </feature-section> </div> </template> <script setup> import { computed } from "vue"; import { reactive } from "vue"; import { GetPageBySlug } from "@/queries/get-page-by-slug"; const route = useRoute(); const { data } = await useAsyncQuery({ query: GetPageBySlug, variables: { slug: route.params.slug ? route.params.slug.join('/') : '/' } }); {/* Output the query results to the console */} console.log(JSON.stringify(data, undefined, 2)); </script>
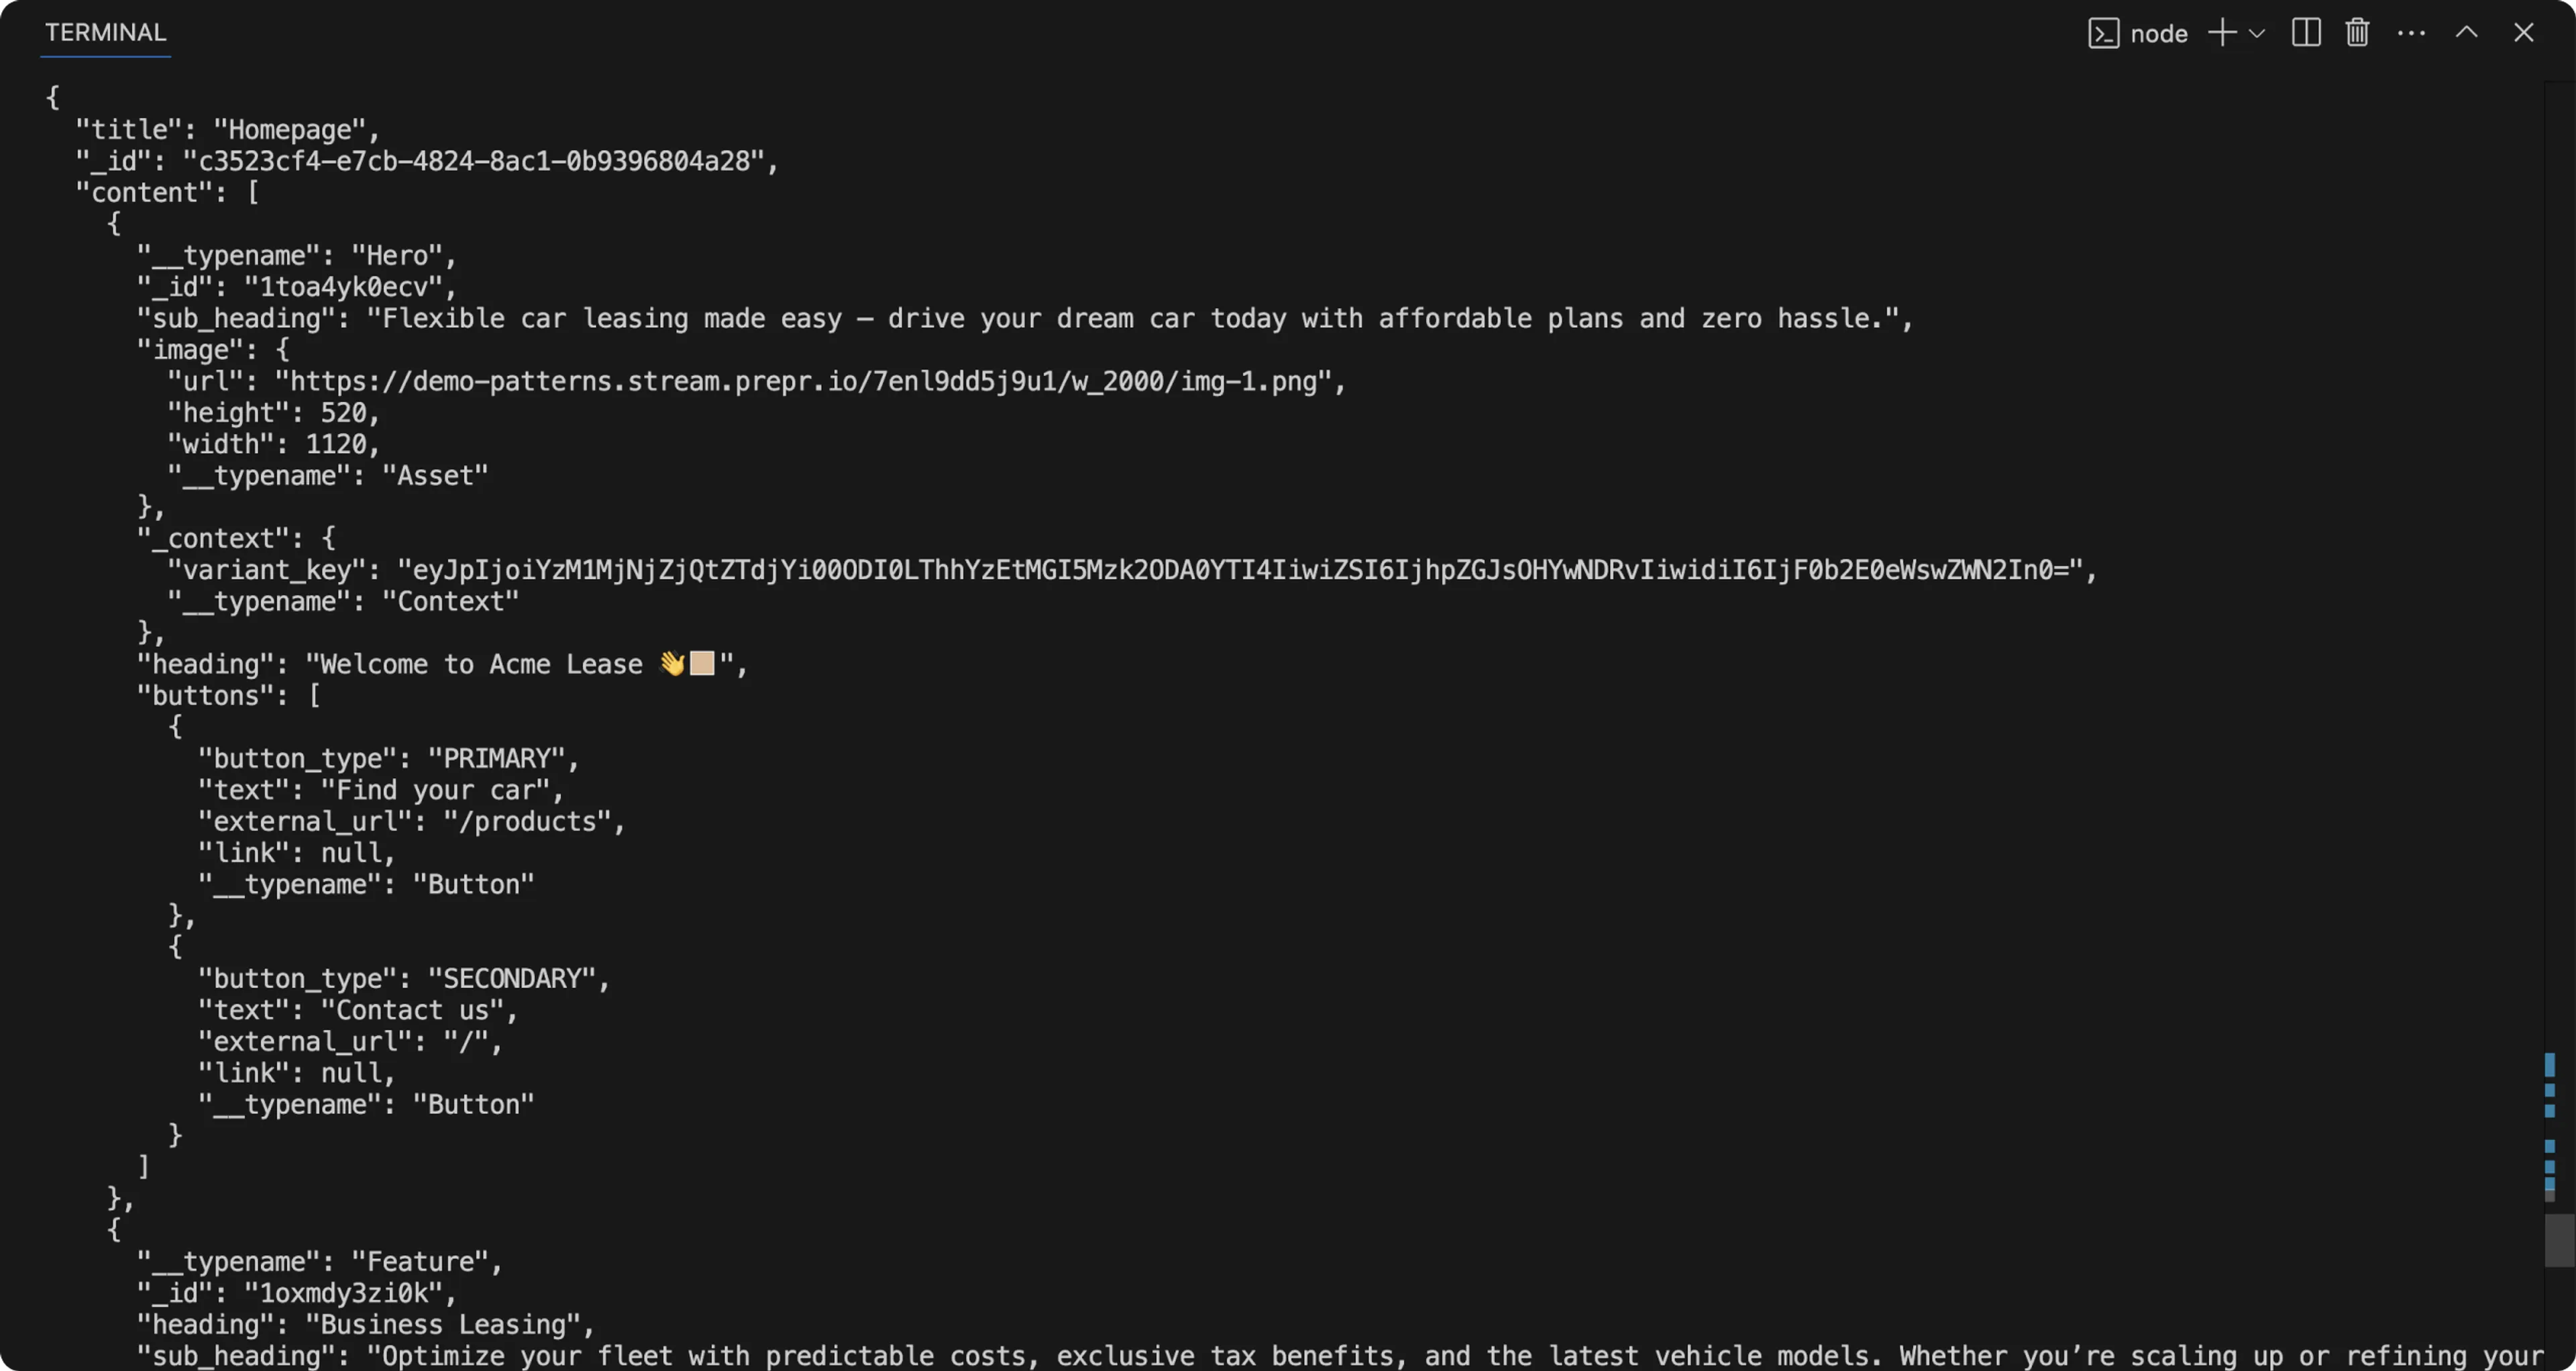
When you check the console in your terminal, the response to the query looks something like this:
-
Now that the query has been created and retrieves the data successfully, you can fetch and set the data for the page by getting elements from the stack field
contentand returning them in theindex.vuefile as follows:./pages/[...slug]/index.vue<template> <!--Loop through elements in the queried stack and set the data variable to the components you want --> <component v-for="element in stack" :key="element._id" :is="getComponent(element.__typename)" :data="element" ></component> </template> <script setup> import { computed } from "vue"; import { reactive } from "vue"; import { GetPageBySlug } from "@/queries/get-page-by-slug"; // Import the components import HeroSection from "@/components/hero-section"; import FeatureSection from "@/components/feature-section"; const route = useRoute(); // Set up the components const components = [ { name: "Hero", comp: HeroSection }, { name: "Feature", comp: FeatureSection }, ]; // Assign the components for the stack loop above const getComponent = (name) => { const component = components.find((component) => component.name === name); return component ? component.comp : null; }; const { data } = await useAsyncQuery({ query: GetPageBySlug, variables: { slug: route.params.slug ? route.params.slug.join('/') : '/' } }); console.log(JSON.stringify(data, undefined, 2)); // Assign the page and stack variables with the queried results const page = data.value.Page; const stack = computed(() => { return page.content; }); </script>
Now when you view the website on your localhost, you’ll see something like the image below:
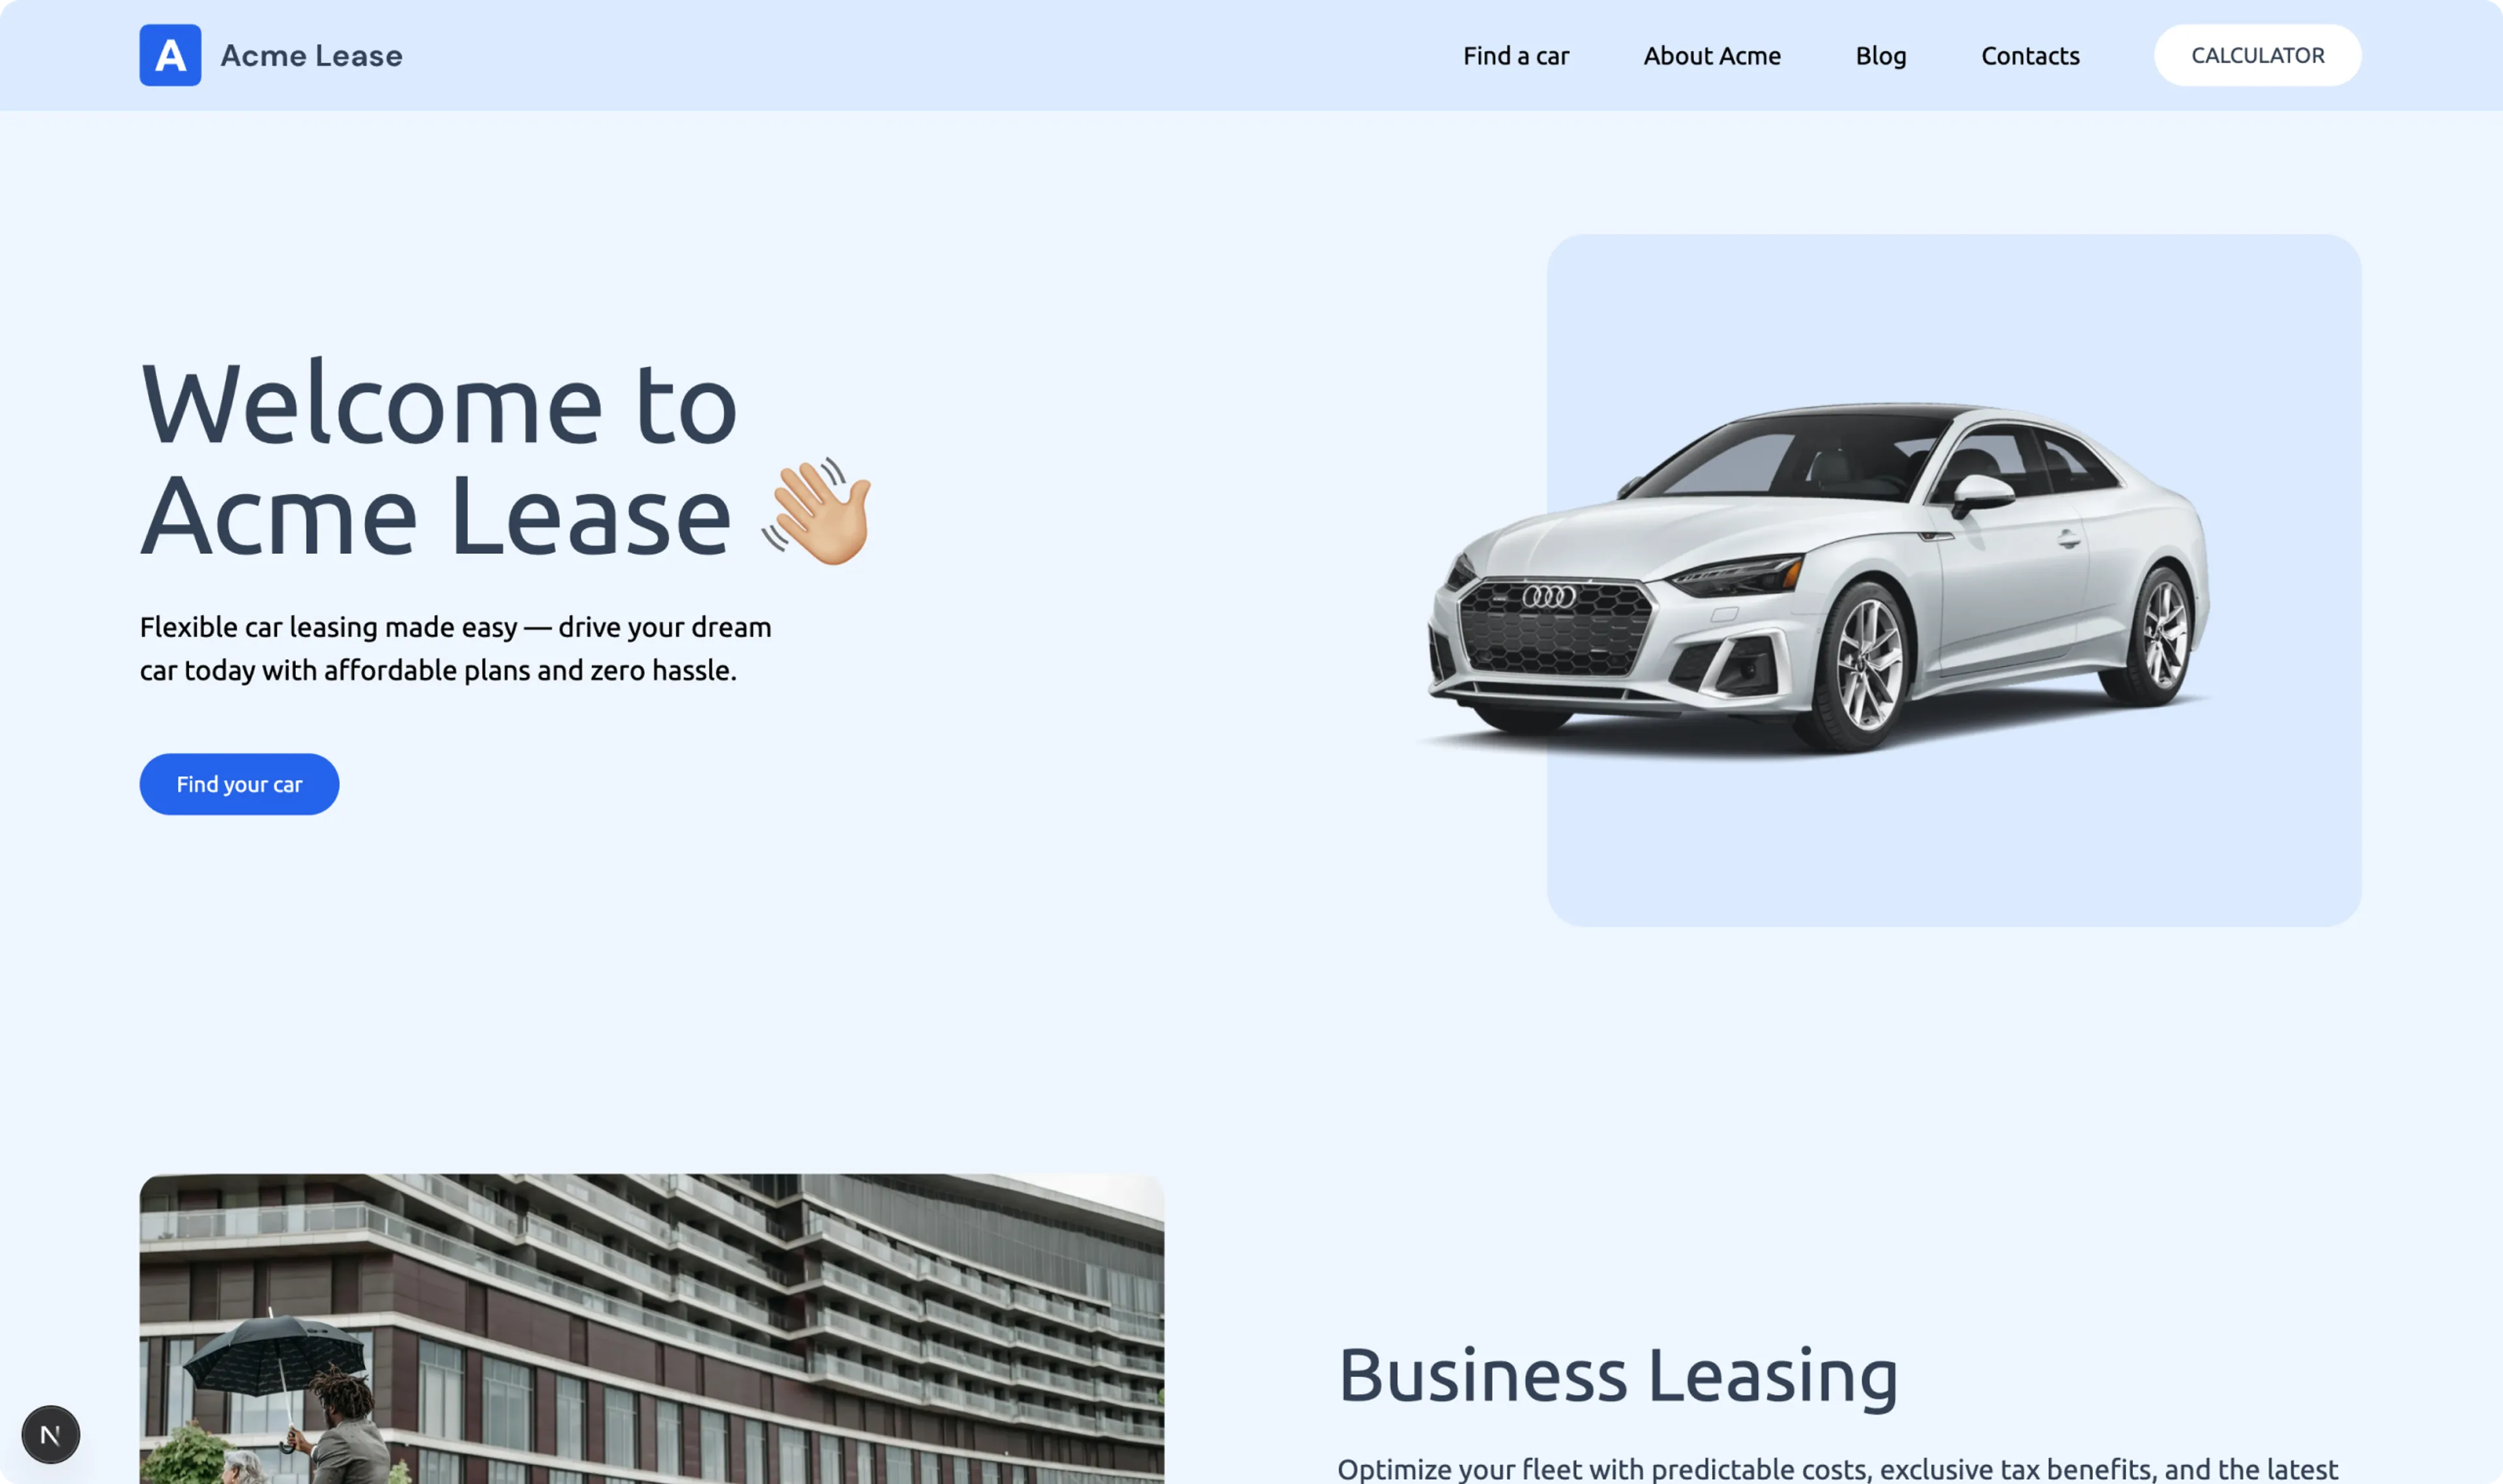
Congratulations! You have successfully connected your front end to Prepr to make your website dynamic. Continue your journey to the next section to set up data collection.