Using TypeScript with the GraphQL API
This article explains how to make the most out of Prepr GraphQL API features when using TypeScript in your front-end app.
Introduction
TypeScript is a strongly typed programming language that builds on JavaScript. Developers choose to use TypeScript instead of JavaScript in their projects to take advantage of cleaner and more scalable code, better code readability, type safety, and code that’s easier to debug and test.
By using TypeScript in Strict Mode, you get stronger guarantees of program correctness for types and null checks. You can use a GraphQL code generator to generate TypeScript types and keep these up to date with any schema changes.
Prepr delivers strict types in the GraphQL API schema so that TypeScript in strict mode can support the following situations in the front end:
- To process content fields in their expected data types.
- To make sure that some fields in content items are not null before rendering the content in the front end.
Enable strict mode and generate TypeScript types
Follow the steps below to use the strict mode feature in Prepr CMS, generate TypeScript in your front end and process an API response with strong TypeScript types.
The steps below are based on a simple Next.js project that connects to Prepr using Apollo Client for GraphQL API requests.
Let’s start with the setup in your Prepr environment.
Enable field validation
When you model content, you identify which fields should be required. So, when you set up the Schema in Prepr, configure these fields as follows:
- Click the Schema tab to open the Schema Editor and click the applicable model.
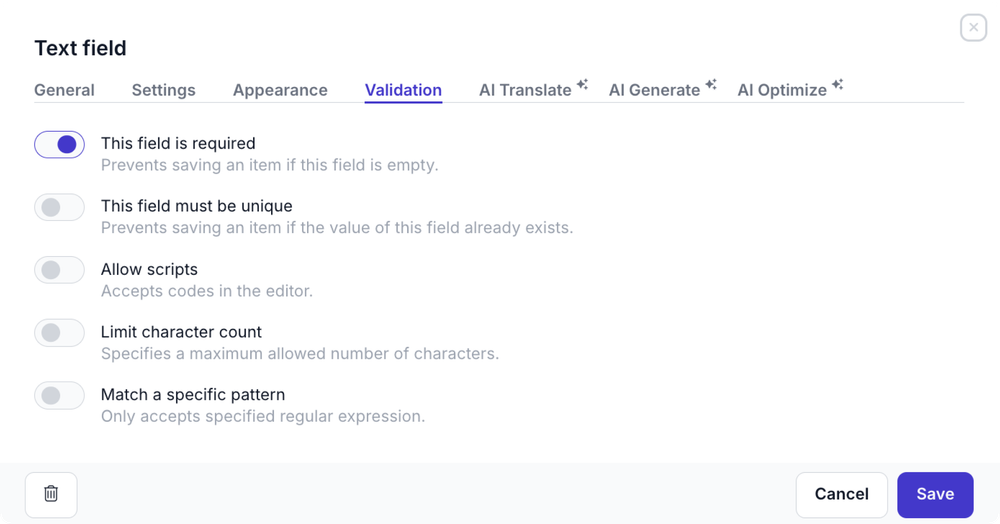
- Click the field that needs to be set as required, choose the Validation tab and enable the This field is required toggle and click the Save button.
Set workflow stages to trigger the required validation
Now that you’ve enabled the validation for required fields, you can define when this validation gets triggered.
By default, validation rules on fields are triggered when publishing a content item. Content editors can save a content item in the In progress or Review workflow stage before publishing it.
If you want to make sure that content editors fill the required fields at a workflow stage before Published, click the icon, choose the General option and choose the group of workflow stages for the Required field validation stage value.
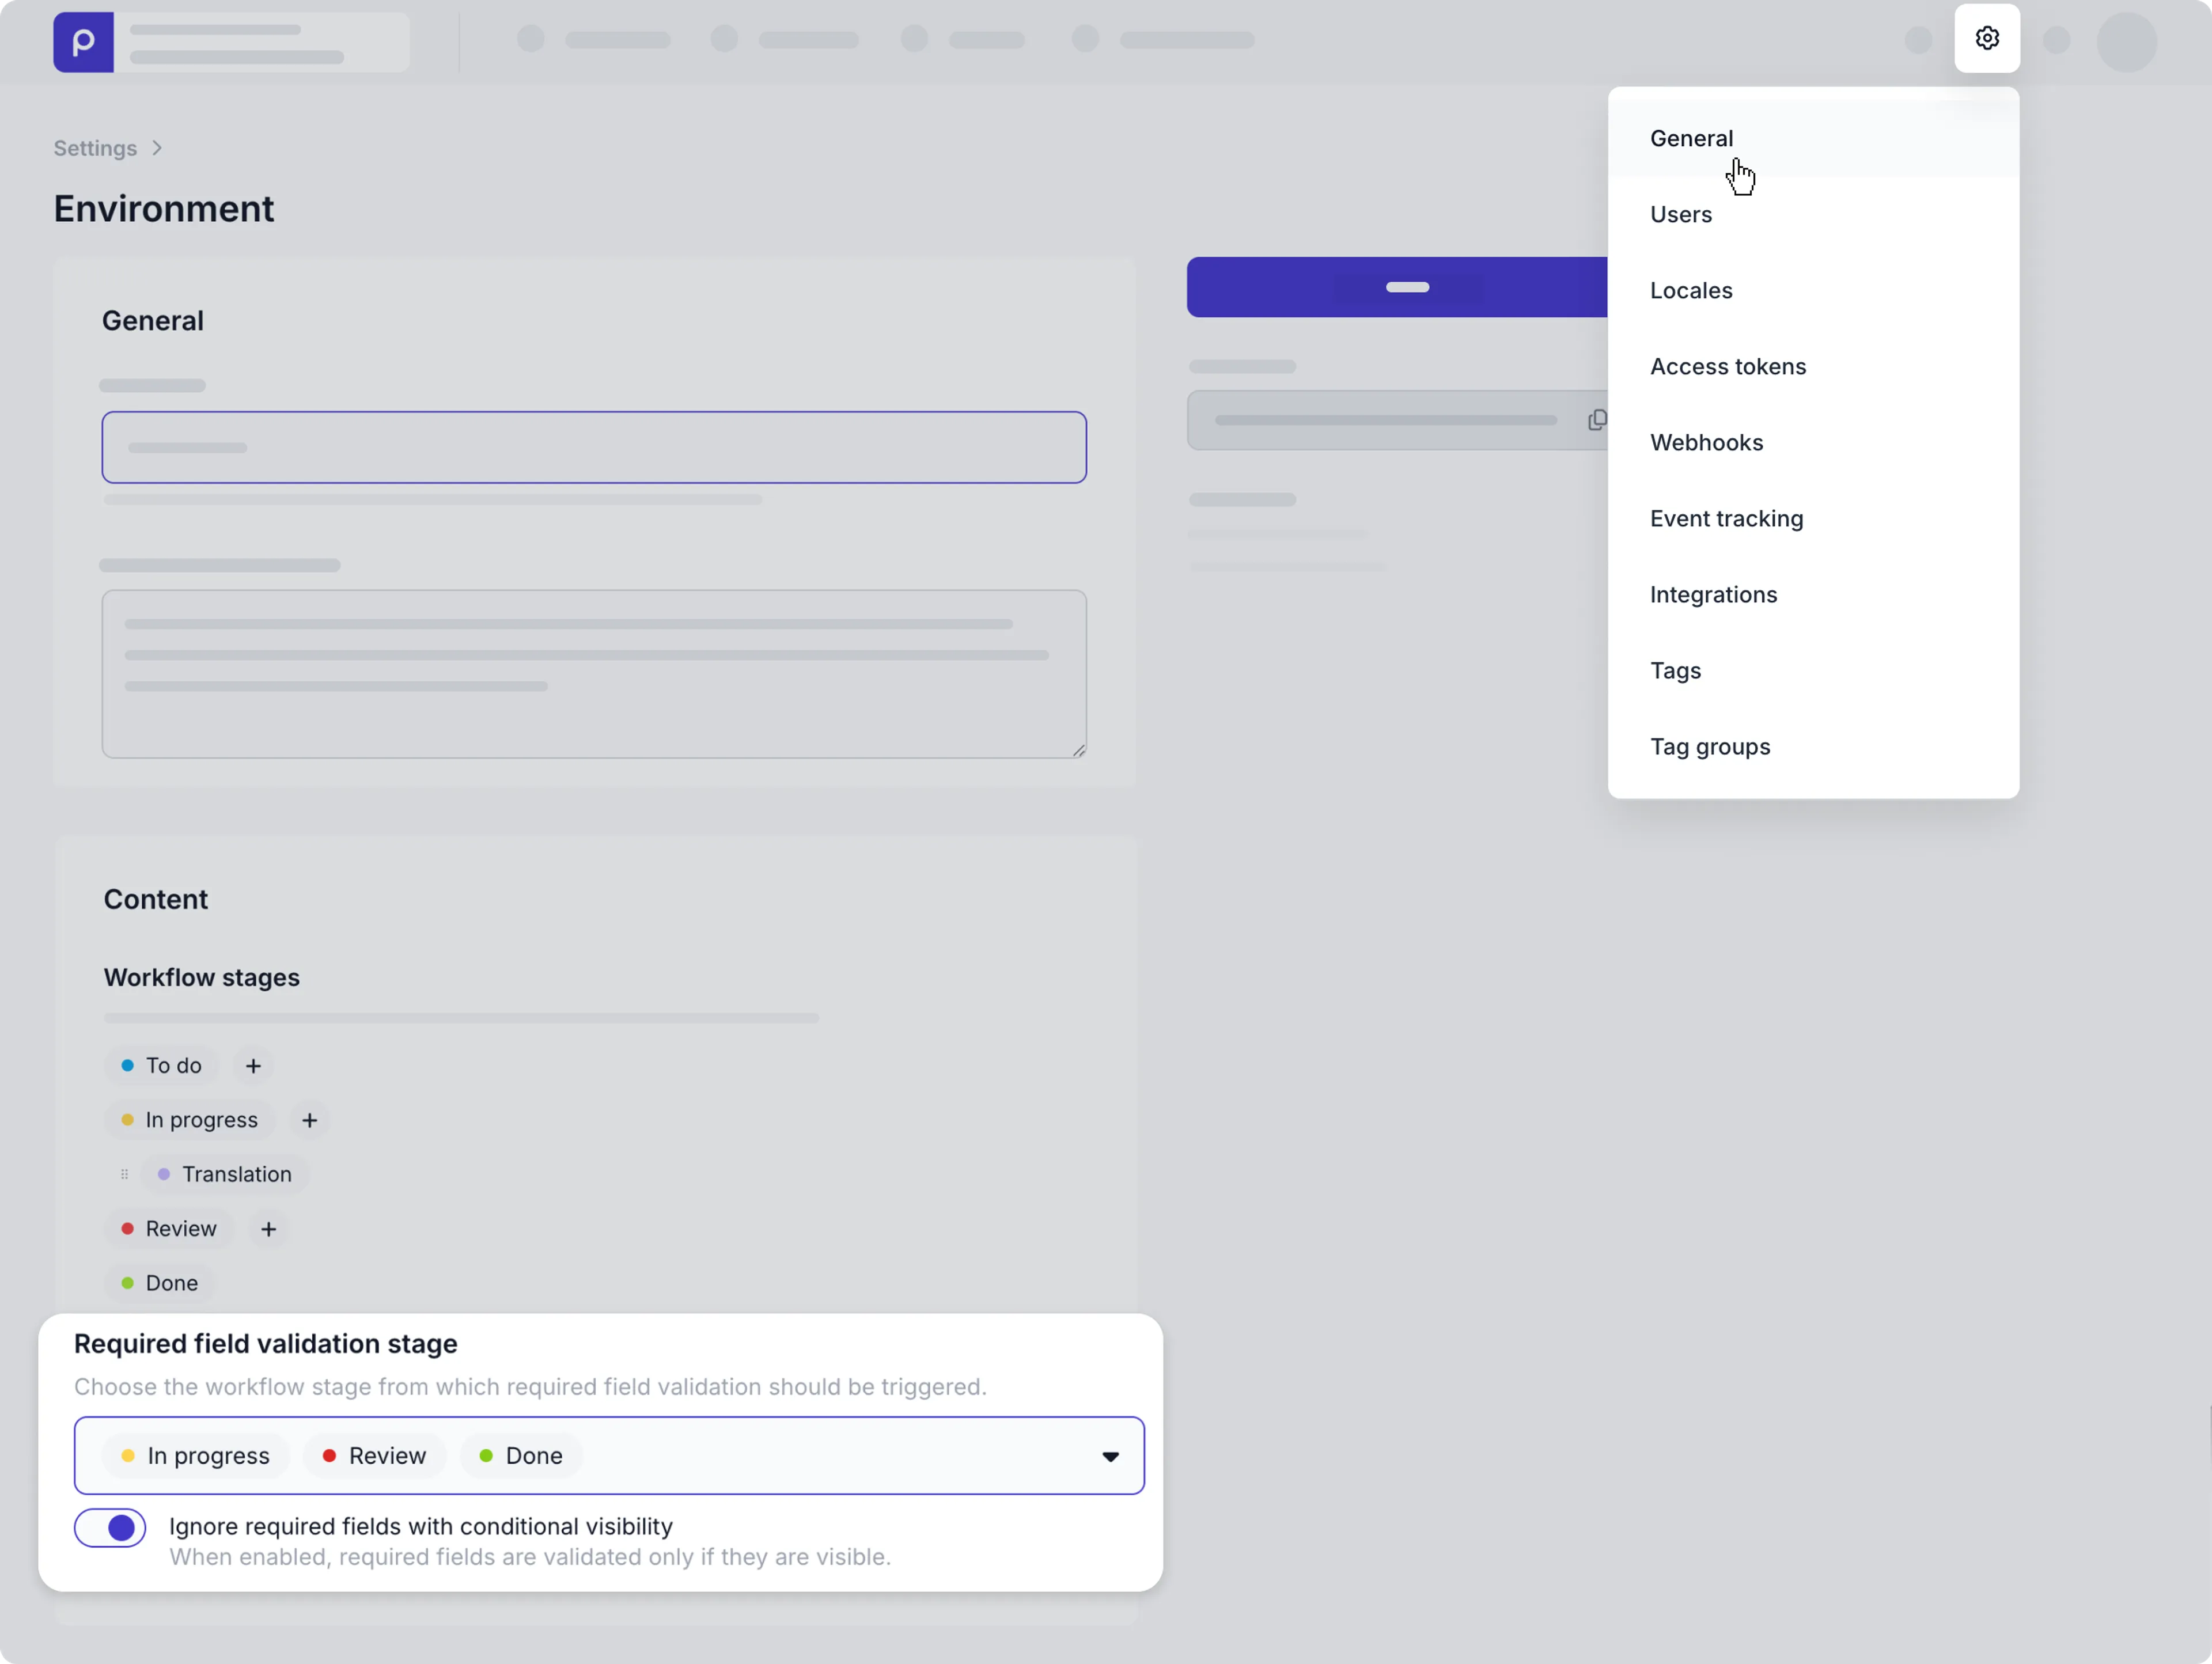
By doing this, you also make sure that required fields will not have null or undefined values in the response of your API request.
Enable strict mode
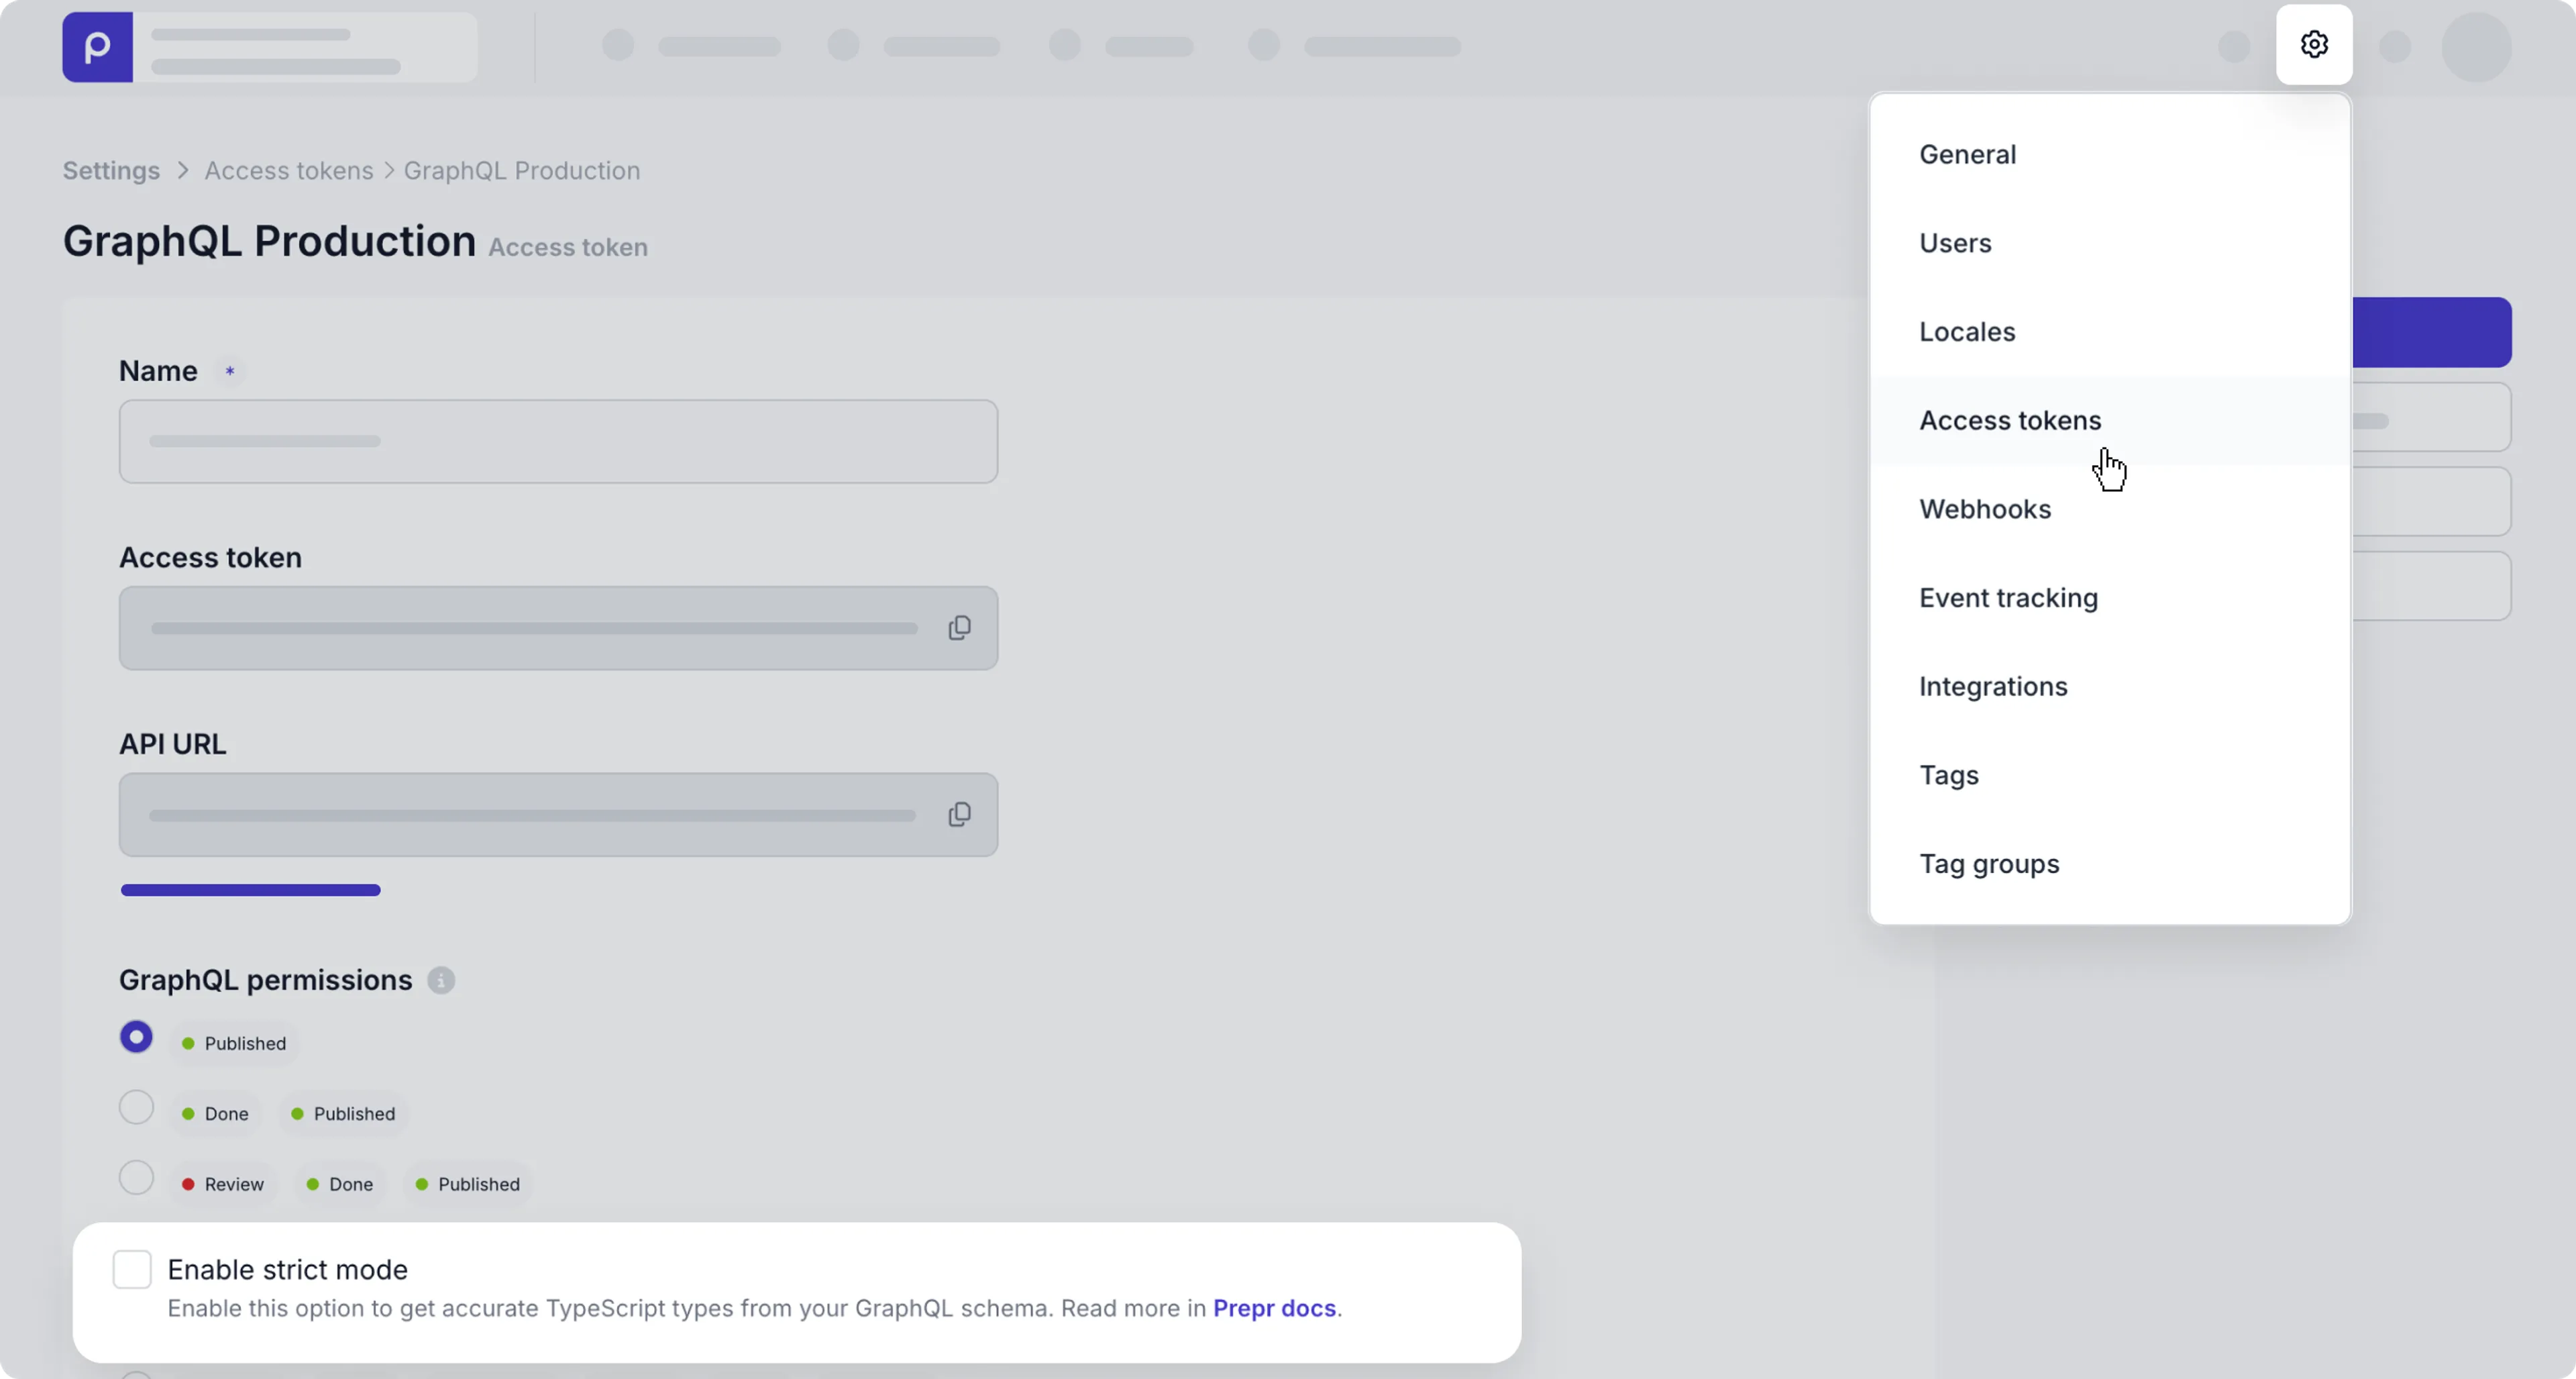
To make sure to get accurate TypeScript types from your GraphQL schema, click the icon and choose the Access Tokens option to view the list of access tokens. Choose the GraphQL access token with the same available workflow stages chosen above for the required validation and check the Enable strict mode box.
Now that the Prepr environment is ready, follow the steps below to update your front end.
Install a GraphQL code generator
Now that your Prepr environment is set up, go to your front end project and install a GraphQL code generator like codegen with the following steps:
- Go to the terminal and execute the following commands:
npm install graphql
npm install -D typescript @graphql-codegen/cli- Once done, initialize the setup wizard with the following command:
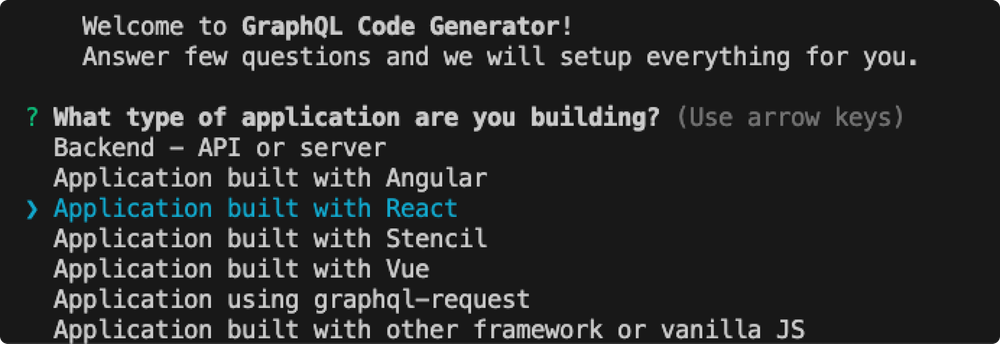
npx graphql-code-generator init- Choose the option that matches your application.
For this guide, we’re using a Next.js project, so we choose the
Application built with Reactoption.
-
For the Where is your schema? question, get the API URL by logging into your Prepr account:
a. Click the and choose the Access tokens option to view all the access tokens.
b. Click one of the access tokens to open the details and copy the API URL value. For example, the GraphQL Production access token to only retrieve published content items on your site.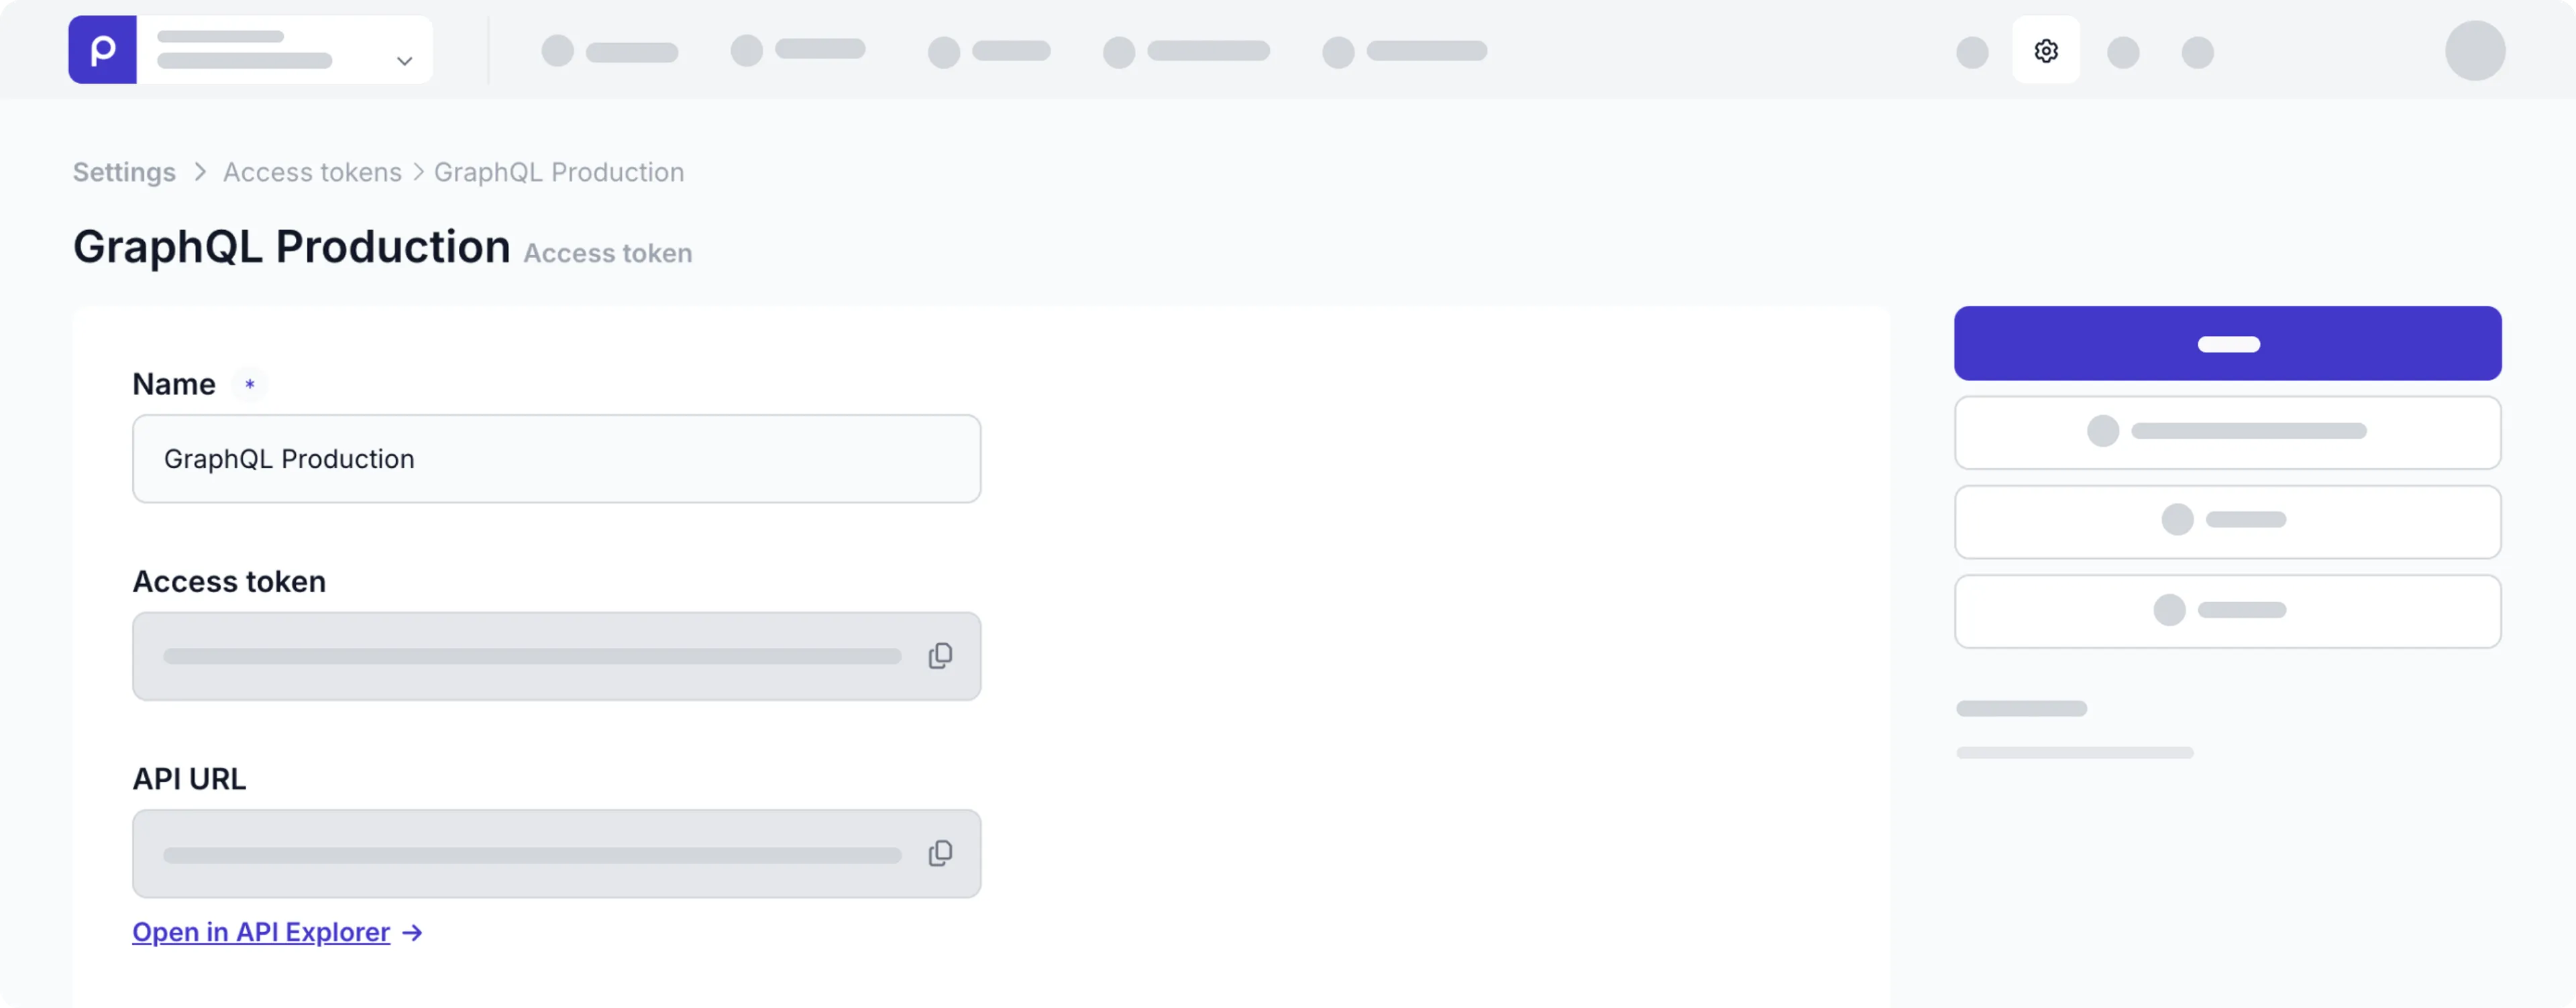
-
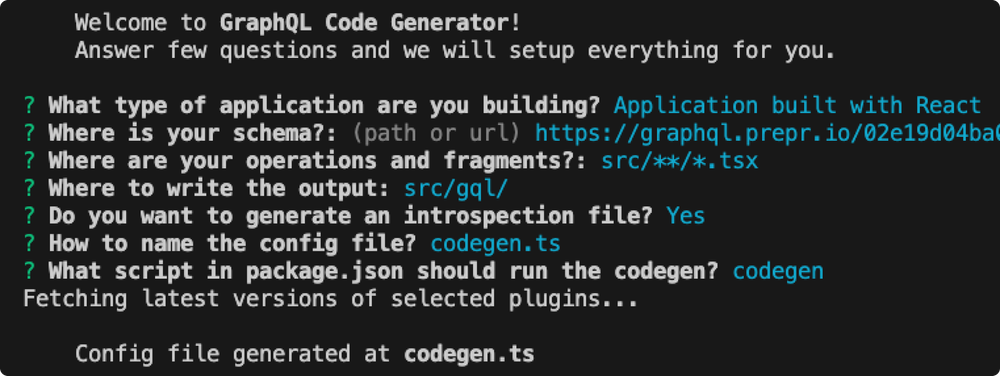
For the remaining questions, choose the options as shown in the image below.
- Install additional plugins with the following command.
npm install @graphql-codegen/client-preset @graphql-codegen/typescript @graphql-codegen/typescript-react-apollo @graphql-codegen/typescript-resolvers- Once successfully installed, update the new file,
codegen.tsin the root of your project as follows:
import type {CodegenConfig} from '@graphql-codegen/cli';

const config: CodegenConfig = {
    overwrite: true,
    schema: "<YOUR-ACCESS-TOKEN>",
    documents: ['!src/gql/**/*', 'src/queries/**/*.{ts,tsx}'],
    generates: {
        "src/gql/": {
            preset: 'client',
            plugins: [],
            presetConfig: {
              fragmentMasking: { unmaskFunctionName: 'getFragmentData' },
            },
            config: {
                reactApolloVersion: 3,
            },
        },
        "./graphql.schema.json": {
            plugins: ["introspection"]
        }
    }
};

export default config;
Add GraphQL queries to your front-end application
Now, that the codegen configuration is done, add your needed queries to your front end.
In our Next.js example, we’re creating a GetArticles.ts script in the queries folder to retrieve all articles from Prepr.
import {graphql} from '@/gql'

export const ARTICLES = graphql(`
  query GetArticles {
    Articles {
      items {
        _id
        _slug
        title
      }
    }
  }
`)
For more information on how to connect your front-end app to Prepr to fetch content, check out how to install Apollo Client for examples.
In the next steps, you will run the code generator to generate the TypeScript types from your queries.
Generate TypeScript types
Generate the TypeScript types by running the following command in the terminal:
npm run codegenIf the command is successful you’ll see output in graphql.ts in the new gql folder like in the example below.
/* eslint-disable */
import { TypedDocumentNode as DocumentNode } from '@graphql-typed-document-node/core';
export type Maybe<T> = T | null;
export type InputMaybe<T> = Maybe<T>;
export type Exact<T extends { [key: string]: unknown }> = { [K in keyof T]: T[K] };
export type MakeOptional<T, K extends keyof T> = Omit<T, K> & { [SubKey in K]?: Maybe<T[SubKey]> };
export type MakeMaybe<T, K extends keyof T> = Omit<T, K> & { [SubKey in K]: Maybe<T[SubKey]> };
export type MakeEmpty<T extends { [key: string]: unknown }, K extends keyof T> = { [_ in K]?: never };
export type Incremental<T> = T | { [P in keyof T]?: P extends ' $fragmentName' | '__typename' ? T[P] : never };
/** All built-in and custom scalars, mapped to their actual values */
export type Scalars = {
  ID: { input: string; output: string; }
  String: { input: string; output: string; }
  Boolean: { input: boolean; output: boolean; }
  Int: { input: number; output: number; }
  Float: { input: number; output: number; }
  /** The DateTime type adheres to ISO 8601 standard. */
  _DateTime: { input: any; output: any; }
};

/** This union type holds all content models. */
export type AllModels = Article | CallToAction | Category | Config | LiveEvent | MenuItem | Navigation | Page | Person;

export type ApplePodcast = {
  __typename?: 'ApplePodcast';
  _id: Scalars['String']['output'];
  url: Scalars['String']['output'];
};

/** Single Article. */
export type Article = Model & {
  __typename?: 'Article';
  /** Count of bookmark events. */
  _bookmarks?: Maybe<Scalars['Int']['output']>;
  /** The time the content item was changed. */
  _changed_on: Scalars['String']['output'];
  /**
   * Count of clicktrough events.
   * @deprecated Will be removed in next version, use _event instead.
   */
  _clicktroughs?: Maybe<Scalars['Int']['output']>;
  /**
   * Count of comment events.
   * @deprecated Will be removed in next version, use _event instead.
   */
  _comments?: Maybe<Scalars['Int']['output']>;
  _context?: Maybe<Context>;
  /** The time the content item was created. */
  _created_on: Scalars['String']['output'];
  /** ID of your Prepr Environment. */
  _environment_id: Scalars['String']['output'];
  /** Unique identifier for each content item. */
  _id: Scalars['String']['output'];
  /** Count of like events. */
  _likes?: Maybe<Scalars['Int']['output']>;
  _locale: Scalars['String']['output'];
  _locales: Array<Scalars['String']['output']>;
  /** This field returns all localizations for this content item. */
  _localizations: Array<Article>;
  /** The time for when the content item is or will be published. */
  _publish_on?: Maybe<Scalars['String']['output']>;
  /**
   * Count of purchase events.
   * @deprecated Will be removed in next version, use _event instead.
   */
  _purchases?: Maybe<Scalars['Int']['output']>;
  /** Calculated time to read in minutes. */
  _read_time?: Maybe<Scalars['Int']['output']>;
  /**
   * Count of share events.
   * @deprecated Will be removed in next version, use _event instead.
   */
  _shares?: Maybe<Scalars['Int']['output']>;
  /** Unique within Type, string identifier for each content item. */
  _slug?: Maybe<Scalars['String']['output']>;
  /** Count of subscribe events. */
  _subscribes?: Maybe<Scalars['Int']['output']>;
  /** Count of view events. */
  _views?: Maybe<Scalars['Int']['output']>;
  /**
   * Count of vote events.
   * @deprecated Will be removed in next version, use _event instead.
   */
  _votes?: Maybe<Scalars['Int']['output']>;
  authors: Array<Person>;
  categories: Array<Category>;
  content?: Maybe<Array<Maybe<_Prepr_Types>>>;
  cover?: Maybe<Array<Maybe<Asset>>>;
  excerpt?: Maybe<Scalars['String']['output']>;
  seo?: Maybe<Seo>;
  title?: Maybe<Scalars['String']['output']>;
};

/** ArticleCollection component. */
export type ArticleCollection = Component & {
  __typename?: 'ArticleCollection';
  _context?: Maybe<Context>;
  _id: Scalars['String']['output'];
  articles?: Maybe<Array<Article>>;
  cta_label?: Maybe<Scalars['String']['output']>;
  cta_url?: Maybe<Scalars['String']['output']>;
  description?: Maybe<Scalars['String']['output']>;
  heading?: Maybe<Scalars['String']['output']>;
};

...

export type GetArticlesQueryVariables = Exact<{ [key: string]: never; }>;

export type GetArticlesQuery = { __typename?: 'Query', Articles?: { __typename?: 'Articles', items: Array<{ __typename?: 'Article', _id: string, _slug?: string | null, title?: string | null }> } | null };

export const GetArticlesDocument = {"kind":"Document","definitions":[{"kind":"OperationDefinition","operation":"query","name":{"kind":"Name","value":"GetArticles"},"selectionSet":{"kind":"SelectionSet","selections":[{"kind":"Field","name":{"kind":"Name","value":"Articles"},"selectionSet":{"kind":"SelectionSet","selections":[{"kind":"Field","name":{"kind":"Name","value":"items"},"selectionSet":{"kind":"SelectionSet","selections":[{"kind":"Field","name":{"kind":"Name","value":"_id"}},{"kind":"Field","name":{"kind":"Name","value":"_slug"}},{"kind":"Field","name":{"kind":"Name","value":"title"}}]}}]}}]}}]} as unknown as DocumentNode<GetArticlesQuery, GetArticlesQueryVariables>;
GetArticlesDocument and GetArticlesQuery are generated based on the query with the name GetArticles defined in the previous step.
These are used to make a query request in the next step.
Make the GraphQL request
Once the types are generated and available you can make the GraphQL request to fetch the content you need to render in the front end.
Fetch the content for your front-end pages like in the example page.tsx below.
import {getClient} from "@/ApolloClient";
import {GetArticlesDocument, GetArticlesQuery} from "@/gql/graphql";
import {notFound} from "next/navigation";

async function getData() {
  const {data} = await getClient().query<GetArticlesQuery>({
    query: GetArticlesDocument,
    fetchPolicy: 'no-cache',
  })

  if (!data) {
    return notFound()
  }
  return data.Articles?.items;
}

export default async function Page() {
  const articles = await getData();

  return (
    <div>
      <h1>My blog site</h1>
      <ul>
        {articles?.map((article) => (
          // Display a list of the fetched articles
          <li key={article._id}>
            {article.title}
          </li>
        ))}
      </ul>

    </div>
  );
}
And that’s it! You’ve successfully implemented TypeScript strict mode in your front-end. If you found this article useful and would like to explore other similar topics in the Prepr docs, please let us know.