Managing adaptive content
This guide shows you how to personalize your website to improve engagement and user experience.
This guide is focused on the typical activities of a marketer. Check out the personalization guide for developers for the one-time setup in the front-end app.
Introduction
Prepr lets you create personalized experiences with Adaptive content. With Adaptive content, you can make different versions of content for various visitor segments. You can then show the right content to each visitor based on their segment giving them a personalized experience.
Use case
Let’s look at a typical use case.
You want to increase the number of visitors who request a quote through your car leasing website. To achieve this goal, you take the following actions:
-
You find that the Home page is one of the main entry points in the visitor journey that starts from clicking the Find a car CTA button and resulting in a quote request.

-
So, you come up with a plan to improve the content in the hero section of the home page.
- You decide to group visitors by those who want to lease electric cars.
- You prepare personalized content for this targeted audience to drive more visitors toward the ultimate goal of requesting a quote.
-
To determine how well this personalized variant of the Hero section performs, you add it as adaptive content with the following goals:
- Micro-conversion goal: You want to measure how many visitors click the Find your car button on the home page because it’s the start of the visitor journey to reach the end goal.
- Macro-conversion goal: You want to measure how many visitors request a quote within a day of visiting the home page.
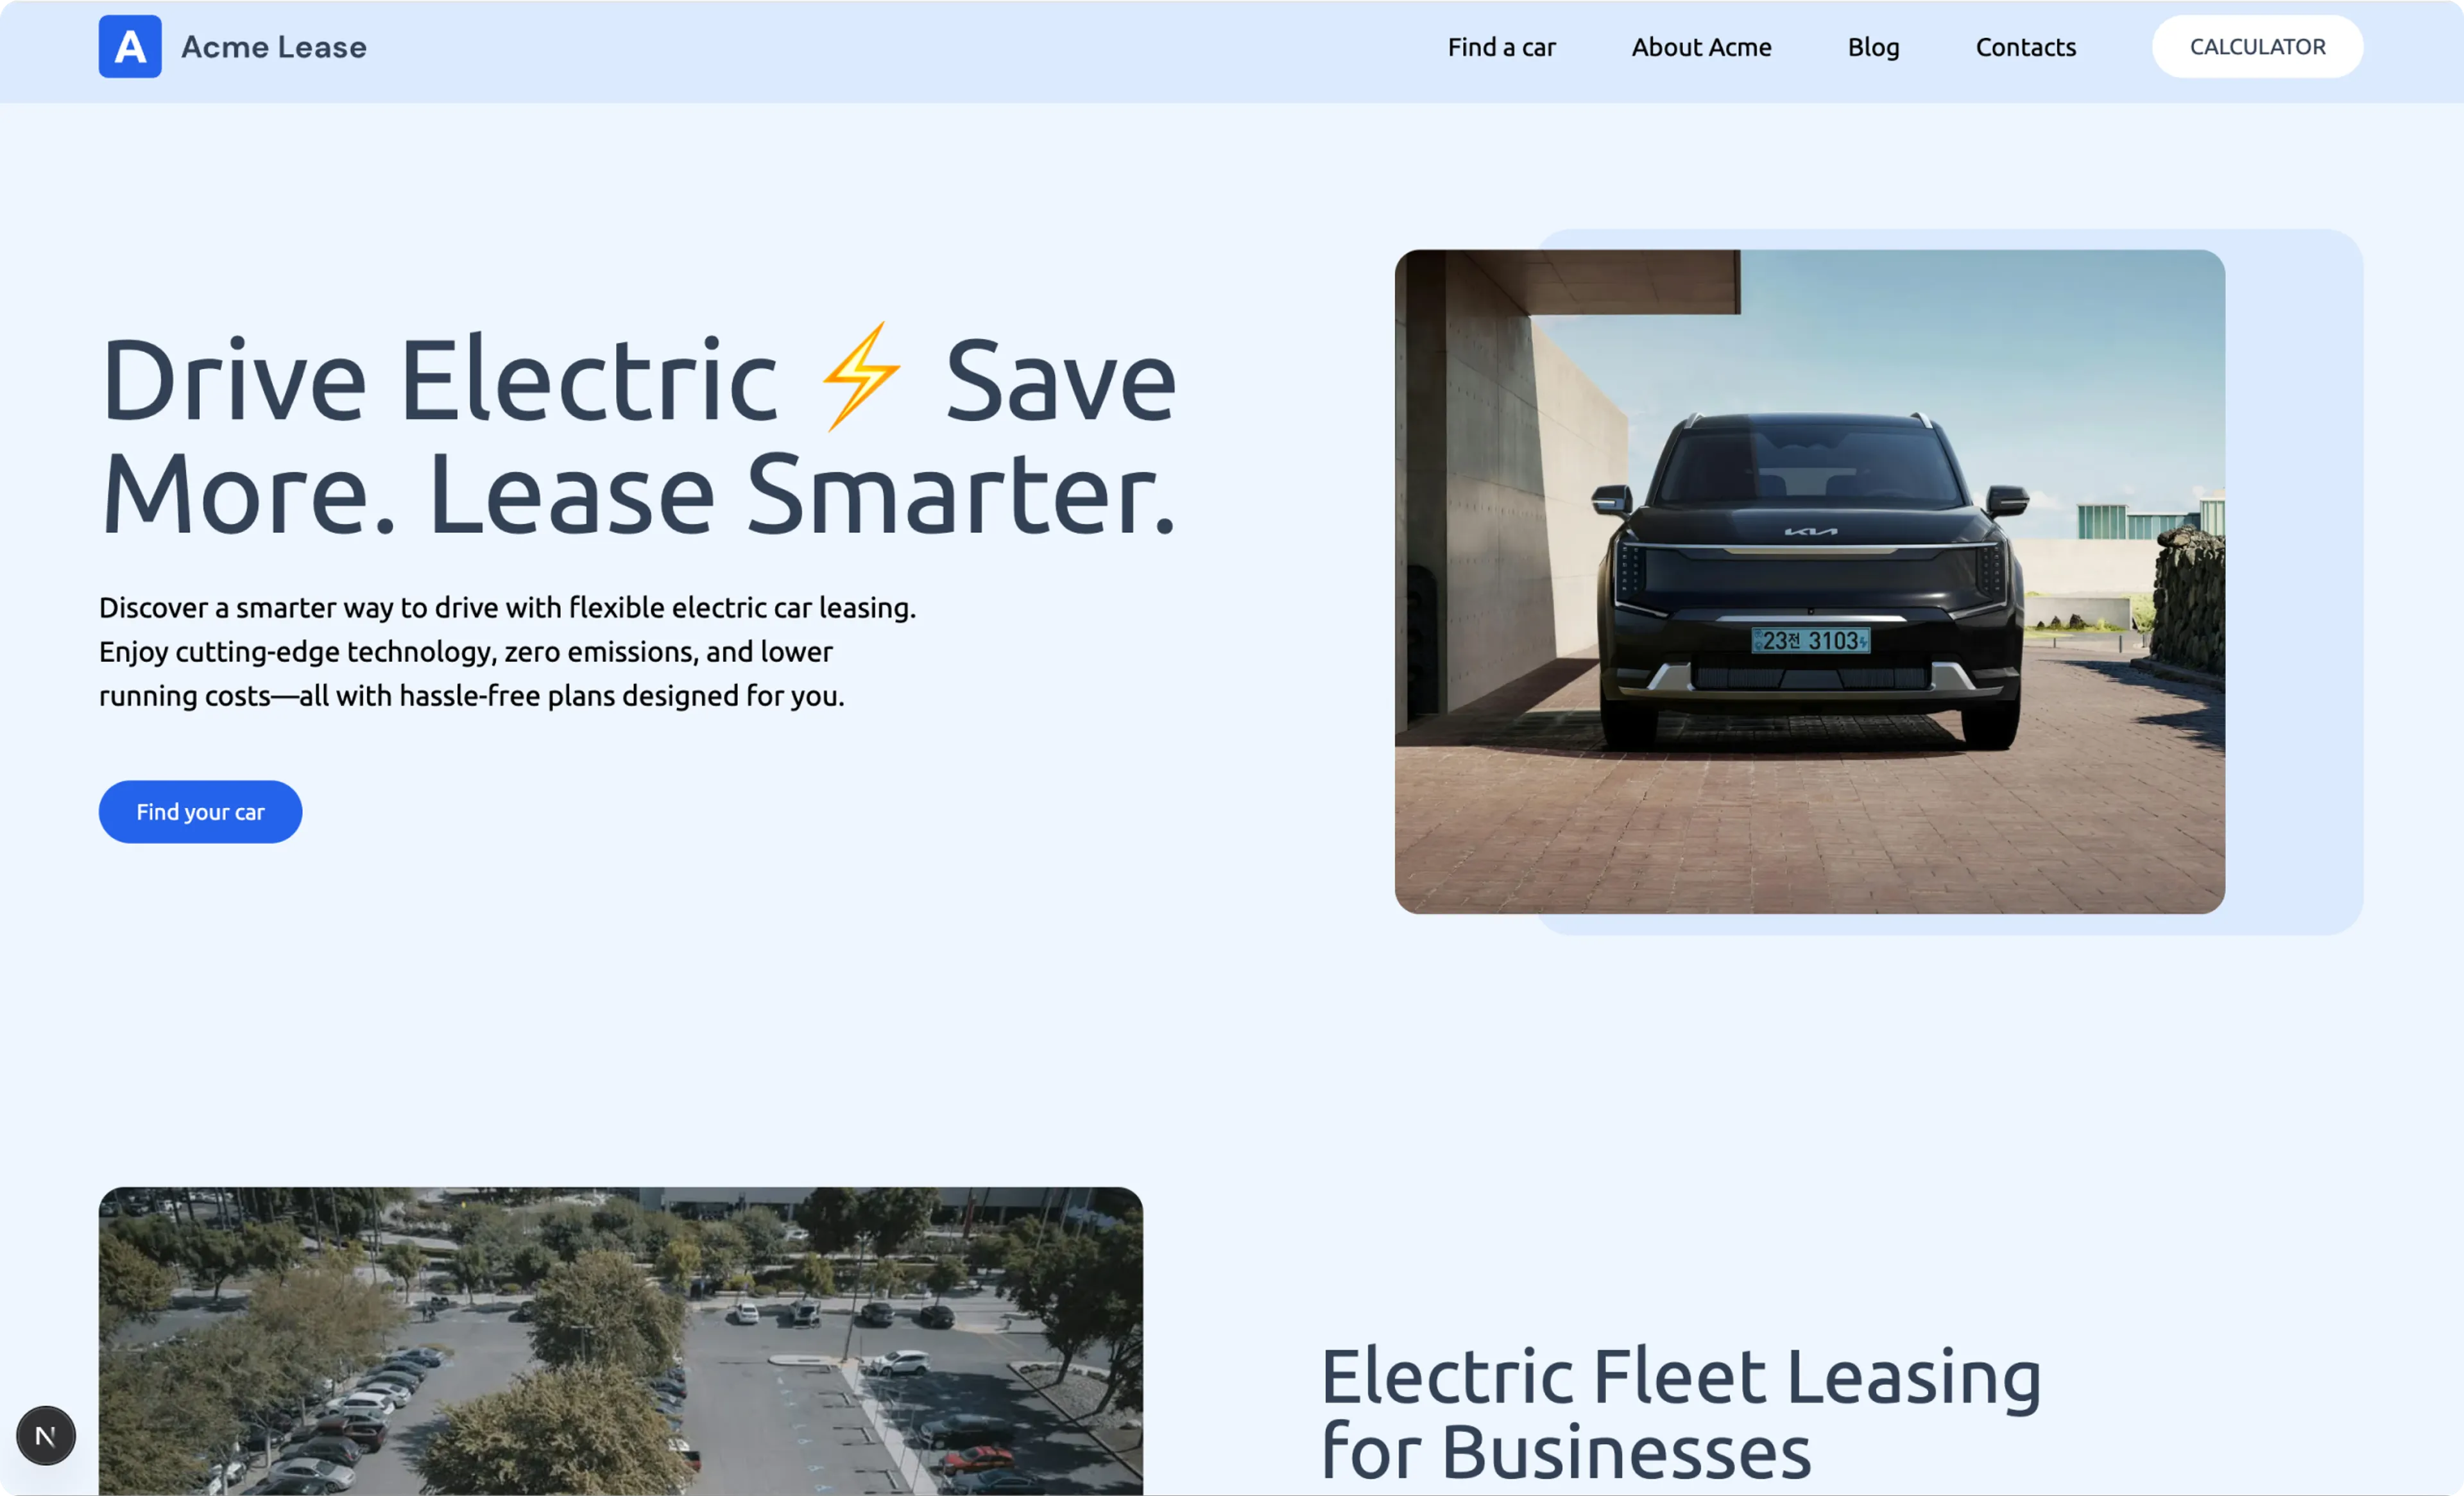
General website visitors
When visitors navigate to the Acme Lease home page, they see a generic page like in the image below.
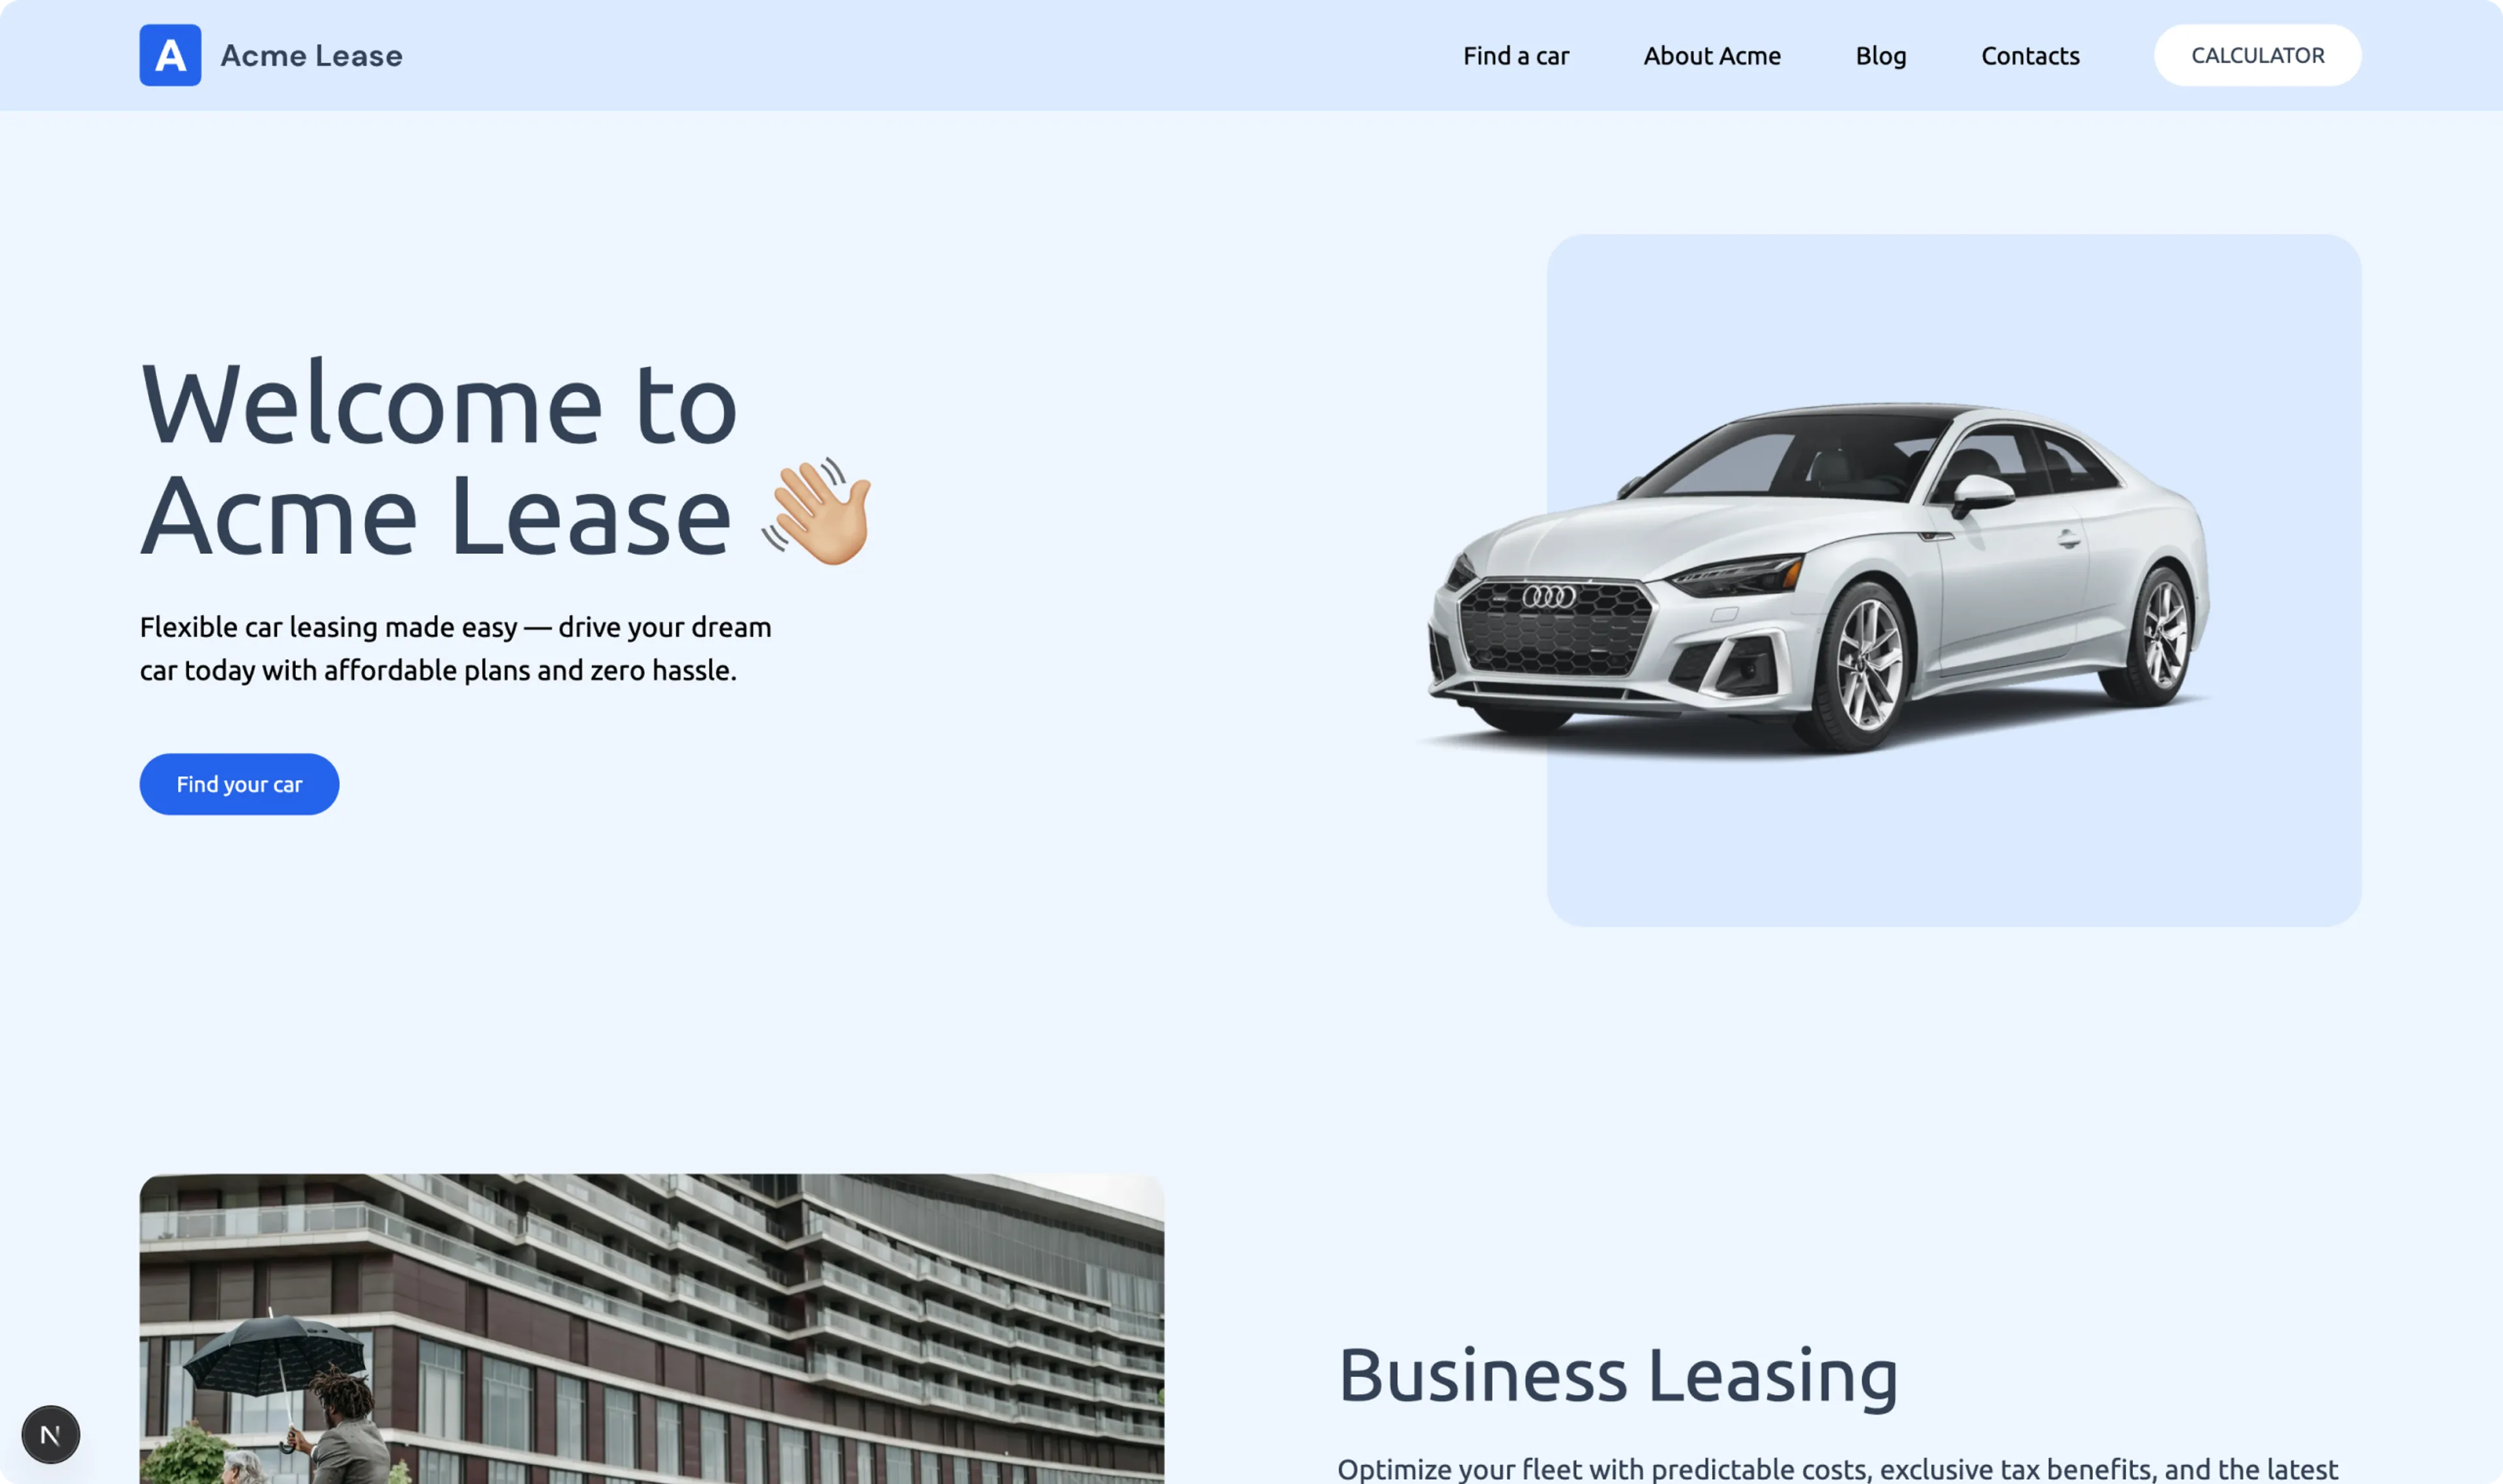
Visitors interested in leasing an electric car
When a potential customer searches for an electric lease car and clicks an Acme Lease ad, they are directed to the electric lease landing page on the Acme Lease website.
If they visit the home page again later, they’ll see content focused on electric lease cars instead of the generic home page above.
For this use case, the front-end application tracks each visitor’s behavior based on their interests. When a visitor views the Electric Lease Landing Page, Prepr places them in the Electric Car Buyers segment.
This is just one way to set up adaptive content. You could also set up adaptive content based on other characteristics such as location or device. You could even add adaptive content based on criteria outside of the web app, for example, when a user visits your web app from a social media link. Check out the Managing segments doc for more details.
Prerequisites
To add adaptive content to your website like in the above example, you need to have the following set up in Prepr:
This guide uses the Acme Lease demo data as an example.
Personalize your website
To personalize your website, you need to complete the following steps:
- Set up segments based on specific visitor interaction on the content. These segments are the groups of visitors for whom you want to deliver a personalized experience.
- Define conversion goals to get deeper insights into how well this experiment works for visitor experience.
- Add an adaptive content element. For each segment, create content specifically aimed at those groups of visitors.
- Manage the adaptive content by updating the adaptive content settings, if necessary.
- Evaluate the adaptive content variants. Prepr collects metrics on the performance of the pages with adaptive content. You can use this data to adjust the content in these pages or the segments’ criteria.
Set up segments
Before adding adaptive content you need to choose different target segments for your web app. Using the Acme Lease demo content example, you can set up a segment for visitors who are interested in leasing electric cars with the following steps.
-
Go to the Segments tab and click the + Add segment link.
-
- Set up the segment conditions. For the Electric Car Buyers segment, the condition is Visitors who
didviewspecific items,Electric Lease Landing Page,at least once,in the last quarter.
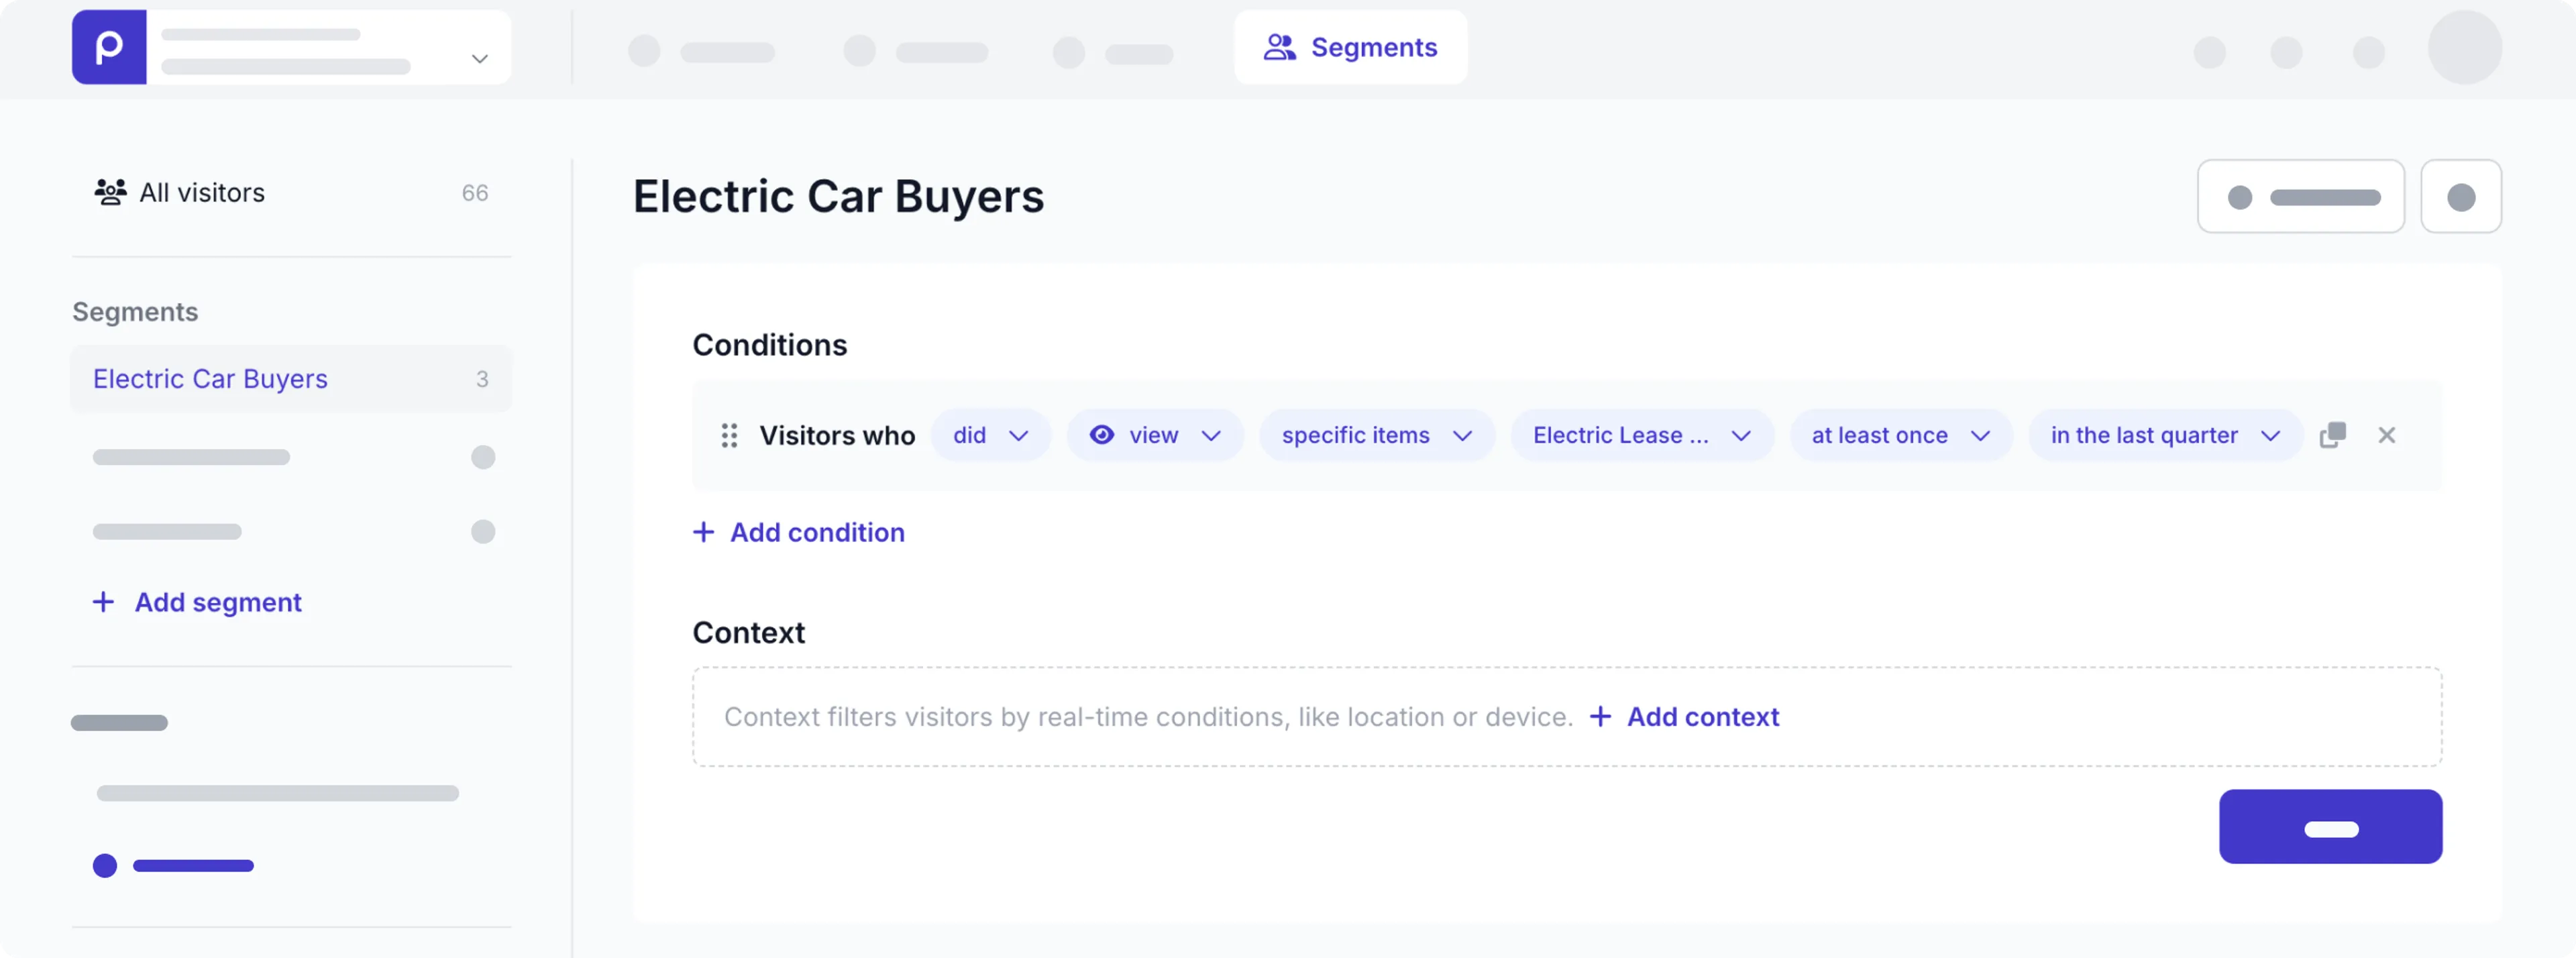
- Set up the segment conditions. For the Electric Car Buyers segment, the condition is Visitors who
-
Click the Save button.
-
In the modal enter the segment Name and the Description for AI. This description provides context when you create personalized variants with AI.
-
Click the Save button.
By completing this step, you’ve grouped your web app visitors based on their viewing behavior. For more options on how to manage segments, check out the segments doc.
Define conversion goals
Once you’ve created a segment, you may want to see the impact of the personalized content on a number events along the visitor journey for these group of visitors. For example: As your primary goal, you want to measure how often visitors who enter the personalization experiment successfully request a quote.

Let’s define the primary goal to request a quote.
-
Go to Segments → Goals.
-
Click the + Add goal link. For the primary goal, set the condition to Visitors who
didviewspecific items,Contact sales,at least oncein the last quarter.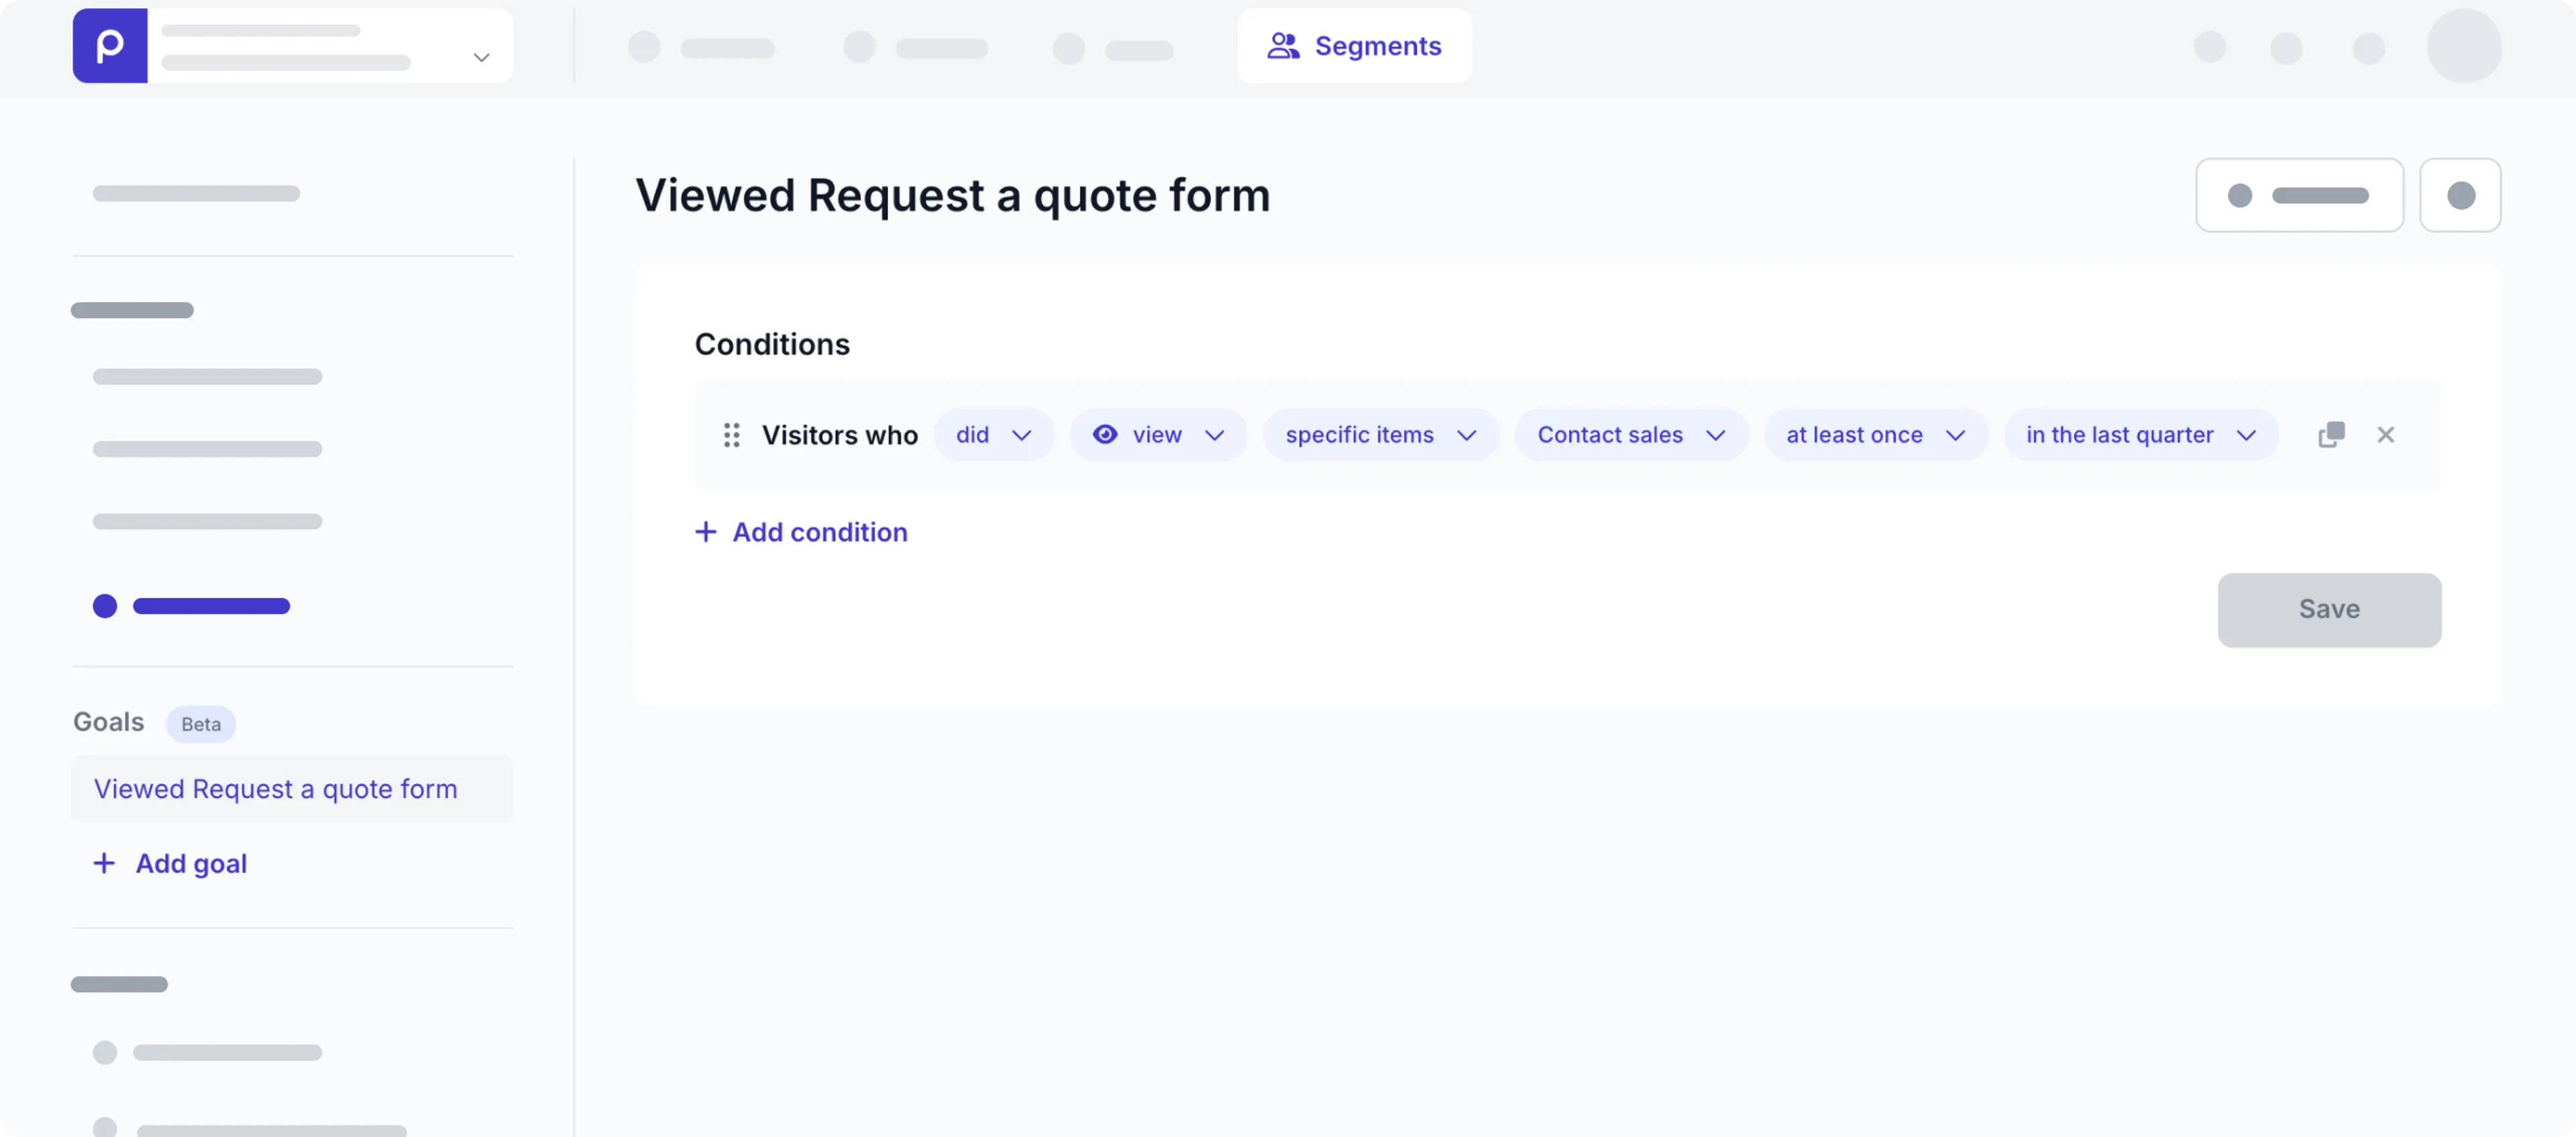
You can set up any combination of conditions in your goals for Events. Combine conditions by using the
ANDorORlogical operators. -
Click the Save button and enter a name like Request a quote.
-
Click the Save button.
Add an adaptive content element
Now that you know for which visitors you want to personalize the experience, it’s time to create specific content for each segment. Navigate to the Content tab, and click to open the content item where you want to add the adaptive content, such as a Homepage.
You can add adaptive content to a content item by either requesting AI suggestions for variants or by adding the personalized variants manually.
Generate AI personalized variants
Before creating AI personalized variants, make sure that you have an environment description and a segment description defined to provide context for the AI requests.
By creating personalized variants with AI, you get multiple suggestions to inspire you to create engaging adaptive content very quickly. Follow the steps below to get these AI suggestions for personalized content based on a segment.

-
Go to the Stack field (in our example it’s called Content) and hover over a specific element to see the available actions.
-
Click the Personalize icon.
If you don’t see the Personalize action when you hover over an element in your content item stack, this means the Adaptive content feature is not enabled for the Stack field. For setup details check out the Stack field settings.
-
Hover over the original element in the Adaptive content box, and click the icon.
-
You can then choose the segment for the variant you want to create. If the segment you want to choose is greyed out, hover over it and click the Add description link to update the Description for AI value in the segment directly. Once done, go back to the browser tab for the content item and retry the action to create the variant with AI.
-
Once the AI suggestions are available, you can either update the suggested values manually or click the icon to get new suggestions for any of the generated fields.
-
When you’re happy with the results, click the Apply button to accept all the suggestions.
Create personalized variants manually
Alternatively, if you want to create the adaptive content manually, follow the steps below.

- Go to the Stack field (in our example it’s called Content) and hover over a specific element to see the available actions.
- Click the Personalize icon. The element is placed in an Adaptive content block and is automatically linked to All other visitors.
If you don’t see the Personalize action when you hover over an element in your content item stack, this means the Adaptive content feature is not enabled for the Stack field. For setup details check out the Stack field settings.
- In the Adaptive content box, hover over the original element and click the icon to duplicate it or Add another adaptive content element.
- Update the text and or images in the duplicated element to match the context of the segment you created in the previous step. Check out the Acme Lease demo Homepage content item for an example.
- Click the Add segment link and choose your segment for the section you adapted.
- You can also drag and drop another content item or component into the adaptive content block. This feature gives you a wide list of options when adapting your content to a specific segment.
Now that you’ve added the adaptive content, you can link the goals from the previous step. To link the goals to your adaptive content, follow the steps below.
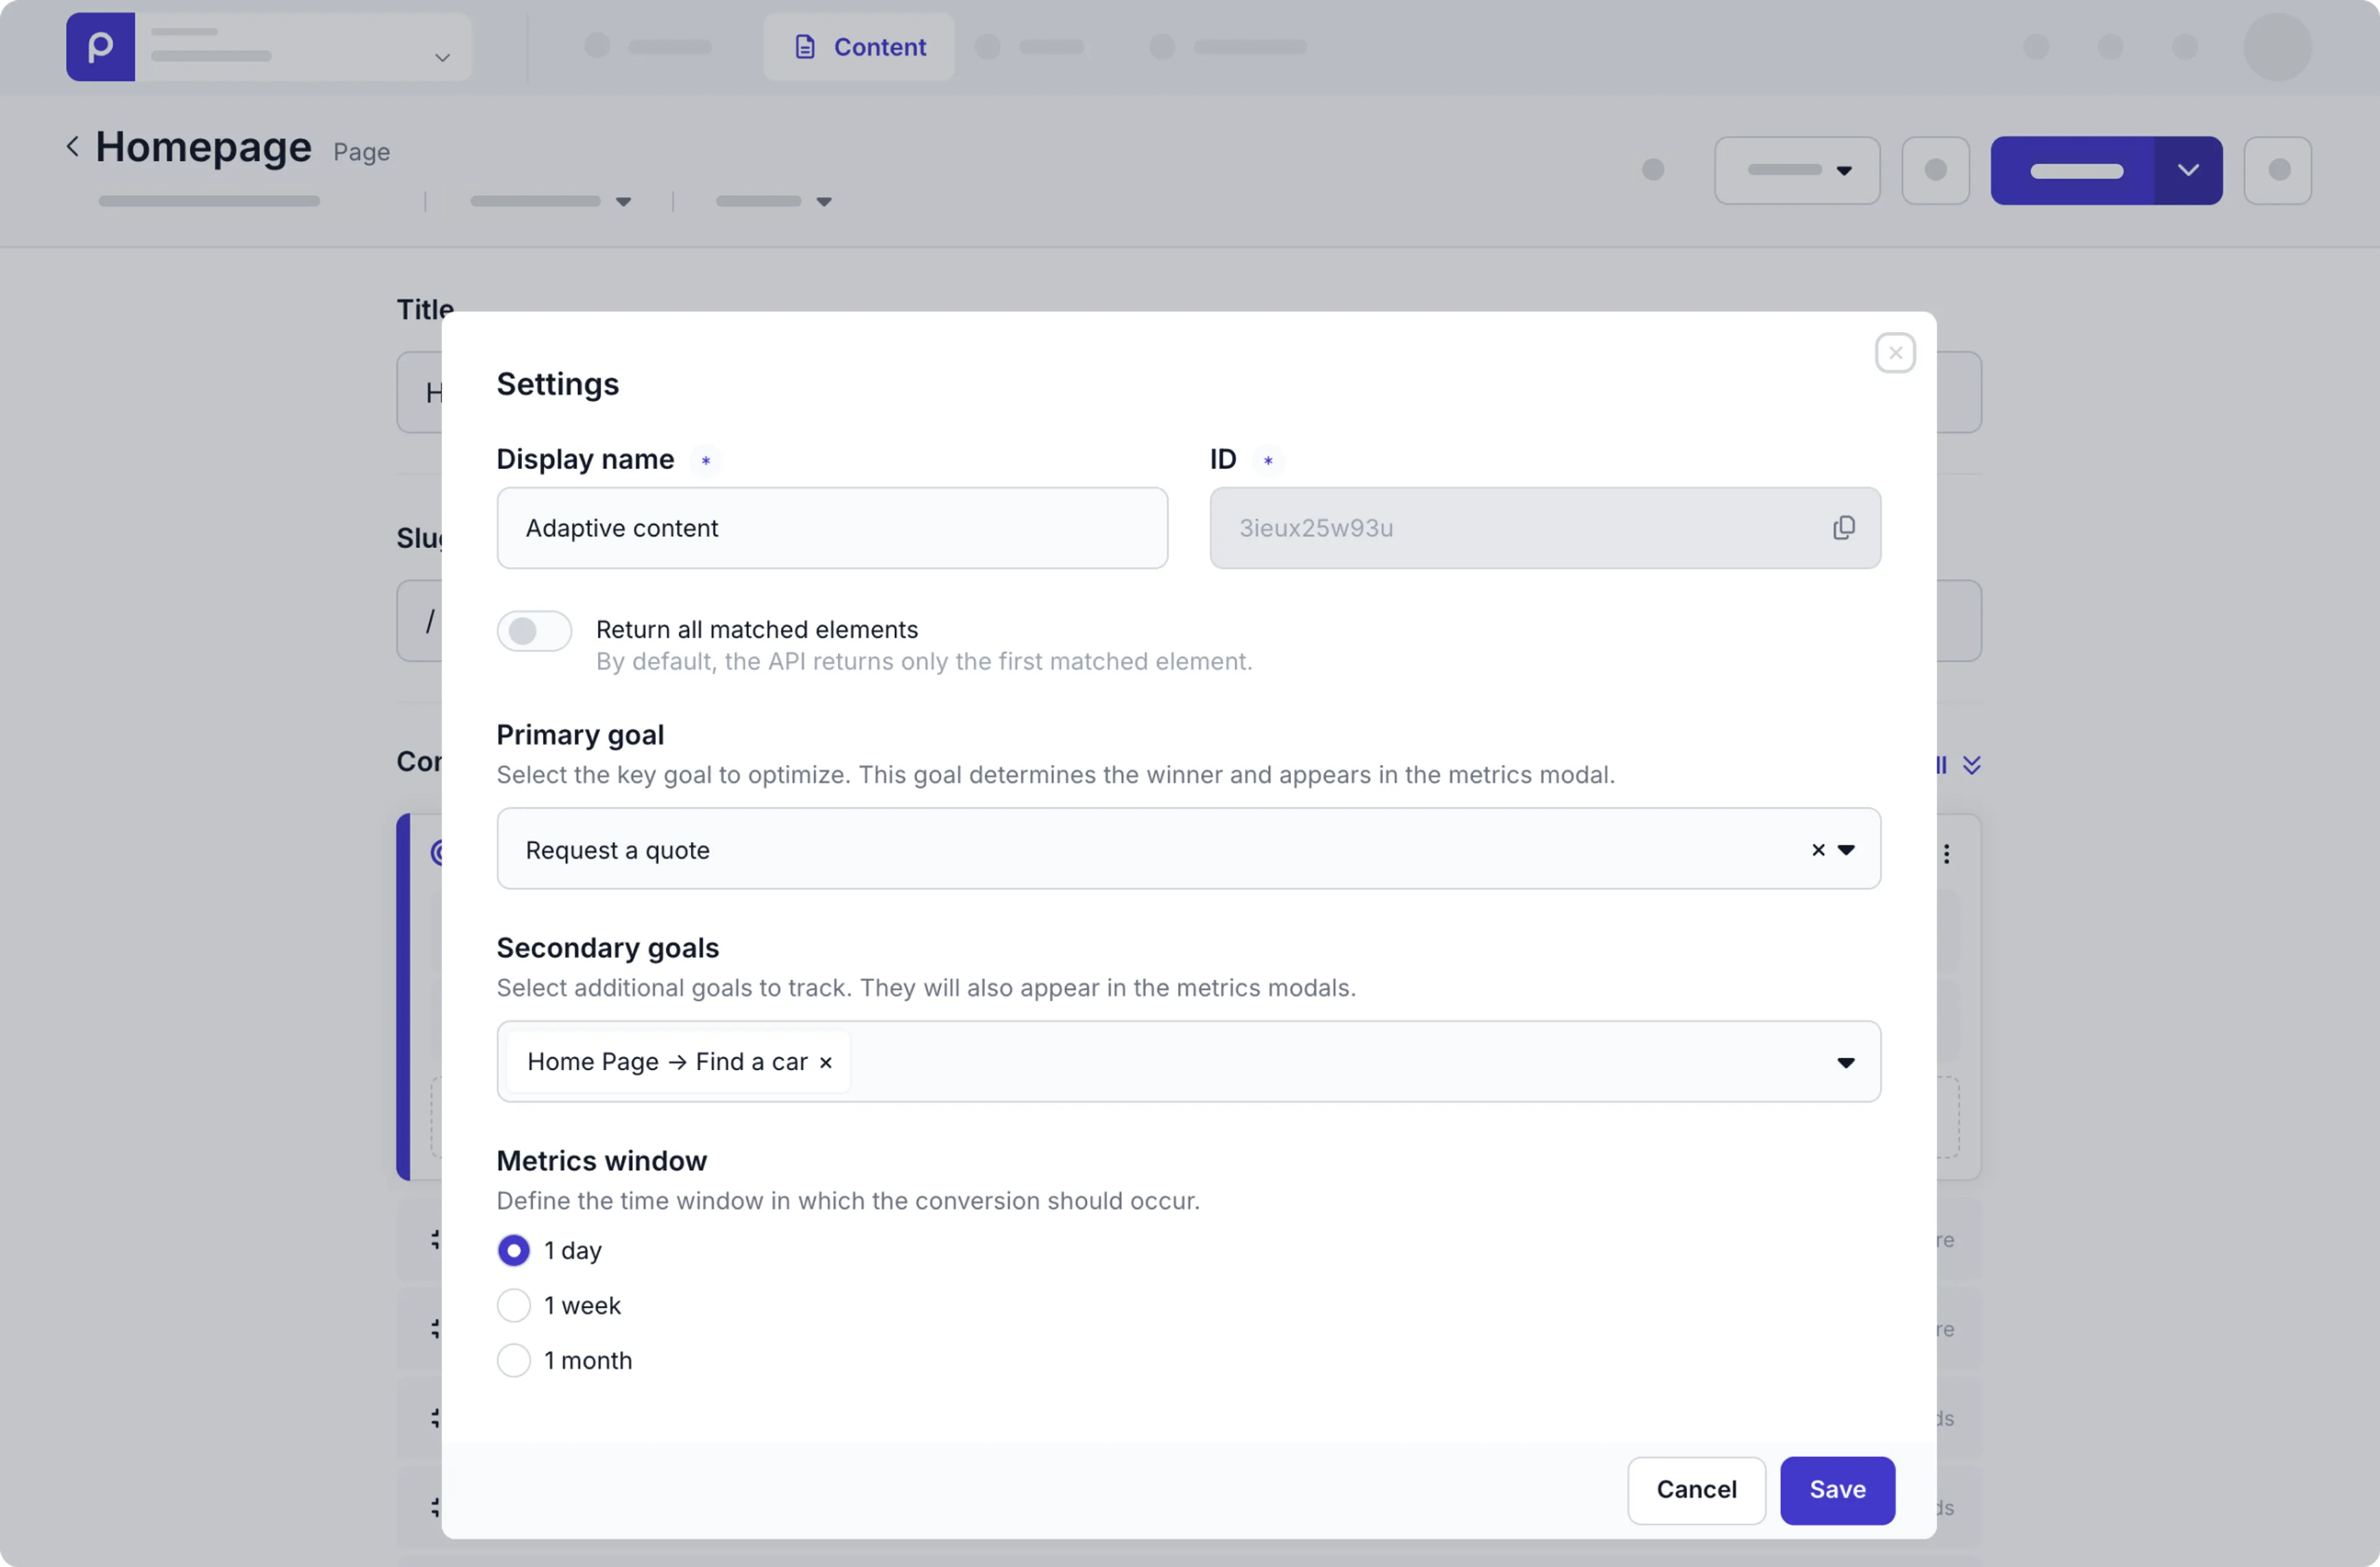
- Click the icon in your adaptive content group and choose the Manage settings option.
- Set the Primary goal value to the Request a quote goal you defined in the previous step.
- Set the Secondary goals value to the Home Page - Find a car goal.
- Keep the default Time window of 1 day to measure the number of visitors who requested a quote within one day of viewing the A/B test content.
At this point, you have successfully added adaptive content.
When you first personalize an element, you won’t see any metrics data initially (Awaiting data) until a developer adds the one-time setup and web app visitors start interacting with your adaptive content.
Manage the adaptive content
You can update settings for your adaptive content, for example, if you want to change the name of the adaptive content group to distinguish it from others in the same content item. Click the icon in your adaptive content group to see the options detailed below.

Manage settings
Go to Manage settings to change the name of the adaptive content group, to indicate your primary and secondary goals with their constraints for this experiment, and to define the query behavior: show all matched elements instead of just the first matched element in the web app.
Reset data
After some time, your live adaptive content will accumulate some data and these give you insights into how the variants perform against each other. It’s possible that from these insights you want to make adjustments to the variants and re-evaluate the adjusted variants instead of creating new adaptive content. In this case you can reset the metrics data. When you do this Prepr starts tracking and collecting data from scratch as if it’s new adaptive content.
Note that if you reset the metrics data, you can no longer view the previously tracked metrics.
Remove adaptive content
You can also remove the adaptive content element at any time by clicking the Remove adaptive content option. If you choose to do this, all variants will be available as separate elements in the Stack field and it’s up to you to decide if you want to keep all, or delete some or all of them.
Evaluate the personalized variants
After a developer has done the one-time setup for Personalization and the adaptive content has been active for some time, you’ll see some metrics data.
Click the Metrics link to open the Metrics modal. If your personalization has been running for a while, you should see some significant results like in the image below:
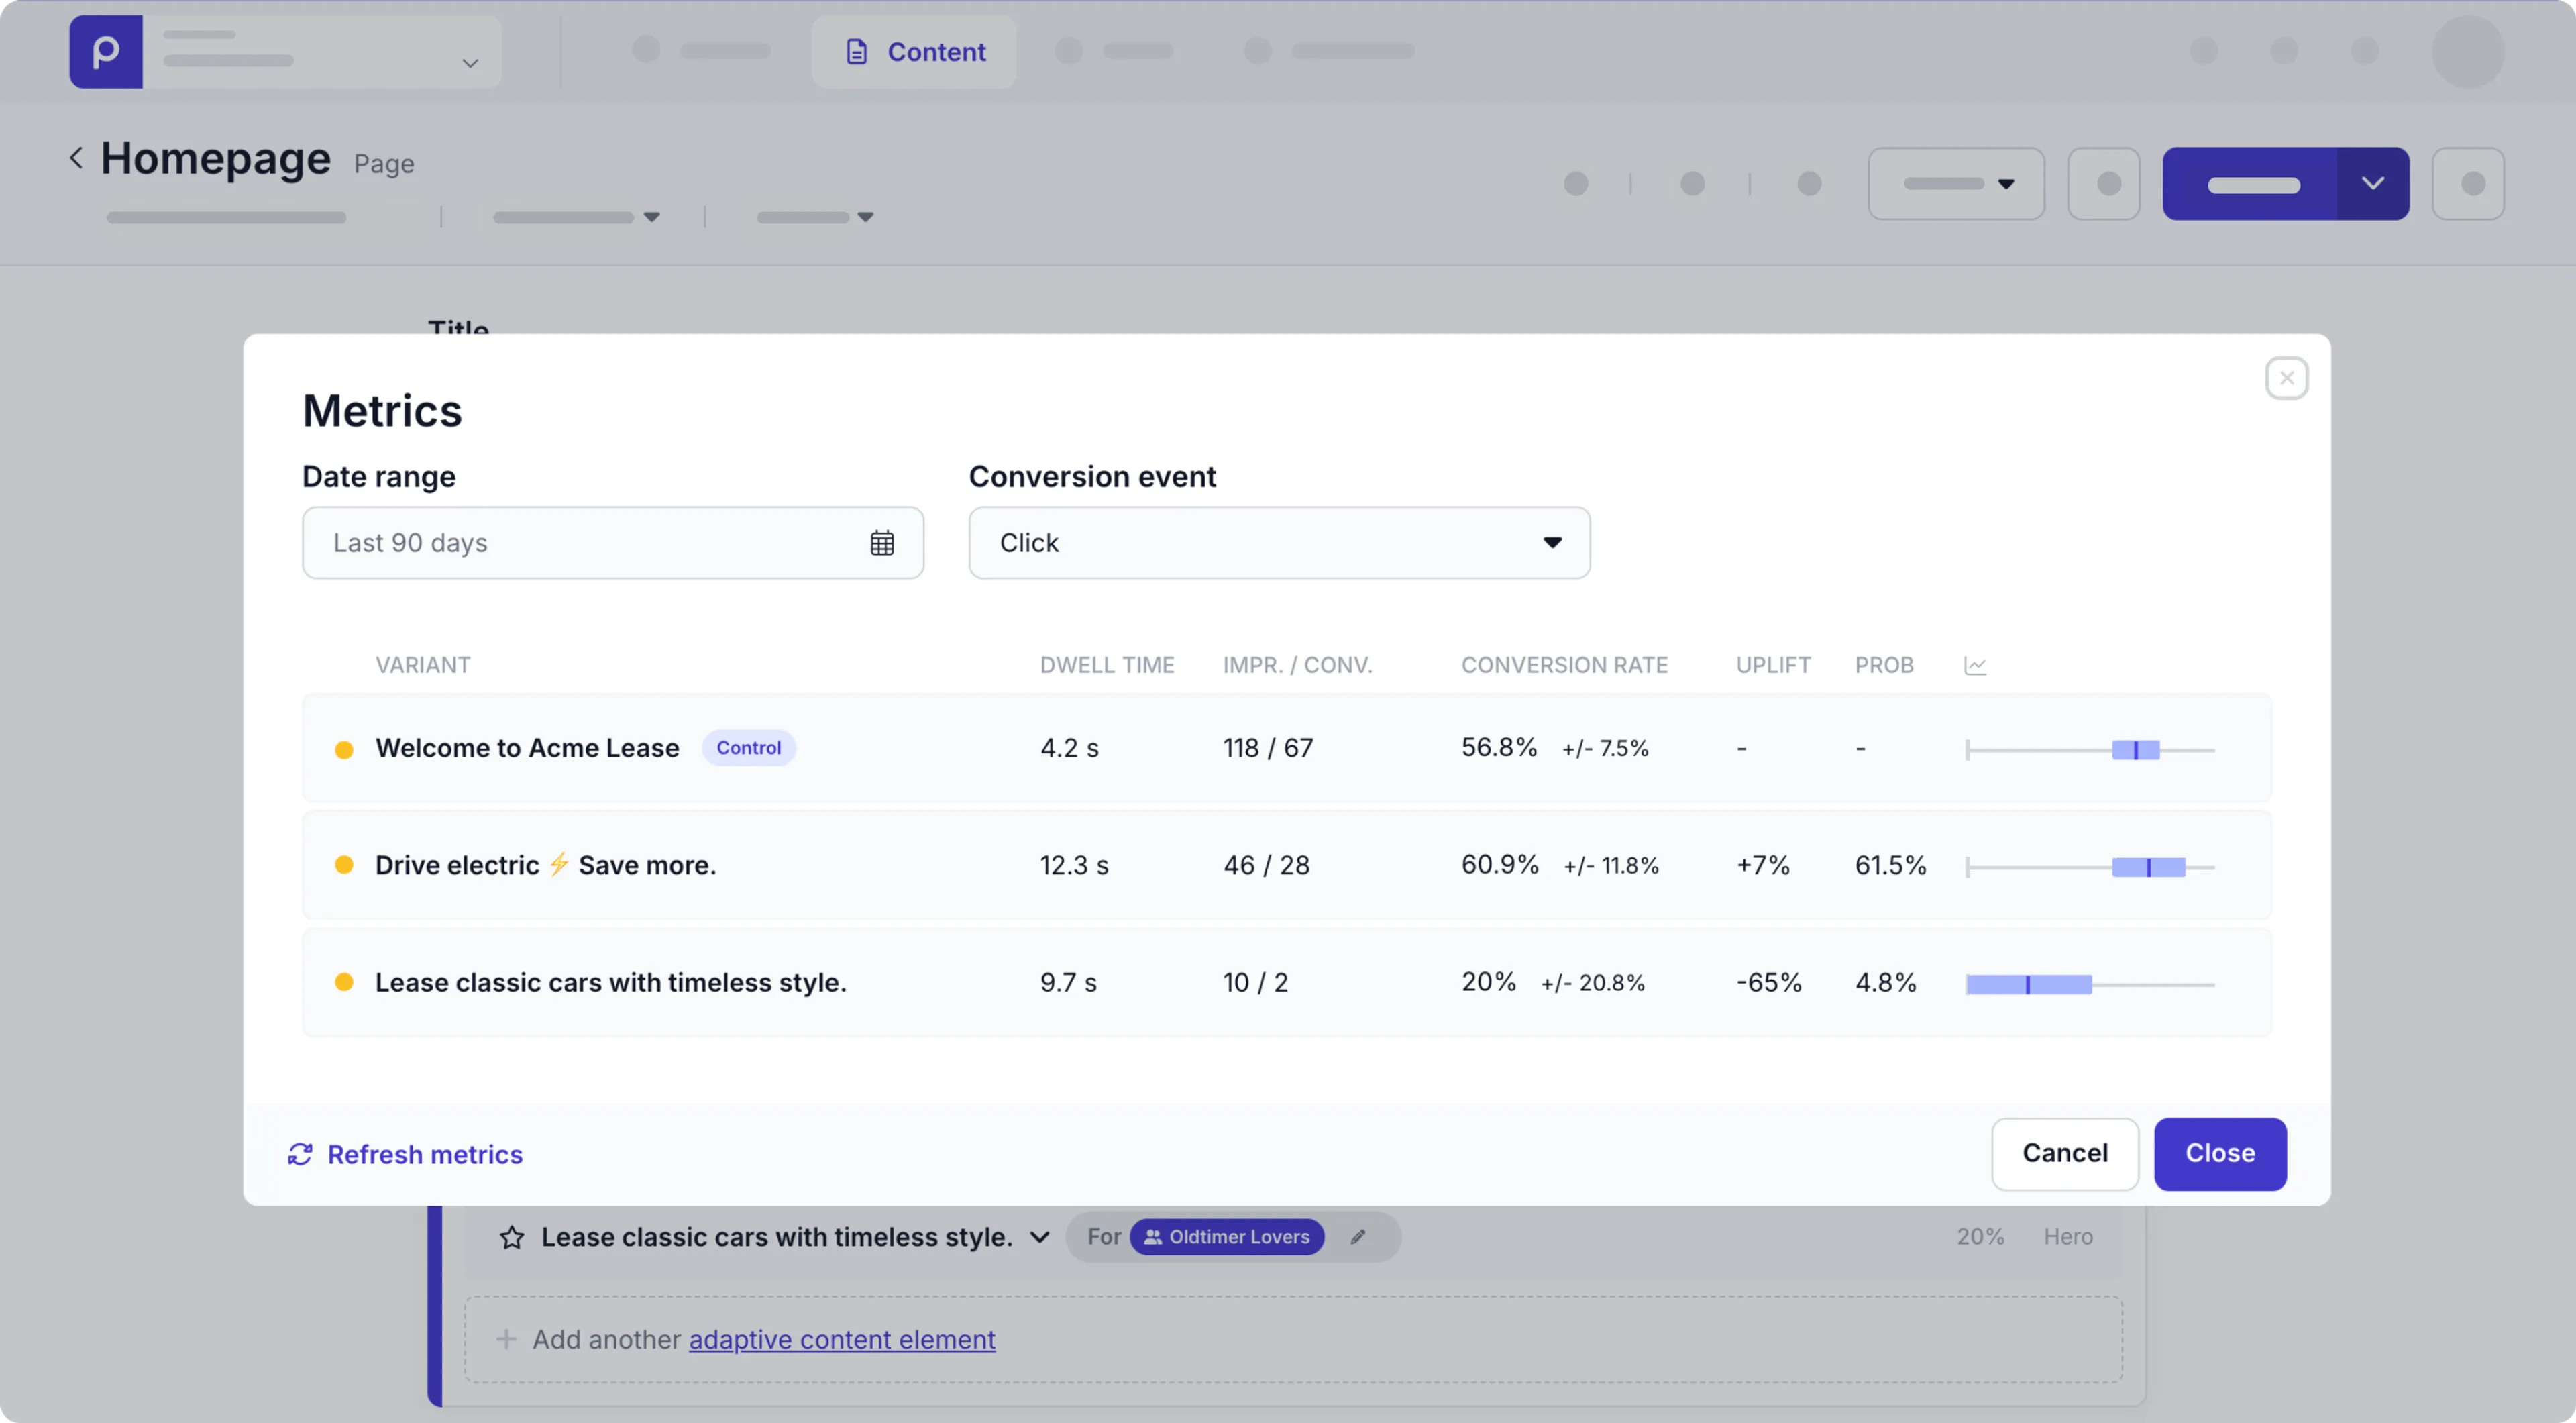
The metrics data can be filtered by a Date range (Maximum 90 days, defaulted to the start of the experiment). You can also choose to view the metrics data by a specific Conversion event. The color marker at the beginning of each variant indicates if the metrics are significant (green) or not (orange). Whether the metrics are significant is based on the probability and a minimum sample size.
See the list below for the metrics available in Prepr.
- Dwell time - The average amount of time in seconds that visitors view this element.
- Impressions (IMPR) - These are the number of times that the element is viewed by visitors. The developer sets this element during the Personalization setup.
- Conversions (CONV) - The number of times that a desired action is performed on the element by visitors, such as a click. The developer sets this element during the Personalization setup.
- Conversion rate - A percentage based on the conversions and the impressions. It is calculated as
(Impressions/Conversions)×100. - Standard deviation - You’ll notice a +/- percentage value next to the conversion rate. This value tells you how much the conversion rates vary from the mean.
- Uplift - The increase in the conversion rate for the variant compared to the Control (The variant for all other visitors). It is calculated as: (Conversion Rate (variant) − Conversion Rate (control)) / Conversion Rate (control) × 100
- Probability (PROB) - This is the probability that this variant will outperform the control.
Congratulations, you have successfully personalized your website.
Other use cases
This guide explains just one use case for personalization. Below we list a few more common options.
Segments from external CRM/CDP systems
It’s possible to personalize Prepr content based on segments maintained in other CDP/CRM systems. In this case, you need to reference these external segments from within Prepr using the segment unique identifier from that system.
Your personalization flow will look like this:
-
Create a new segment in Prepr and set the ID value to the segment unique identifier copied from your CRM/CDP system.
-
The developer then retrieves adaptive content using the API with one difference — they pass the
Prepr-Segmentsheader instead of thePrepr-Customer-Id.
Call-to-actions
Personalizing call-to-actions can significantly increase conversion rates. Offer each segment the call-to-action that fits best. For example, show a relevant whitepaper to first-time visitors and offer a demo to returning visitors.
Categories
Do you have content or products in different categories? Capture which categories your visitors view and display them on the homepage on their next visit.
Want to learn more?
Check out the following guides:
Schedule a free consultation
Do you want to get started with personalization but still have questions or want a demo?
Schedule a free call with a Prepr solution engineer.