Typesense
This integration allows you to use the Typesense search engine for an optimized search experience on Prepr content in your web app.
The Typesense integration is available as a paid option on top of your regular subscription. Please contact our Sales team for more details.
Introduction
Prepr supports integration with Typesense, an open source, typo tolerant search engine. It enables your Prepr content items to be indexed using the Typesense algorithm, maximizing the search speed and content discovery in your web app.
Integrating Typesense with Prepr content
Get the API credentials from your Typesense app
To connect Prepr to Typesense, you need a valid API key to create Typesense collections and index documents in collections. Typesense uses these credentials to identify your Prepr application and control access to the Typesense API.
There are two options to install Typesense, either with Typesense Cloud or Self-hosting . If you choose to do self-hosting, make sure the host is public for Prepr to have access.
Once Typesense is installed, generate the API key according to the instructions in the Typesense installation docs. You’ll need the Admin API key, Host, Protocol and Port when setting up the Typesense integration in Prepr.
Connect Prepr to Typesense
Now that you have the required credentials, you can set up the Typesense integration in Prepr as follows:
- Click the icon and choose the Integrations option. Go to the Typesense card and click the Activate button.
If you do not have access to the Typesense yet, click Request activation to contact our Sales team.
-
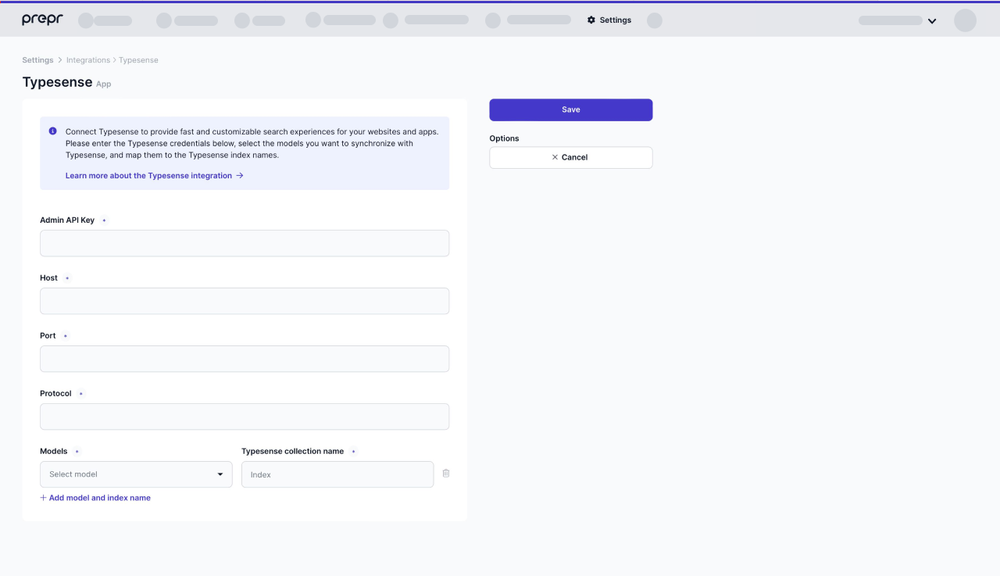
In the Typesense app page, enter your Typesense credentials from the previous step.
-
Select the models you want to sync to Typesense and map them to each Typesense collection. You can specify the existing collections you already have in your Typesense app, or you can provide new names from within Prepr. In the latter case, the collections with the relevant names will be created automatically once the data is synced to Typesense. Read more about the Typesense collections .
-
Click Save to confirm the settings.
That’s it. You’ve connected Prepr to Typesense. From now on, Prepr will automatically keep syncing your content items to Typesense for indexing.
When a new content item is published, a new document is added to the related collection in Typesense. Any changes to the published content item result in updating the corresponding Typesense document. Once the content item is unpublished, the Typesense document will be deleted.
So you can be sure your data is always-in-sync, and that the most up-to-date content is available to your web app visitors.
Changes to the Schema, in other words, the content item structure won’t be synced to Typesense automatically. In this case, you must run the sync manually. Please read the section below on how to sync schema updates to Typesense.
Indexed field types
Before sending your content item data to Typesense, Prepr automatically transforms it into a JSON format that Typesense recognizes. Once data is prepared and synced, the corresponding documents are added to the Typesense collection you specified above.
The following table shows indexed Prepr field types and the corresponding Typesense field types .
| Prepr field types | Typesense field types | Additional info |
|---|---|---|
| Text | string | |
| Boolean | bool | |
| Float | float | |
| Integer | int32, int64 | |
| Dynamic content | String | All text fields in the Dynamic content field will be merged into a single string. |
| Content reference | String array | It only includes the title of the referenced content item/s. |
| Asset | JSON object | It contains the Optimized URL for each asset. |
| Tag | String | Multiple tags are merged into a single comma-separated string. |
| Stack | String | Content elements in a stack field are separated into additional Typesense records, and the content will be flattened, with each property/element prefixed by _body. |
| Date and time | int64 | Only single Date or DateTime values are supported. These are converted to Unix timestamps . |
| Location | geopoint[] | All location fields are combined and formatted as an array of objects for Typesense geopoint[] field. Data will be stored in _geoloc. |
Configure your Typesense setup
The sections below show you how to set up your Typesense configuration for Prepr. This configuration improves search results in your web app, enhances ranking, supports searches for related content and a multi-language environment. Some of the steps below require you to configure facet fields in Typesense.
Facet fields
When syncing content to Typesense, Typesense uses facet fields to filter or group search results easily.
They make it simpler for Typesense to refine large datasets by breaking them down into meaningful categories.
For more details, see the Typesense docs on facet fields.
Enable auto-schema detection
You need to set up the .* wildcard as an auto field type to enable auto-schema detection.
This ensures that any unspecified fields in your documents are automatically detected and typed correctly.
This step is essential for handling dynamic document structures in your Prepr schema.
To enable auto-schema detection, add the followings fields to your schema:
{
    "name": "YOUR_COLLECTION_NAME",
    "fields": [
        {
            "name": ".*",
            "type": "auto"
        }
    ]
}
Enable search on related content items
Include the associateIDs field as a facet field in your Typesense schema for related content items.
This field is used to identify relationships between content items in Prepr.
If a related content item is updated in Prepr, the corresponding record in Typesense can also be updated seamlessly.
In this case, add the following fields to your schema:
{
    "name": "YOUR_COLLECTION_NAME",
    "fields": [
        {
            "name": "associateIDs",
            "type": "string[]",
            "facet": true
        }
    ]
}
Group related records to avoid duplicate results
Set up the distinctID field as a facet field to group related records, ensuring that search results only show unique entries.
This avoids duplicate results for content with similar attributes.
Add or verify the presence of the field in your schema like in the JSON below:
{
    "name": "YOUR_COLLECTION_NAME",
    "fields": [
        {
            "name": "distinctID",
            "type": "string",
            "facet": true
        }
    ]
}
Enable language code support
If you have localized content in Prepr, then it’s important to enable the language code support to get accurate search results.
Configure the locale field as a facet field to allow for locale-based filtering in your search results like in the JSON below.
{
    "name": "YOUR_COLLECTION_NAME",
    "fields": [
        {
            "name": "locale",
            "type": "string",
            "facet": true
        }
    ]
}
(optional) Geosearch support
If you’re using coordinate fields in Prepr and want to enable geosearch in Typesense, you need to add a _geoloc field with type geopoint[] in your collection schema. This allows Typesense to sort or filter records based on proximity.
{
    "name": "YOUR_COLLECTION_NAME",
    "fields": [
        {
            "name": "_geoloc",
            "type": "geopoint[]",
            "facet": true
        }
    ]
}
Using geosearch with existing schemas:
If you want to enable geosearch in an existing Typesense collection, you’ll need to update the schema to include the _geoloc field.
Use this example to quickly update your Typesense collection schema:
{
    "fields": [
        {
          "name": "_geoloc",
          "type": "geopoint[]",
          "optional": true,
          "facet": true
        }
    ]
}
Example configuration
Collection configuration
To use the schema configuration example below, replace the name value YOUR_COLLECTION_NAME with the name of your Typesense collection or Prepr model, such as Article, Blogpost, or Product.
{
    "name": "YOUR_COLLECTION_NAME",
    "fields": [
        {
            "name": ".*",
            "type": "auto"
        },
        {
            "name": "associateIDs",
            "type": "string[]",
            "facet": true
        },
        {
            "name": "locale",
            "type": "string",
            "facet": true
        },
        {
            "name": "distinctID",
            "type": "string",
            "facet": true
        }

        // OPTIONAL, for geosearch
        {
          "name": "_geoloc",
          "type": "geopoint[]",
          "facet": true
        }
    ]
}
Search configuration
Check out a complete example of a Typesense search configuration below.
{
    "q": "search term",
    "query_by": "_body*,title,work_title",
    "facet_by": "locale",
    "filter_by": "locale:=en-US",
    "sort_by": "_level:asc,_text_match:desc",
    "distinct_by": "distinctID"
}| Parameter | Value | Purpose |
|---|---|---|
| query_by | _body* | Includes fields with the _body prefix in searches. In other words, it enables searching within the main content of your documents, including any nested fields. And it ensures user queries match both parent and nested content. |
| facet_by | locale | Allows you to group and filter results by language. For example, when you add the parameter filter_by: locale:=en-US, it includes searches on content in US English. |
| sort_by | _level:asc | It allows the _level field to be sorted. The sort results are by content hierarchy, ensuring that higher-level (less nested) content appears first. |
| sort_by | _text_match:desc | In this example, it’s the secondary sort criteria. It ensures that, within the same hierarchy level, results with the best text match are prioritized. |
| distinct_by | distinctID | It prevents duplicate results by grouping records that represent the same logical content, such as different translations or versions. |
You can configure multiple sorts for the sort_by parameter by comma-separating each sort like in the above example. The priority of each sort matches the order that they are listed in the value. The first sort is the primary sort and the second sort is the secondary sort, etc.
Connect your front end to Typesense
Now that your Prepr data is indexed with Typesense, you’re ready to implement Typesense in your web app.
Follow the Typesense instructions to install a client for your programming language. After setting up the client, you can initialize and connect it to Typesense .
For examples on how to search records in your collections, check out the Searching for books doc.
Also, check out how to build a search UI with Typesense .
Well done! You’ve reached the last step to enable the Typesense integration with Prepr content. After some time in production, you’ll have content in Prepr and might make some changes to the Prepr schema. In that case, check out the next step to learn how to sync existing content and schema updates.
Sync existing content and schema updates to Typesense
The steps above allow you to index all new content created after enabling the Typesense integration. If you need to index any content you already have, or after a schema update, you need to run the sync action manually.
To sync content items to Typesense manually, you must call the given Prepr endpoint and specify a model ID, which you can find under Schema → Model → → Copy Model ID.
Content items will be synced in batches, the overall time depends on the number of content items you have.
The following API request will sync content items to Typesense:
GET: https://mutation.prepr.io/publications/typesense/sync{
"model": {
"id": "YOUR_MODEL_ID"
}
}Make sure to create an access token with the REST API scopes content_items and content_items_publish and bind a user to this token under → Access tokens.
Please note that access tokens with write permissions must not be visible client-side. Read more in the Mutation API Authorization doc.
If you have any questions, please contact our Support team .