Setting up recommendations
Estimated duration: 15-30 minutes
Introduction
Prepr allows you to add recommendations to your web application quickly. This tutorial demonstrates how to deliver recommendations using the Prepr GraphQL API. Follow the step-by-step guide below.
Use case
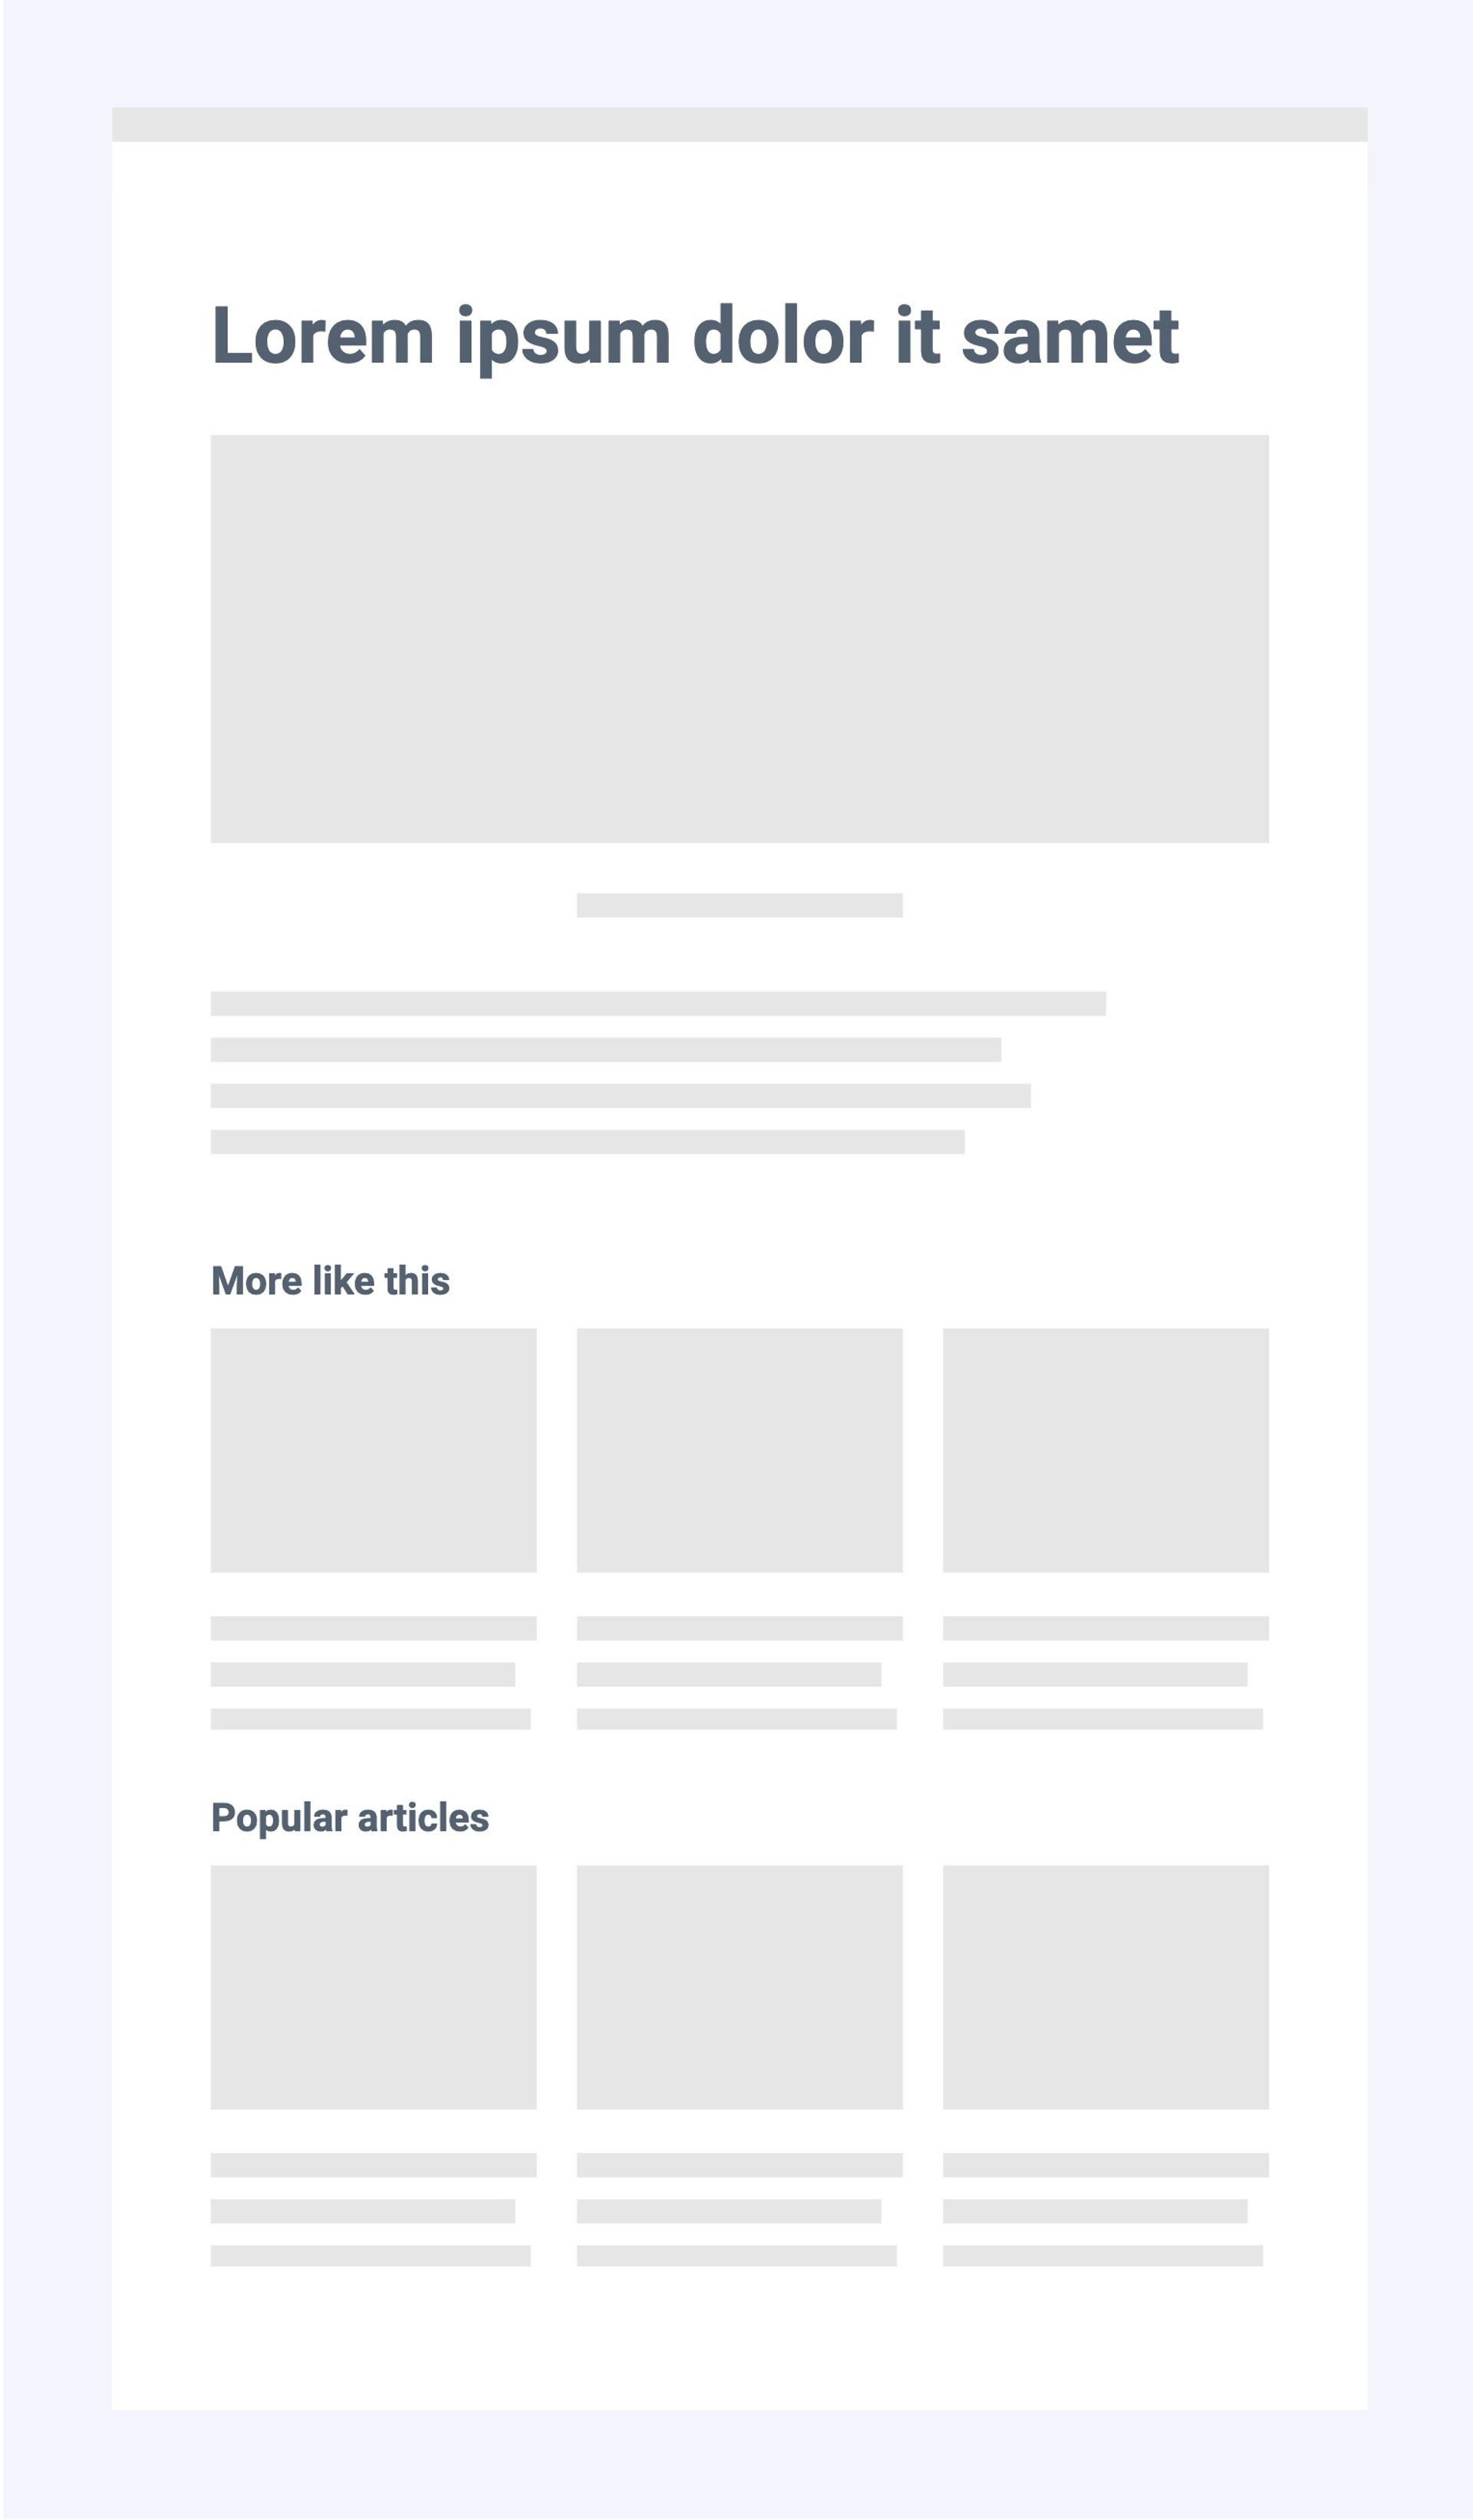
Deliver highly relevant content recommendations to the visitors of your websites and apps using the GraphQL API to increase engagement. Let’s examine an everyday use case: an article that you want to show recommendations for.

Recommendations are usually displayed below an article to entice visitors to view more content. With Prepr, you can display three types of recommendations:
- Similar items
- People also viewed items
- Popular items
Similar items
Similar items are recommendations similar to the article the visitor is currently viewing. Because it’s on the same topic, or because it’s by the same author, or maybe it’s approximately the same length.
With this recommendation type, the algorithm looks at the characteristics of the article (content, meta-data, links to other articles, etc.) and determines what the most relevant related articles are based on a score.
People also viewed items
People also viewed items are items that other visitors also viewed along with the item that a visitor is currently viewing. The algorithm looks at the current item and determines the visitors that viewed this item. It then lists the other items that these visitors also viewed.
Popular items
Popular items, the name says it all, are the most viewed items. The algorithm looks at how often an item has been viewed for this recommendation type. You could say this is not a recommendation but sorting by popularity.
Content structure
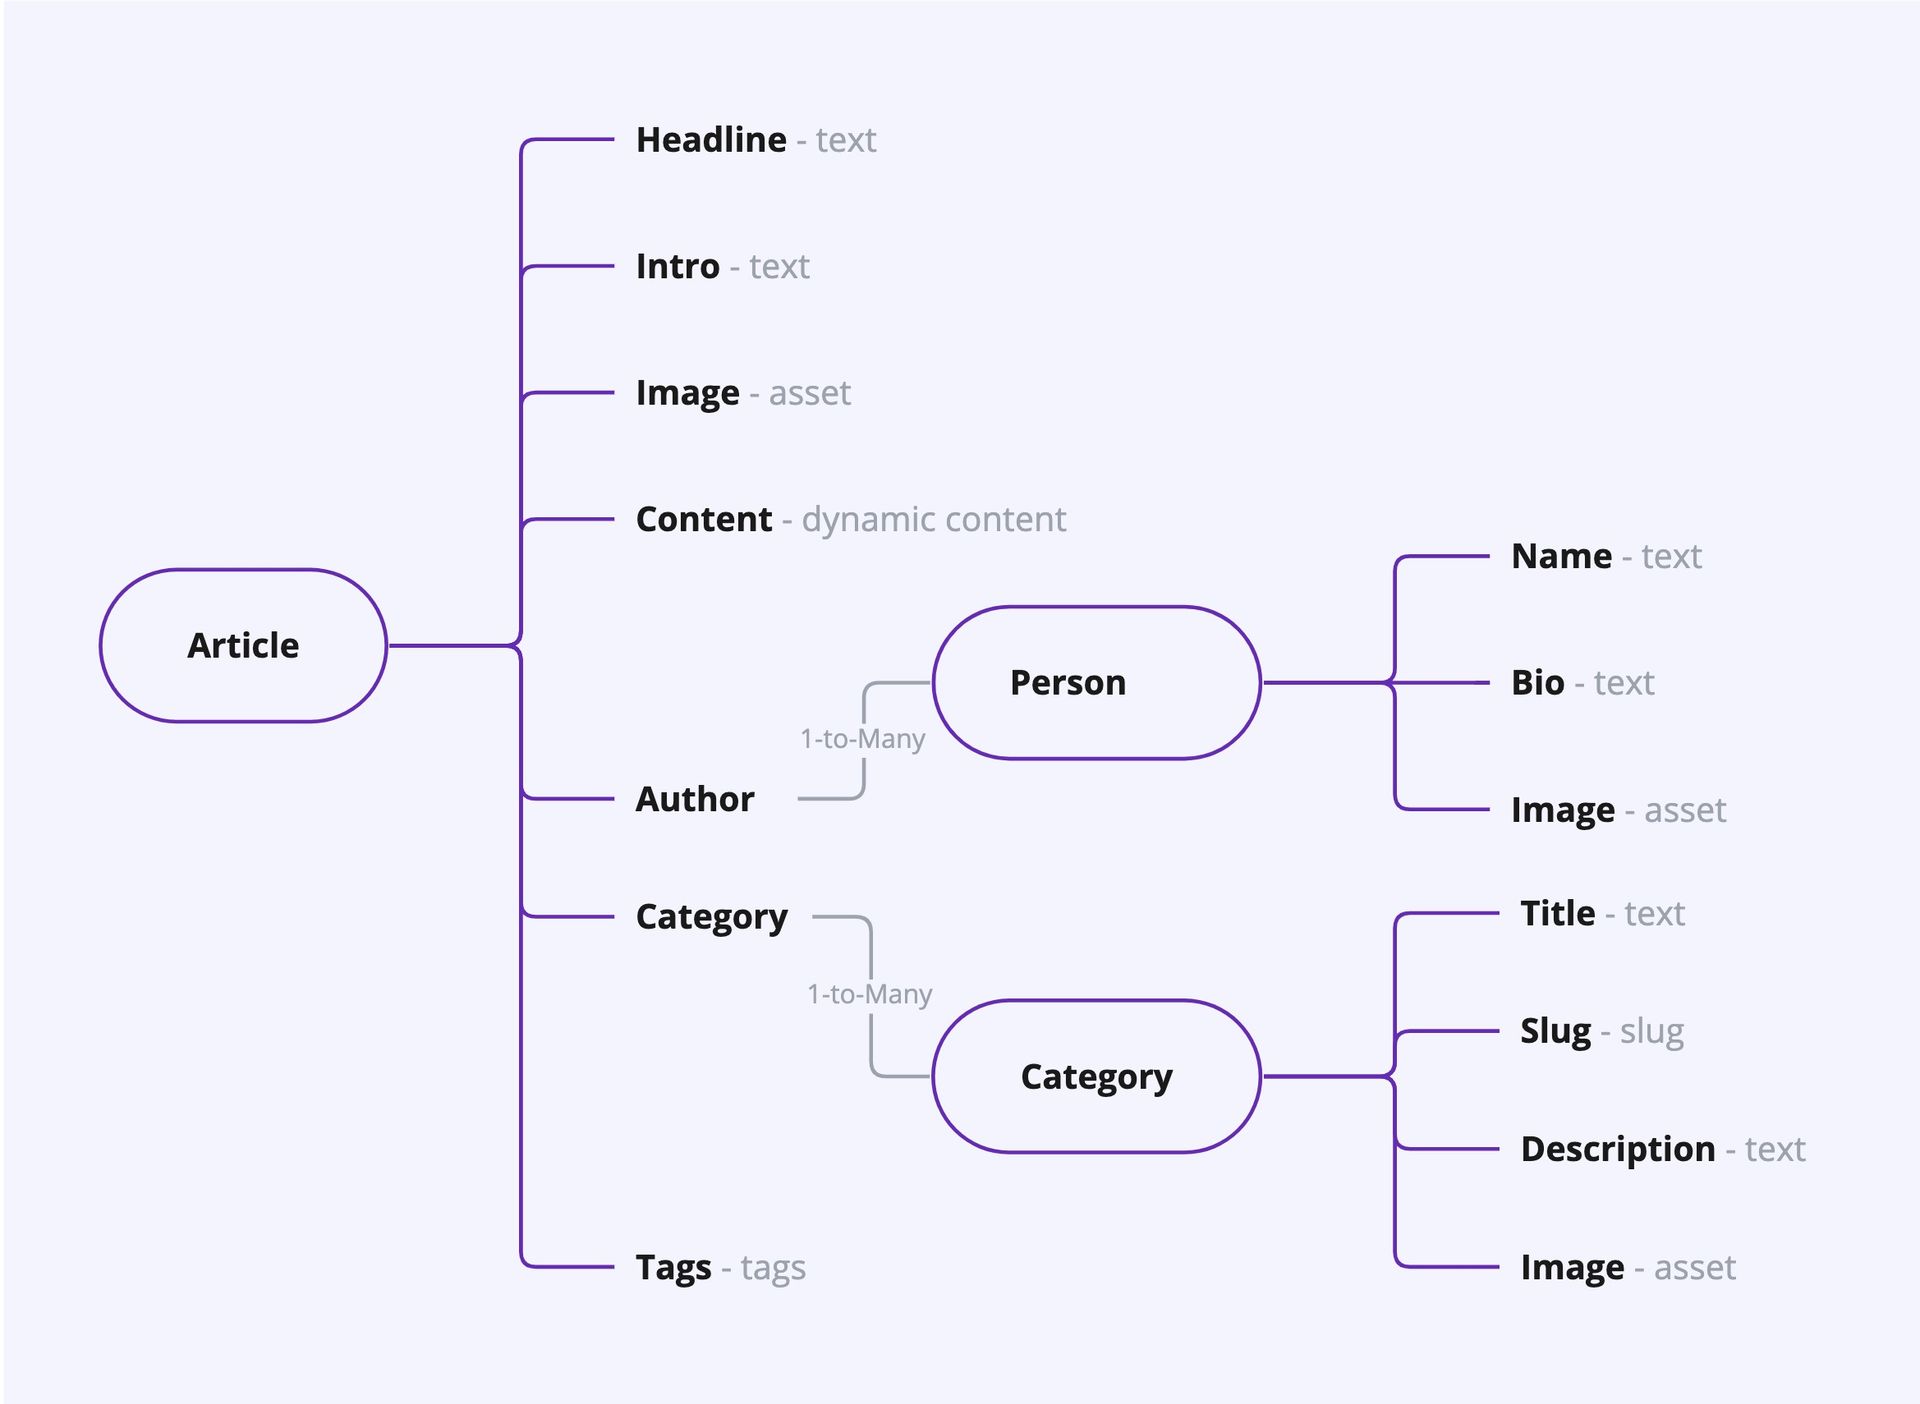
Before you start generating the recommendations, it’s a good idea to look at the content model of the article. That structure largely determines how accurate the recommendations become.

In this case you have an article with a number of content fields: title, intro and content. In addition, there are references to an author and to one or more categories. And finally, an editor can manually add tags. Prepr uses all this information to provide the most relevant recommendations.
Creating a Prepr CMS account
You can skip this step if you already have a Prepr CMS account with models and content items.
Following this guide requires a (free) Prepr CMS account.
- Go to https://signup.prepr.io/ and sign up
- Follow the quick start guide to add models and content items
Querying the API for similar items
To retrieve similar items, you must first have the ID of the content item where you want to show recommendations for
Getting a content item ID
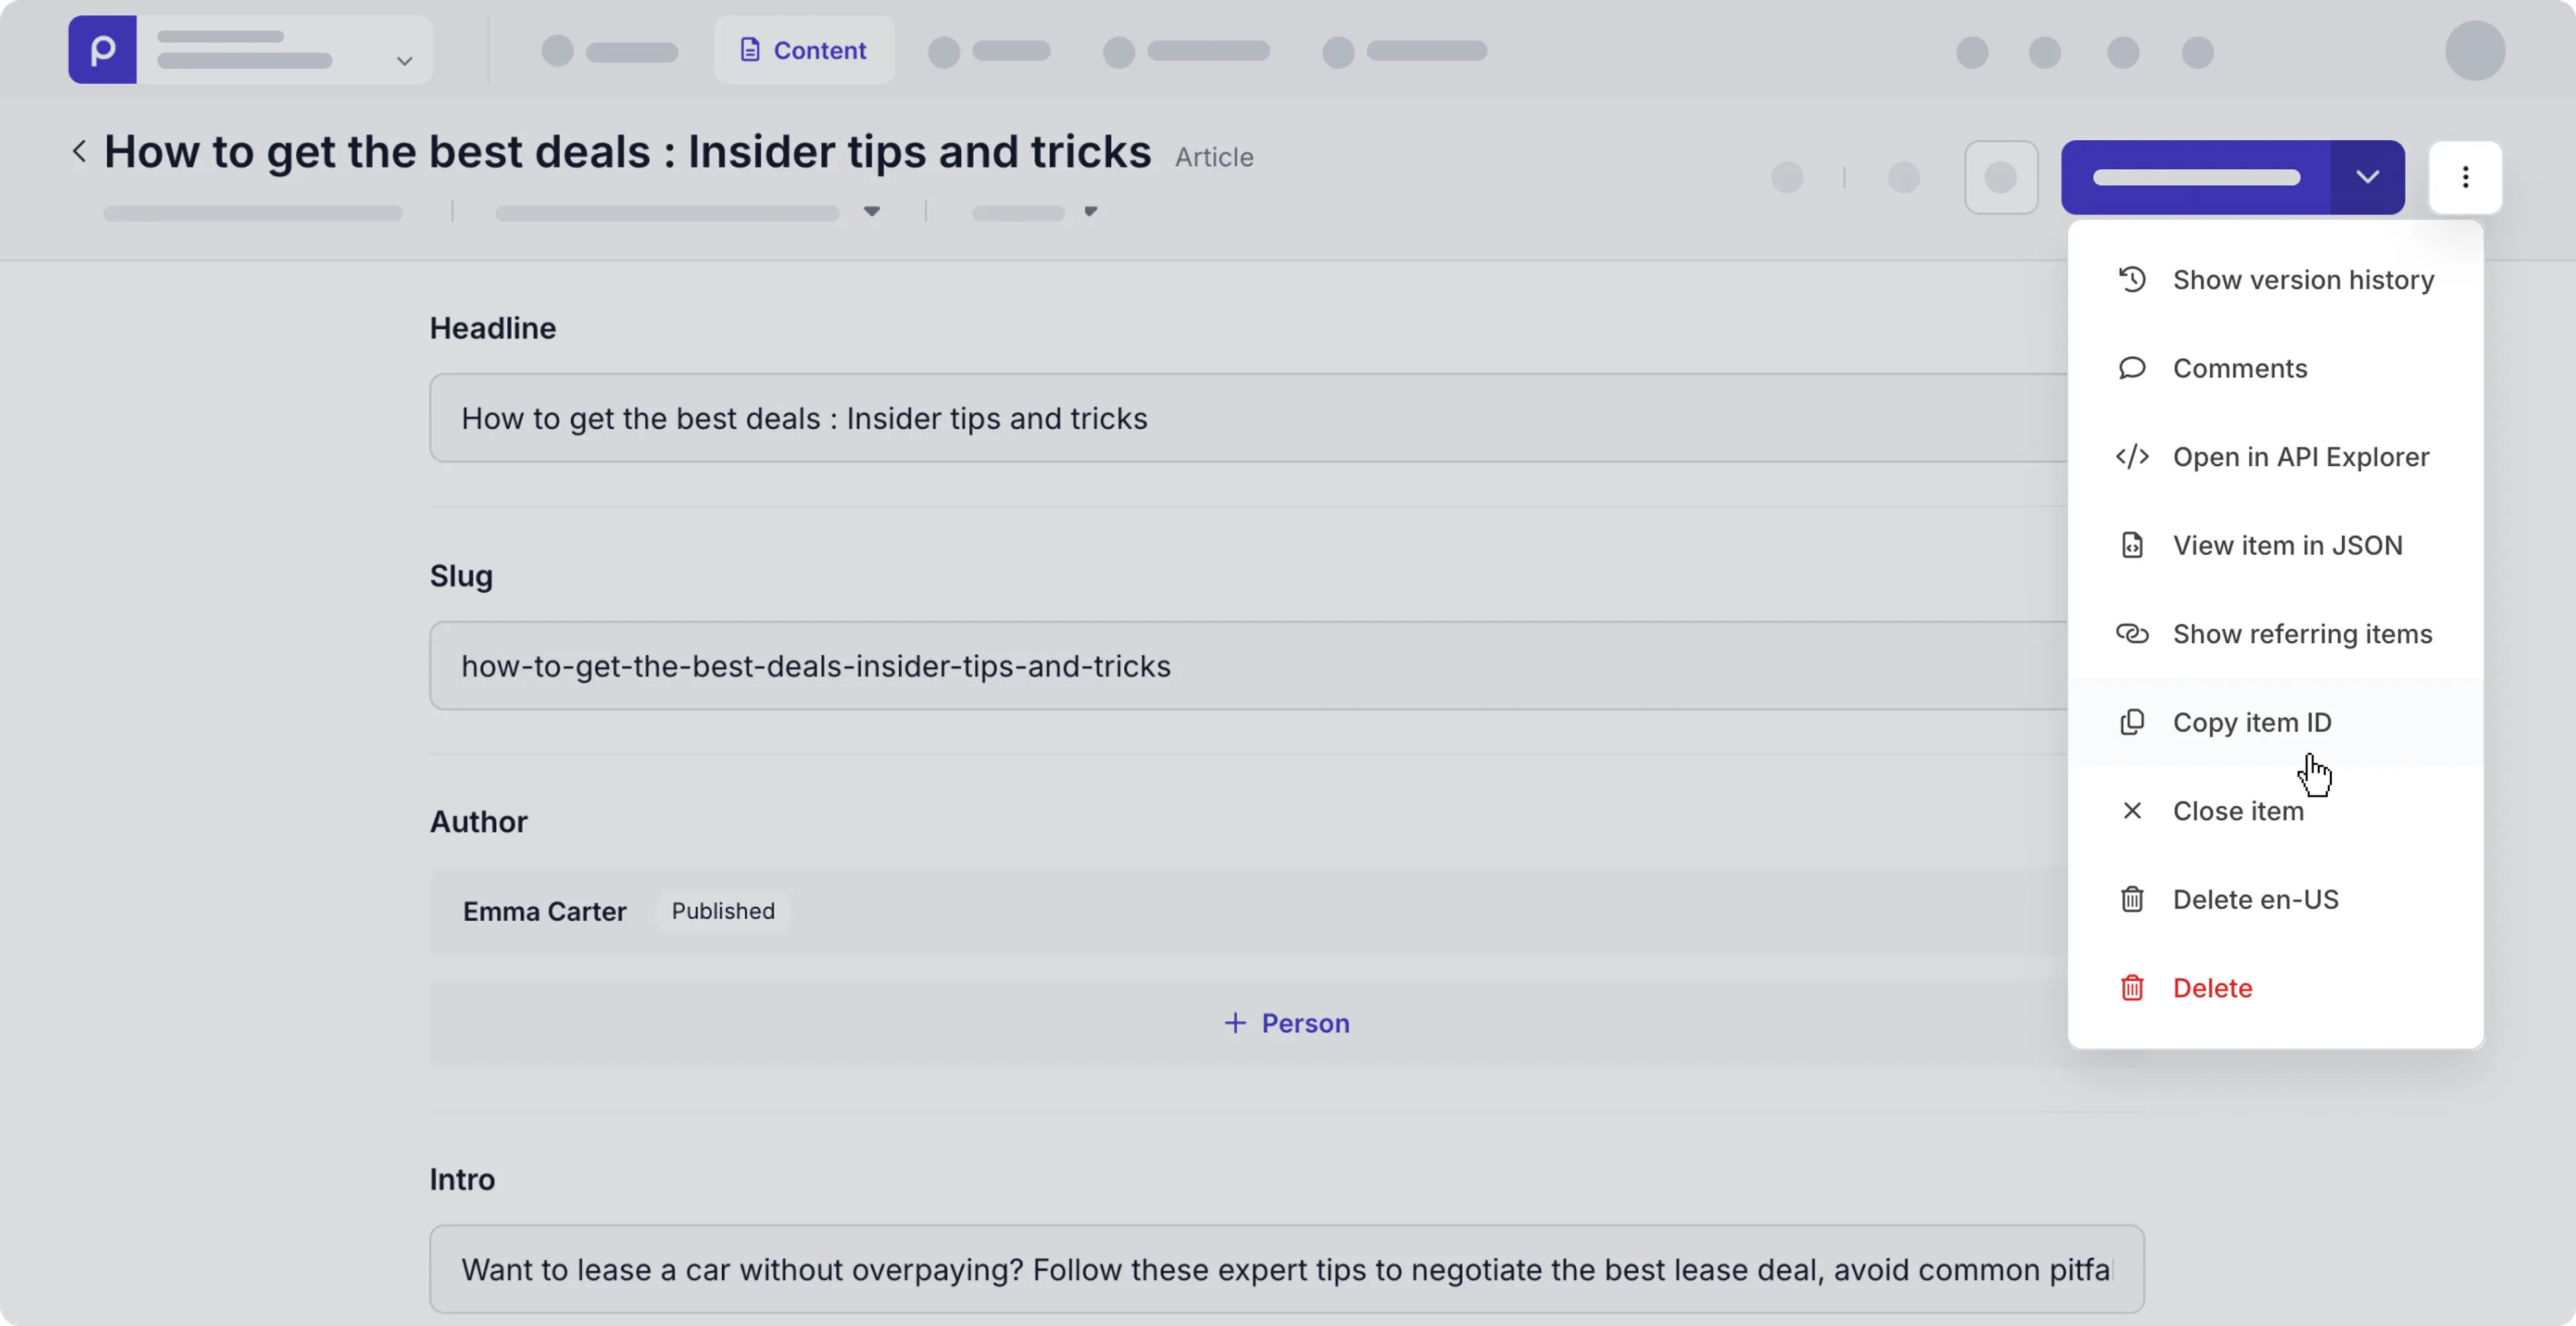
- Go to the Content tab and open the content item for which you want to retrieve similar items.
- Click the icon and choose the Copy item ID option.

Retrieving similar items
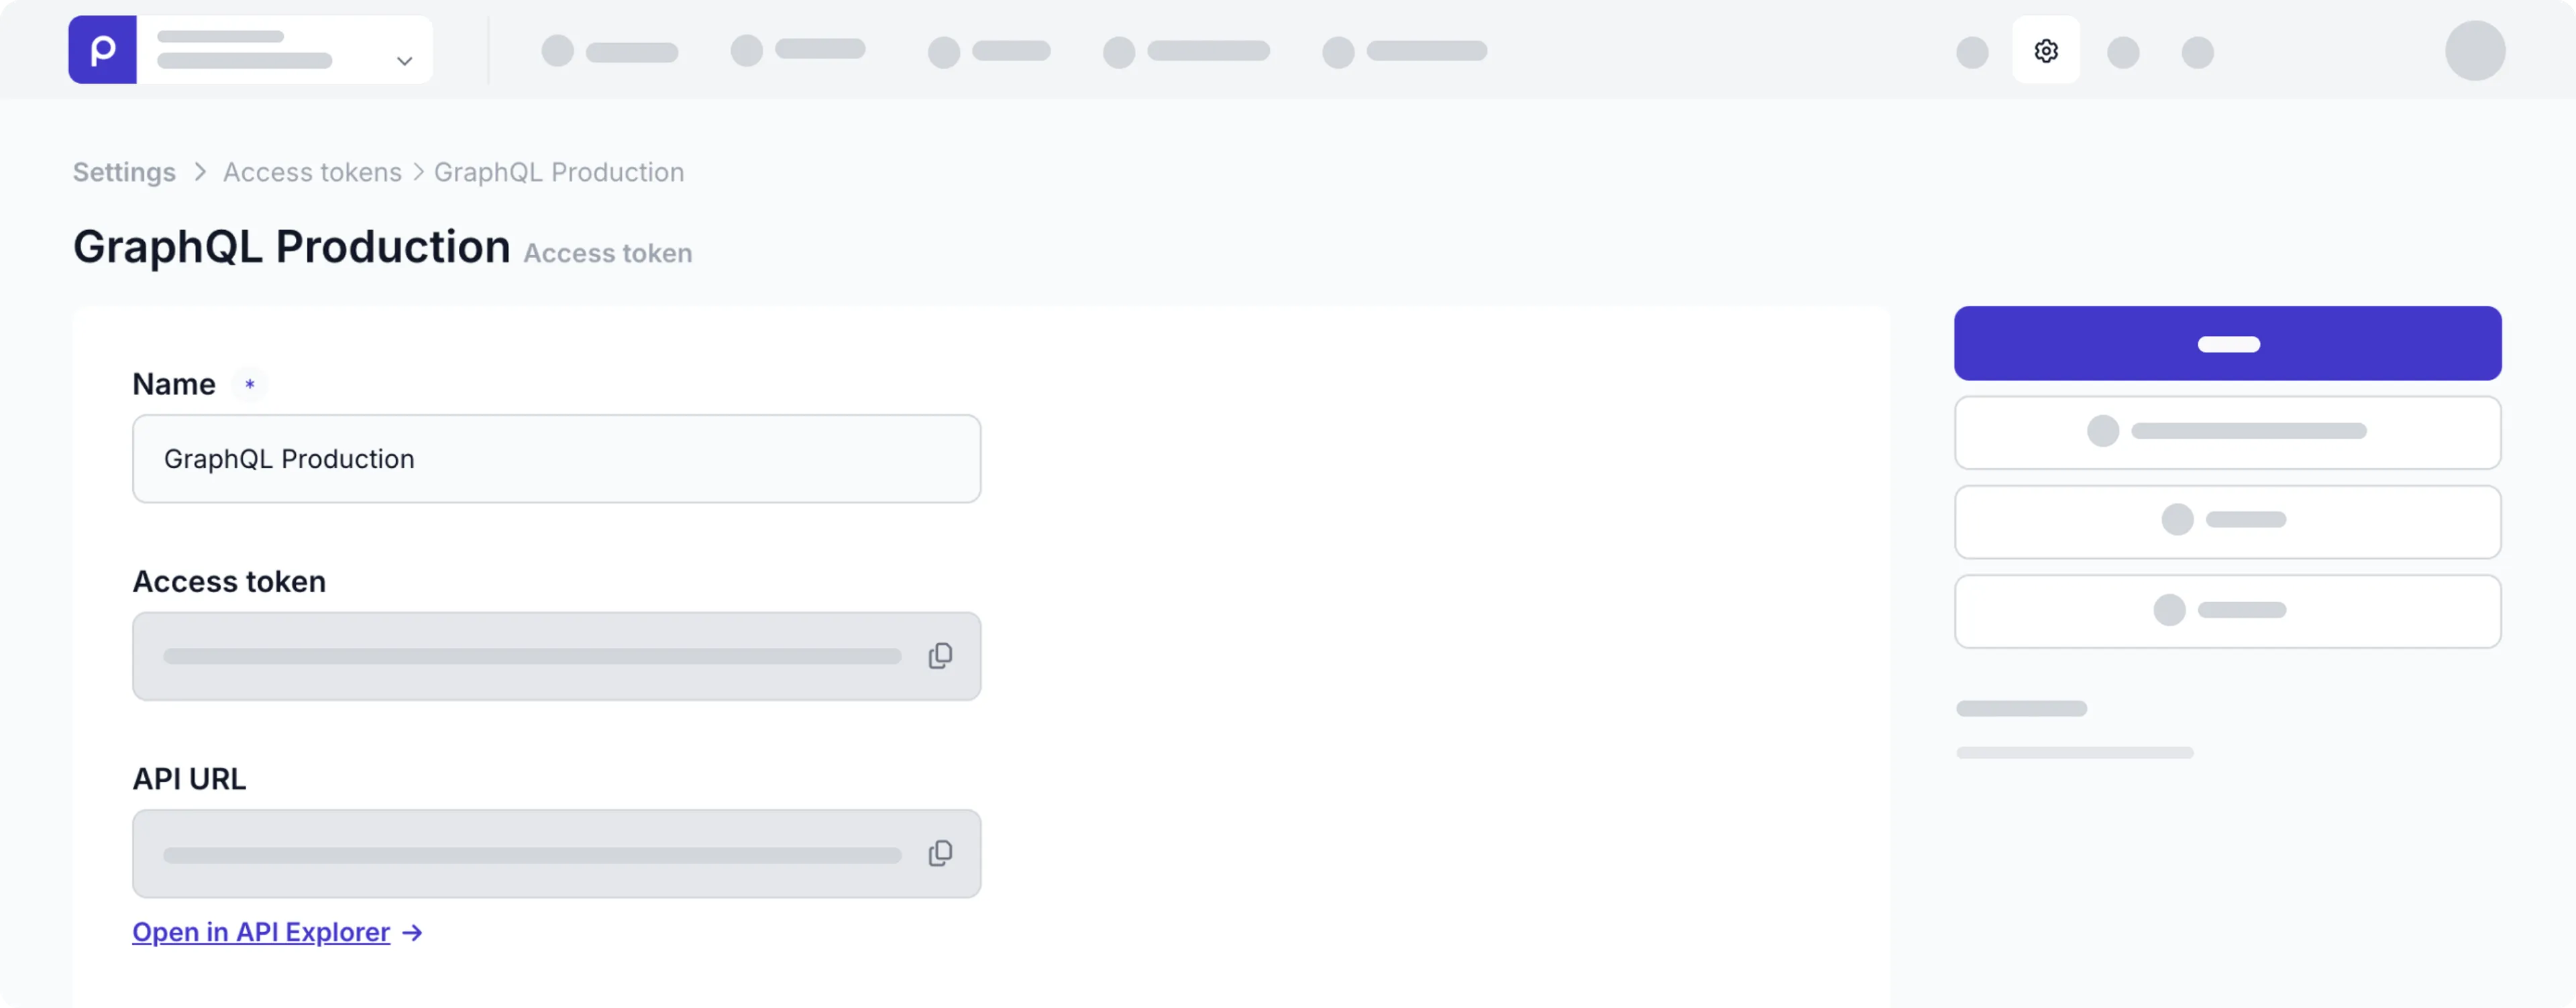
- Click the icon and choose the Access tokens option.
- Click to open the GraphQL Production token details.
- Click the Open in API explorer link.

View the API reference for all API authentication details
- Add the following query to the explorer:
query {
 Similar_Articles(
   id: "0cbe2455-124c-4820-b2ac-dcc4261e150c"
 ) {
   items {
     _id
     title
   }
 }
}- Replace the id value with the ID of your content item
Note the Similar_Articles query type at the beginning of the query. For each content model in your environment the Prepr creates a corresponding GraphQL type with a similarity algorithm. The plural type name of the content model is prefixed with Similar_. For example Article generates a type Similar_Articles. You can find all these options in the API Explorer.
- Run the query
The result should look something like:
{
 "data": {
   "Similar_Articles": {
     "items": [
       {
         "_id": "885b71ac-5a4b-4d2e-9770-a4a6f20425e9",
         "title": "15 Tips On How To Brand Yourself Online"
       },
       {
         "_id": "f1d9b142-883f-4964-8d8f-cd2f255330a2",
         "title": "Why Customization Is Key For Entrepreneurs In The Digital Age"
       },
       {
         "_id": "dd42b8c4-4773-4fdd-a71f-87e57b35beaa",
         "title": "Building User Trust In UX Design"
       },
       {
         "_id": "79c453ed-ffe2-4aec-8fb2-f549e3775264",
         "title": "Building A Video Streaming App With Nuxt.js"
       },
       {
         "_id": "5a53b271-898e-4eef-b877-5863b34b6ff9",
         "title": "UI Design Testing Tools I Use All The Time"
       },
       {
         "_id": "ca0e0d37-600b-42f7-a013-9b0f8e18f127",
         "title": "The Evolution Of Jamstack"
       },
       {
         "_id": "dd3309eb-df84-4e4b-8fdf-80b31b8eb58a",
         "title": "The Rise Of Design Thinking As A Problem Solving Strategy"
       },
       {
         "_id": "f4b65d11-c2e2-4320-a363-e7d420d03ed2",
         "title": "Modeling A GraphQL API For Your Blog"
       }
     ]
   }
 }
}
That’s all. You now have recommendations that you can show in your application. Let’s see how we can improve the recommendations even more.
Filtering the result
The previous example included all items for determining recommendations. But often, you want to make the result even more accurate. For example, you may want to query only recommended articles published recently or in a particular category.
So let’s see how you can do that.
- Expand the query with the following parameters:
query {
 Similar_Articles(
   id: "0cbe2455-124c-4820-b2ac-dcc4261e150c"
   where: {
     _publish_on_gt: "2021-01-01T00:00:00+00:00"
     categories: {
       _slug_any: [
         "ux-design", "development"
       ]
     }
   },
   limit: 3
 ) {
   items {
     _id
     title
   }
 }
}- We added _publish_on_gt: “2021-01-01T00:00:00+00:00” to show only articles published after January 1, 2021. Note the underscore at the beginning of the parameter.
- We added categories:
{ _slug_any: [ "ux-design", "development" ] }to limit the result to only articles in the “UX Design” or the “Development” categories. Note the square brackets because we’re dealing with an array. - We added limit: 3 to limit the number of results to three items
The result should look something like:
{
 "data": {
   "Similar_Articles": {
     "items": [
       {
         "_id": "dd42b8c4-4773-4fdd-a71f-87e57b35beaa",
         "title": "Building User Trust In UX Design"
       },
       {
         "_id": "5a53b271-898e-4eef-b877-5863b34b6ff9",
         "title": "UI Design Testing Tools I Use All The Time"
       },
       {
         "_id": "dd3309eb-df84-4e4b-8fdf-80b31b8eb58a",
         "title": "The Rise Of Design Thinking As A Problem Solving Strategy"
       }
     ]
   }
 }
}
View the API reference for all filter options.
Optimizing the recommendation algorithm
You can tweak the recommendation algorithm further if you want more control over the results.
Prepr uses three parameters to determine recommendations: Entities, Tags, and References.
- Entities - Prepr uses AI Text Analysis to determine what an article is about by automatically extracting entities from the text.
- Tags - Prepr uses the tags associated with an article.
- References - Prepr uses an item’s relationship with other content items. So in this example, Prepr looks at other articles in the same category and articles by the same author.
By default, Prepr uses all three parameters to determine recommendations, but you can change that and specify the weight of each parameter.
Here’s an example of how that works:
query {
 Similar_Articles(
   id: "0cbe2455-124c-4820-b2ac-dcc4261e150c"
   where: {
     _publish_on_gt: "2021-01-01T00:00:00+00:00"
     categories: {
       _slug_any: [
         "ux-design", "development"
       ]
     }
   },
   limit: 3
   rules: {
     entities: 1
     tags: 0
     references: 0.5
   }
 ) {
   items {
     _id
     title
   }
 }
}- We added rules:
{ entities: 1, tags: 0, references: 0.5 }to indicate that tags should not be included and that references count for half. Note that the commas are optional.
We recommend starting with the default setting and adding rules only if the result does not meet your expectations.
View the API reference for all rules options.
Querying the API for People Also Viewed items
To retrieve People also viewed items, you need the ID of the content item that you want to show recommendations for.
Getting a content item ID
- Go to the Content tab and open the content item you want to use as the reference.
- Click the icon and choose the Copy item ID option.

Now that you have the Content Item ID, you can track visitors who viewed the same content item. That information can be used to display the People Also Viewed items.
Capturing views
You can capture view events in Prepr using a lightweight piece of JavaScript, the Prepr Tracking Code.
Follow the steps in the Tracking setup guide to add the Prepr Tracking Code.
Once you’ve enabled tracking, you can then add a meta tag to record view events on content items.
Check out the Events doc for all tracking options.
Retrieving People also viewed items
Now that you’re tracking the visitors that view an item, you can retrieve the other items that these visitors also viewed.
- Click the icon and choose the Access tokens option to view all the access token.
- Click to open the GraphQL Production token details.
- Click the Open in API explorer link.

View the API reference for all API authentication details
- Add the following query to the explorer:
query {
  PeopleAlsoViewed_Articles (
    id : "90276002-d628-4ba6-b3c8-f756c486b67b" )
  {
    items {
        _id,
        title
    }
  }
}
Note the PeopleAlsoViewed_Articles query type at the beginning of the query. Prepr automatically provides you with a PeopleAlsoViewed query for each model. For example, if your model name is Article, you also get the PeopleAlsoViewed_Articles query. You can find all these query options in the API Explorer.
The result should look something like this:
{
 "data": {
   "PeopleAlsoViewed_Articles": {
     "items": [
       {
         "_id": "0cbe2455-124c-4820-b2ac-dcc4261e150c",
         "title": "How to set up a Google Ads account"
       },
       {
         "_id": "dd42b8c4-4773-4fdd-a71f-87e57b35beaa",
         "title": "Building User Trust In UX Design"
       },
       {
         "_id": "79c453ed-ffe2-4aec-8fb2-f549e3775264",
         "title": "Building A Video Streaming App With Nuxt.js"
       },
       {
         "_id": "5a53b271-898e-4eef-b877-5863b34b6ff9",
         "title": "UI Design Testing Tools I Use All The Time"
       },
       {
         "_id": "dd3309eb-df84-4e4b-8fdf-80b31b8eb58a",
         "title": "The Rise Of Design Thinking As A Problem Solving Strategy"
       },
       {
         "_id": "f1d9b142-883f-4964-8d8f-cd2f255330a2",
         "title": "Why Customization Is Key For Entrepreneurs In The Digital Age"
       },
       {
         "_id": "885b71ac-5a4b-4d2e-9770-a4a6f20425e9",
         "title": "15 Tips On How To Brand Yourself Online"
       },
       {
         "_id": "ca0e0d37-600b-42f7-a013-9b0f8e18f127",
         "title": "The Evolution Of Jamstack"
       },
       {
         "_id": "f4b65d11-c2e2-4320-a363-e7d420d03ed2",
         "title": "Modeling A GraphQL API For Your Blog"
       }
     ]
   }
 }
}
Filtering the result
The previous example includes all items that other users viewed. But often, you want to make the result even more accurate. For example, only show items published recently or in a particular category.
So let’s see how you can do that.
- Expand the query with the following parameters:
query {
 PeopleAlsoViewed_Articles(
  id : "90276002-d628-4ba6-b3c8-f756c486b67b",
  where: {
    _publish_on_gt: "2021-01-01T00:00:00+00:00"
    categories: {
      _slug_any: [
        "ux-design", "development"
      ]
    }
  },
  limit: 3 ){
    items {
      _id
      title
    }
  }
}- We added
_publish_on_gt: "2021-01-01T00:00:00+00:00"to show only articles published after January 1, 2021. Note the underscore at the beginning of the parameter. - We added categories:
{ _slug_any: [ "ux-design", "development" ] }to limit the result to only articles in the “UX Design” or the “Development” categories. Note the square brackets because you’re dealing with an array. - We added
limit: 3to limit the number of results to three items.
Result:
{
 "data": {
   "PeopleAlsoViewed_Articles": {
     "items": [
       {
         "_id": "dd42b8c4-4773-4fdd-a71f-87e57b35beaa",
         "title": "Building User Trust In UX Design"
       },
       {
         "_id": "79c453ed-ffe2-4aec-8fb2-f549e3775264",
         "title": "Building A Video Streaming App With Nuxt.js"
       },
       {
         "_id": "5a53b271-898e-4eef-b877-5863b34b6ff9",
         "title": "UI Design Testing Tools I Use All The Time"
       }
     ]
   }
 }
}
Querying the API for most popular items
To show the most popular items, you must track how often visitors view content items. That information can be used to display the most popular items.
Capturing views
You can capture view events in Prepr using a lightweight piece of JavaScript, the Prepr Tracking Code.
Follow the steps in the Tracking setup guide to add the Prepr Tracking Code.
Once you’ve enabled tracking, you can then add a meta tag to record view events on content items.
Check out the Events doc for all tracking options.
Retrieving most popular items
Now that you’re tracking how often visitors view an item, you can retrieve the most popular items.
- Click the icon and choose the Access tokens option.
- Click to open the GraphQL Production token details.
- Click the Open in API Explorer link.

View the API reference for all API authentication details
- Add the following query to the explorer:
query {
 Popular_Articles {
   items {
     _id
     title
     _views
   }
 }
}
Note the Popular_Articles query type at the beginning of the query. Prepr automatically provides you with a popularity query for each model. If your model name is Article, you also get the Popular_Articles query. You can find all these query options in the API Explorer.
Note the _views system field that shows the number of views for a content item. This field is optional. We recommend not using it to optimize cache efficiency.
The result should look something like this:
{
 "data": {
   "Popular_Articles": {
     "items": [
       {
         "_id": "0cbe2455-124c-4820-b2ac-dcc4261e150c",
         "title": "How to set up a Google Ads account",
         "_views": 83
       },
       {
         "_id": "dd42b8c4-4773-4fdd-a71f-87e57b35beaa",
         "title": "Building User Trust In UX Design",
         "_views": 59
       },
       {
         "_id": "79c453ed-ffe2-4aec-8fb2-f549e3775264",
         "title": "Building A Video Streaming App With Nuxt.js",
         "_views": 49
       },
       {
         "_id": "5a53b271-898e-4eef-b877-5863b34b6ff9",
         "title": "UI Design Testing Tools I Use All The Time",
         "_views": 40
       },
       {
         "_id": "dd3309eb-df84-4e4b-8fdf-80b31b8eb58a",
         "title": "The Rise Of Design Thinking As A Problem Solving Strategy",
         "_views": 29
       },
       {
         "_id": "f1d9b142-883f-4964-8d8f-cd2f255330a2",
         "title": "Why Customization Is Key For Entrepreneurs In The Digital Age",
         "_views": 21
       },
       {
         "_id": "885b71ac-5a4b-4d2e-9770-a4a6f20425e9",
         "title": "15 Tips On How To Brand Yourself Online",
         "_views": 11
       },
       {
         "_id": "ca0e0d37-600b-42f7-a013-9b0f8e18f127",
         "title": "The Evolution Of Jamstack",
         "_views": 9
       },
       {
         "_id": "f4b65d11-c2e2-4320-a363-e7d420d03ed2",
         "title": "Modeling A GraphQL API For Your Blog",
         "_views": 5
       }
     ]
   }
 }
}
Filtering the result
The previous example included all items for retrieving the most popular items. But often, you want to make the result even more accurate. For example, only show items published recently or in a particular category.
So let’s see how you can do that.
- Expand the query with the following parameters:
query {
 Popular_Articles(
   where: {
     _publish_on_gt: "2021-01-01T00:00:00+00:00"
     categories: {
       _slug_any: [
         "ux-design", "development"
       ]
     }
   },
   limit: 3
 ) {
   items {
     _id
     title
     _views
   }
 }
}- We added
_publish_on_gt: "2021-01-01T00:00:00+00:00"to show only articles published after January 1, 2021. Note the underscore at the beginning of the parameter. - We added categories:
{ _slug_any: [ "ux-design", "development" ] }to limit the result to only articles in the “UX Design” or the “Development” categories. Note the square brackets because you’re dealing with an array. - We added
limit: 3to limit the number of results to three items.
Result:
{
 "data": {
   "Popular_Articles": {
     "items": [
       {
         "_id": "dd42b8c4-4773-4fdd-a71f-87e57b35beaa",
         "title": "Building User Trust In UX Design",
         "_views": 59
       },
       {
         "_id": "79c453ed-ffe2-4aec-8fb2-f549e3775264",
         "title": "Building A Video Streaming App With Nuxt.js",
         "_views": 49
       },
       {
         "_id": "5a53b271-898e-4eef-b877-5863b34b6ff9",
         "title": "UI Design Testing Tools I Use All The Time",
         "_views": 40
       }
     ]
   }
 }
}
Want to learn more?
Check out the following chapters:
Schedule a free consultation
Do you want to get started with recommendations but still have questions or want a demo?
Schedule a free call with a Prepr solution engineer.