Creating a custom remote source
Follow this guide to add 3rd party content to your web application using Prepr CMS.
Introduction
When creating content items for your web application, you may want to reference content stored in an external system such as another CMS, legacy system, or ecommerce platform. With Prepr, you can easily use any 3rd party system as a remote source by following the guide below.
Check out the built-in remote sources guide if you want to integrate to one of the prebuilt ecommerce integrations like Shopify, BigCommerce, Commercetools, Commerce Layer, or Propeller.
Setting up a custom remote source
To set up a custom remote source, Prepr CMS needs a connection to the external system through an API endpoint. For remote sources not configured in Prepr, you need to first create the custom API endpoint, validate it, and set up the connection details in Prepr to allow editors to add content from this external system to their content items.
Create a custom API endpoint
The first step is to create the API endpoint for your external system. When you create the API endpoint, make sure that the response matches the data format below so that Prepr can make calls to your external system.
When the remote source is set up, Prepr calls the configured endpoint and expects at least one item to be returned.
API response data format
- Make sure the API response contains the following fields with the specified format:
items— anarrayof objects containing a list of items like products, for example. Each of these items have specific attributes to hold the details about each item.total— anintfield to hold the total number of items available. The total value also depends on the search parameters applied below.filters(optional) - If you want to make it possible for content editors to filter groups of items when they add the remote items to a content item in Prepr CMS, include thisarrayof filter criteria objects.
See the detailed list of attributes below which are expected in the items array.
| Attribute | Type | Description | Required |
|---|---|---|---|
id | string | A unique item identifier. The identifier should not be reused when deleting an item. | ✓ |
body | string | The title of the item. This value is visible in Prepr CMS when this item is searched or added to a content item. | ✓ |
description | string | The item description. This value is visible in Prepr CMS when this item is searched or added to a content item. | ✓ |
image_url | string | An image thumbnail URL. If this value is provided, the image of the item will be visible when this item is searched or added to a content item. | ✗ |
external_url | string | A URL to an external page, for example, to redirect an editor to the external system to manage the item directly. | ✗ |
data | object | This object contains a list of key-value pairs that holds additional details of the item that you want to render in the front end. The values can be a string, int, float or boolean. In Step 2, you will add these as fields in the Remote source. | ✗ |
See the detailed list of attributes below which are expected in the filters array.
| Attribute | Type | Description | Required |
|---|---|---|---|
body | string | The title of the filter. This value is visible in Prepr CMS as the name of a filter. | ✓ |
param | string | The unique identifier of the filter that correlates to one of the keys specified in the data object in the items array defined above. If the filter is a range, set two filter entries for the minimum and maximum values. In this case, set the param value to the key combined with [gt] and [lt], respectively. For example, price[gt] and price[lt] | ✓ |
display_type | string | This attribute tells the Prepr UI how to render the input for the filter value. This attribute should contain one of the following values: text, checkbox, dropdown, toggle, date, date_range. | ✓ |
default_value | string | Set this to the default value of the filter, if applicable. | ✗ |
values | array or object | The list of available filter values, if applicable. You can include the filter values simply as an array or as an object of the filter values with their corresponding display names. | ✗ |
See an example response below of a list of products returned by a custom API endpoint for an external system.
{
    "items": [
        {
            "id": "3177c1b8-a4e2-4a84-85e7-6a02cc0c5f98",
            "created_on": "2023-04-05T10:15:30+00:00",
            "changed_on": "2023-04-06T15:48:21+00:00",
            "body": "Ultimate Vegan Burger",
            "description": "A mouthwatering vegan burger packed with flavors and nutrients.",
            "image_url": "https://picsum.photos/200/300",
            "external_url": "https://veganburgerrecipes.com/ultimate-vegan-burger",
            "data": {
                "category": "Comfort food",
                "type": "Healthy",
                "ingredients": [
                    "black beans",
                    "quinoa",
                    "beetroot",
                    "breadcrumbs",
                    "spices"
                ],
                "cuisine": "International",
                "price": 8.99,
                "nuts": false,
                "cooking_time": 30,
                "created_on": "1974-12-18T10:37:49+00:00"
            }
        },
        {
            "id": "bd78aeff-1c4a-49da-9cdf-c5ed5bc9c1a2",
            "created_on": "2023-04-05T08:20:15+00:00",
            "changed_on": "2023-04-05T08:25:15+00:00",
            "body": "Green Goddess Buddha Bowl",
            "description": "A nourishing bowl filled with a variety of greens and plant proteins.",
            "image_url": "https://source.unsplash.com/featured/?salad",
            "external_url": "https://example.com/recipes/detail/vegan-goddess-bowl",
            "data": {
                "category": "Light",
                "type": "Main",
                "difficulty": "easy",
                "ingredients": [
                    "kale,quinoa",
                    "avocado",
                    "cucumber",
                    "chickpeas",
                    "pumpkin seeds"
                ],
                "cuisine": "International",
                "price": 9.5,
                "nuts": false,
                "cooking_time": 30,
                "created_on": "2004-09-18T22:45:56+00:00"
            }
        },
        {
            "id": "90870c84-d3a4-437b-a9b6-96388cabf0fa",
            "created_on": "2023-01-21T14:25:30+00:00",
            "changed_on": "2023-01-30T16:40:45+00:00",
            "body": "Hearty Vegan Stew",
            "description": "A delicious and warming stew that's perfect for cold weather and cozy nights in.",
            "image_url": "https://picsum.photos/id/169/200/300",
            "external_url": "https://vegancooking.example.com/recipes/341576",
            "data": {
                "category": "Comfort food",
                "type": "Main",
                "difficulty": "medium",
                "ingredients": [
                    "potatoes",
                    "carrots",
                    "lentils"
                ],
                "cuisine": "International",
                "price": 6.99,
                "nuts": false,
                "cooking_time": 45,
                "created_on": "2015-09-28T03:22:55+00:00"
            }
        },
        {
            "id": "e9a48d63-689a-4cf1-b5fa-307d7fae8910",
            "created_on": "2023-03-10T08:35:23+00:00",
            "changed_on": "2023-04-01T15:46:07+00:00",
            "body": "Vibrant Vegan Salad Bowl",
            "description": "A colorful array of fresh vegetables and quinoa, perfect for a nutritious lunch or dinner.",
            "image_url": "https://picsum.photos/200/300",
            "external_url": "https://example.com/recipes/vegan-salad-bowl",
            "data": {
                "category": "Keto",
                "type": "Main",
                "difficulty": "easy",
                "cuisine": "International",
                "nuts": false,
                "price": 8.99,
                "cooking_time": 15,
                "created_on": "2013-11-13T21:00:00+00:00"
            }
        },
        {
            "id": "8ba2b831-960b-4cc3-baad-9b153c6d1295",
            "created_on": "2023-02-15T08:30:20+00:00",
            "changed_on": "2023-03-18T15:45:10+00:00",
            "body": "Vegan Lentil Soup",
            "description": "A hearty and nutritious lentil soup, perfect for any season.",
            "image_url": "https://images.unsplash.com/photo-1587502537745-84b86da1204f",
            "external_url": "https://example.com/recipes/vegan-lentil-soup",
            "data": {
                "category": "Comfort food",
                "type": "Starter",
                "difficulty": "easy",
                "cuisine": "International",
                "price": 5.99,
                "nuts": false,
                "cooking_time": 25,
                "created_on": "2015-09-01T00:00:00+00:00"
            }
        },
        {
            "id": "ee94e136-e8b6-456e-8dbd-d176bfcce8e7",
            "created_on": "2023-03-15T10:56:03+00:00",
            "changed_on": "2023-03-18T09:34:05+00:00",
            "body": "Sizzling Vegan Stir-Fry",
            "description": "A delightful vegan stir-fry packed with fresh vegetables and tofu.",
            "image_url": "https://source.unsplash.com/weekly?vegan",
            "external_url": "https://example.com/vegan-stir-fry/9923458294",
            "data": {
                "category": "Light",
                "type": "Appetizer",
                "difficulty": "easy",
                "cuisine": "Asian",
                "price": 8.99,
                "nuts": false,
                "cooking_time": 20,
                "created_on": "2013-06-25T23:45:00+00:00"
            }
        }
    ],
    ...
    "total": 43
}-
Define headers to add authentication or filters required by the API endpoint.
-
Make sure that your endpoint supports pagination with the parameters defined below.
Supported parameters
To learn more about how Prepr interacts with the API endpoint, consider the following:
-
Automatic synchronization. To keep your remote content constantly updated in Prepr, your custom API must support filtering on the last changed items. In this case, Prepr will call the API with a
changed_sinceparam to refresh your items every 15 minutes. For example,website.com/prepr/feed?changed_since=1583414373(UNIX Timestamp). -
Pagination. The API must work with the
skipandlimitparams to paginate params, and the API response should contain a maximum of 50 items. For example,- Page 1:
website.com/prepr/feed?skip=0&limit=50 - Page 2:
website.com/prepr/feed?skip=50&limit=50 - Page 3:
website.com/prepr/feed?skip=100&limit=50, etc
- Page 1:
-
Search. To help editors search for a remote content item, Prepr calls the external system URL with the
qparam containing the editor’s input, for example,website.com/prepr/feed?q=Looking%20for%20an%20item. In this case, the total response will be updated with the filtered number of matching items. -
Locale. To help editors search for a remote content item, Prepr calls the external system URL with the
Prepr-Localeheader. This header, which is based on ISO 639-1 standards (e.g.,en-US), reflects the editor’s current viewing language. This feature enables you to customize your feed according to the viewing language. (This is necessary only if your feed supports multiple languages). -
Filter. To help editors filter remote content items, Prepr calls the external system URL with one or more parameters that match the
paramvalues in thefiltersarray in the API endpoint, for example,website.com/prepr/feed?category=Comfort%food&type=Main. In this case, the total response will be updated with the filtered number of matching items.
Filtering remote content
You can add filters to the API endpoint to allow content editors to filter the items from the remote source in Prepr. The filters make it easier for content editors to find the remote content they need to add to the content item in Prepr.
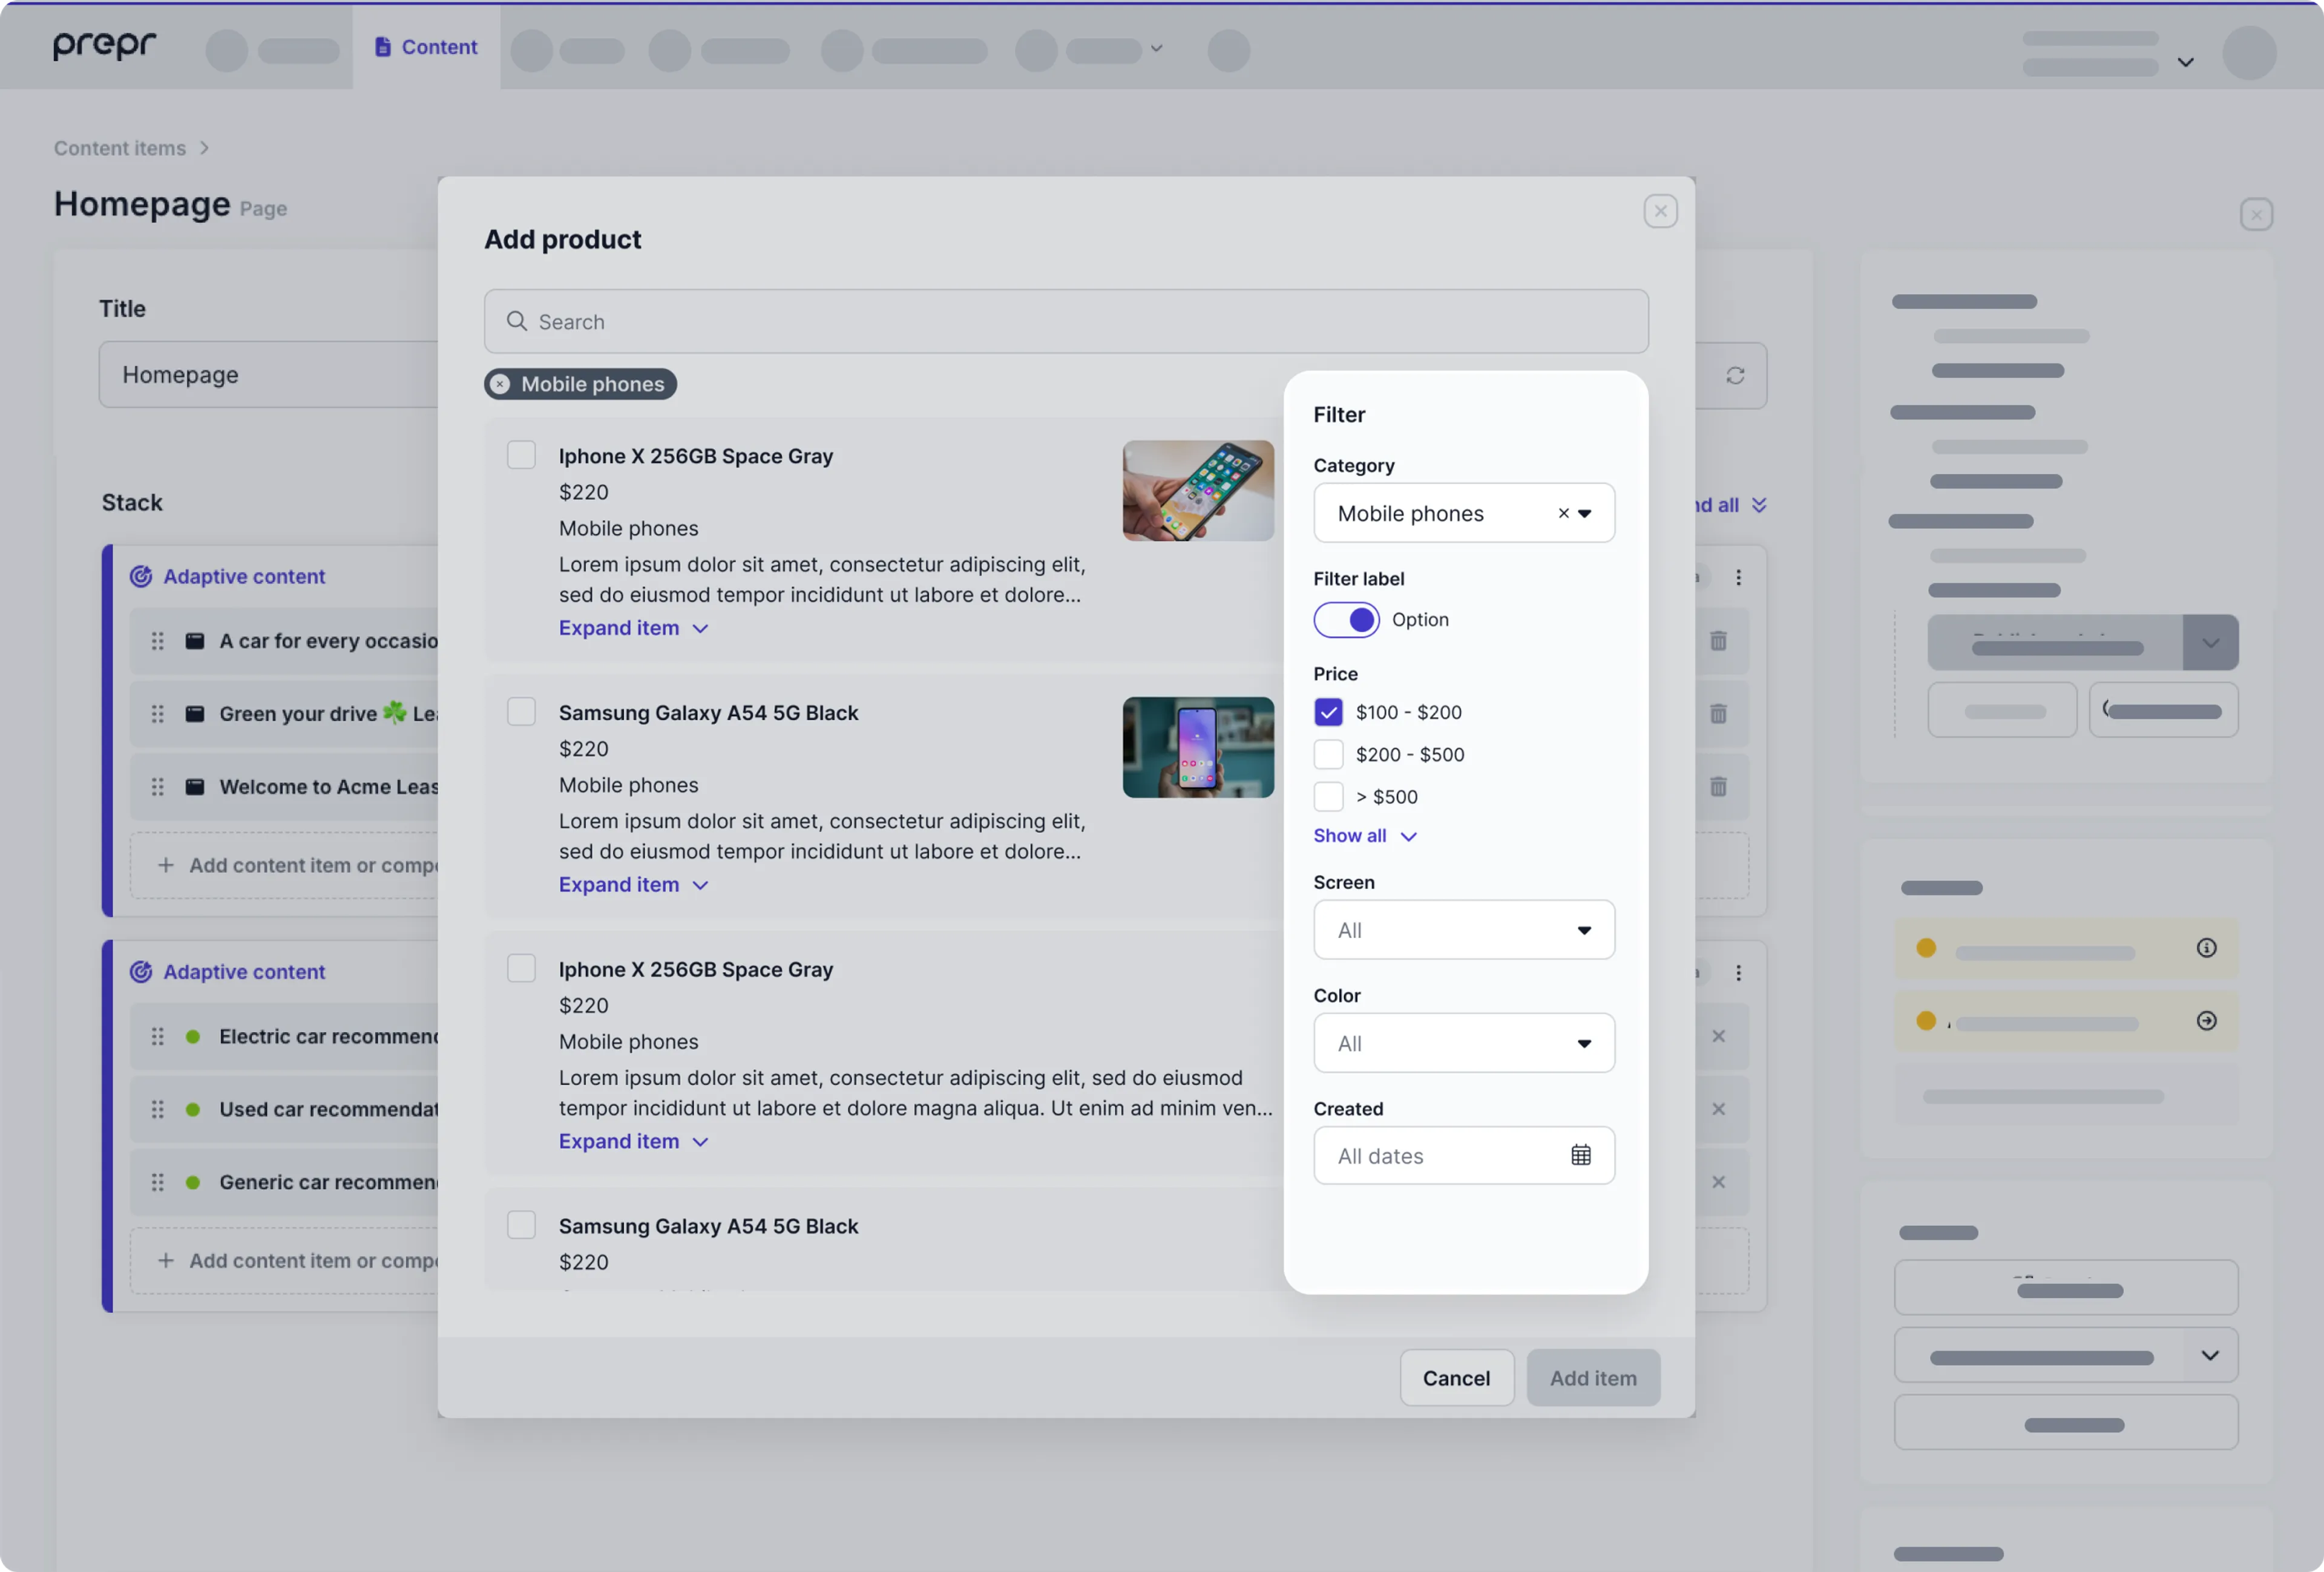
To make these filters available to content editors make sure that the API response data format includes the filters field as defined in the section above.
Filters can be dynamically adjusted based on filter values or searches. Check out the example response below with filters and possible display_type values:
{
    "filters": [
        {
            "body": "Product Id",
            "param": "id",
            "display_type": "text"
        },
        {
            "body": "Category",
            "param": "category",
            "display_type": "dropdown",
            "values": {
                "light" : "Light",
                "healthy" : "Healthy",
                "comfort-food" : "Comfort food",
                "keto" : "Keto"
            }
        },
        {
            "body": "Meal type",
            "param": "type",
            "display_type": "checkbox",
            "values": {
                "appetizer" : "Appetizer",
                "starter" : "Starter",
                "main" : "Main",
                "dessert" : "Dessert"
            }
        },
        {
            "body": "Price",
            "param": "price[gt]",
            "display_type": "checkbox",
            "default_value": "",
            "values": [
                0.00,
                6.00,
                10.00
            ]
        },
        {
            "body": "Price",
            "param": "price[lt]",
            "display_type": "checkbox",
            "values": [
                5.99,
                9.99,
                12.99
            ]
        },
        {
            "body": "Prep time",
            "param": "cooking_time",
            "display_type": "checkbox",
            "default_value": "",
            "values": [
                15,
                20,
                25,
                30,
                45
            ]
        },
        {
            "body": "Contains nuts",
            "param": "nuts",
            "display_type": "toggle",
            "default_value": true
        },
        {
            // The expected date format is YYYY-MM-DD, like 2024-02-28
            "body": "Creation date",
            "param": "created_on",
            "display_type": "date"
        },
        {
            // The request will be made with an array containing a from and until value formatted YYYY-MM-DD
            "body": "Creation date",
            "param": "created_on",
            "display_type": "date_range"
        }
    ],
    "items": [
        ...
    ],
    "total": 43
}
Validate the custom remote source
You can use the Prepr remote source specification to validate the custom endpoint you created before you officially release it. This will help find any mistakes or inconsistencies with the response format that Prepr CMS expects.
Follow the steps below to validate the API endpoint you created in the previous step.
-
Open the Prepr remote source validation repo and clone it to a local project.
-
In the root of the repo, install the required dependencies:
npm install -
Copy the response JSON files from your custom API endpoint and replace the existing example in the
remote-source/specfolder. Make sure each file matches the expected remote source response format withitems,total, and optionalfilters.If the
remote-source/specfolder is missing, empty, or contains invalid JSON responses, the validator returns an error. -
You can run the remote source validation using one of the two commands below.
Option A: Run the default validation command in your local project to validate all response JSON files in the
remote-source/specfolder.npm run validateOption B: Run the node script to explicitly define the remote source spec file and target folder where the response json files reside.
node scripts/validate-prepr-remote-source.mjs --schema spec/2026-03-05.json5 --target remote-source/specAdditional parameter options
-
Instead of copying the JSON files to the cloned project, you can validate them in a different folder location by changing the
--targetparameter value.node scripts/validate-prepr-remote-source.mjs --schema spec/2026-03-05.json5 --target /users/mike/remote-projects/responses -
If needed, you can get the validation results in a separate file by adding the
--report-fileparameter to the validation command like in the example below.node scripts/validate-prepr-remote-source.mjs --schema spec/2026-03-05.json5 --target remote-source/spec --report-file report.json
-
-
Review the validation output and if there are errors, fix your endpoint to generate a Prepr-expected format and retry the validation.
If there are no errors, you can connect to your custom API endpoint in Prepr.
Add the custom remote source in Prepr
Now that you’ve validated the custom API endpoint, proceed with the configuration in Prepr. You’ll need to connect Prepr to your external system using the API credentials. To add a custom remote source, follow these steps:
- Click the Schema tab to open the Schema Editor.
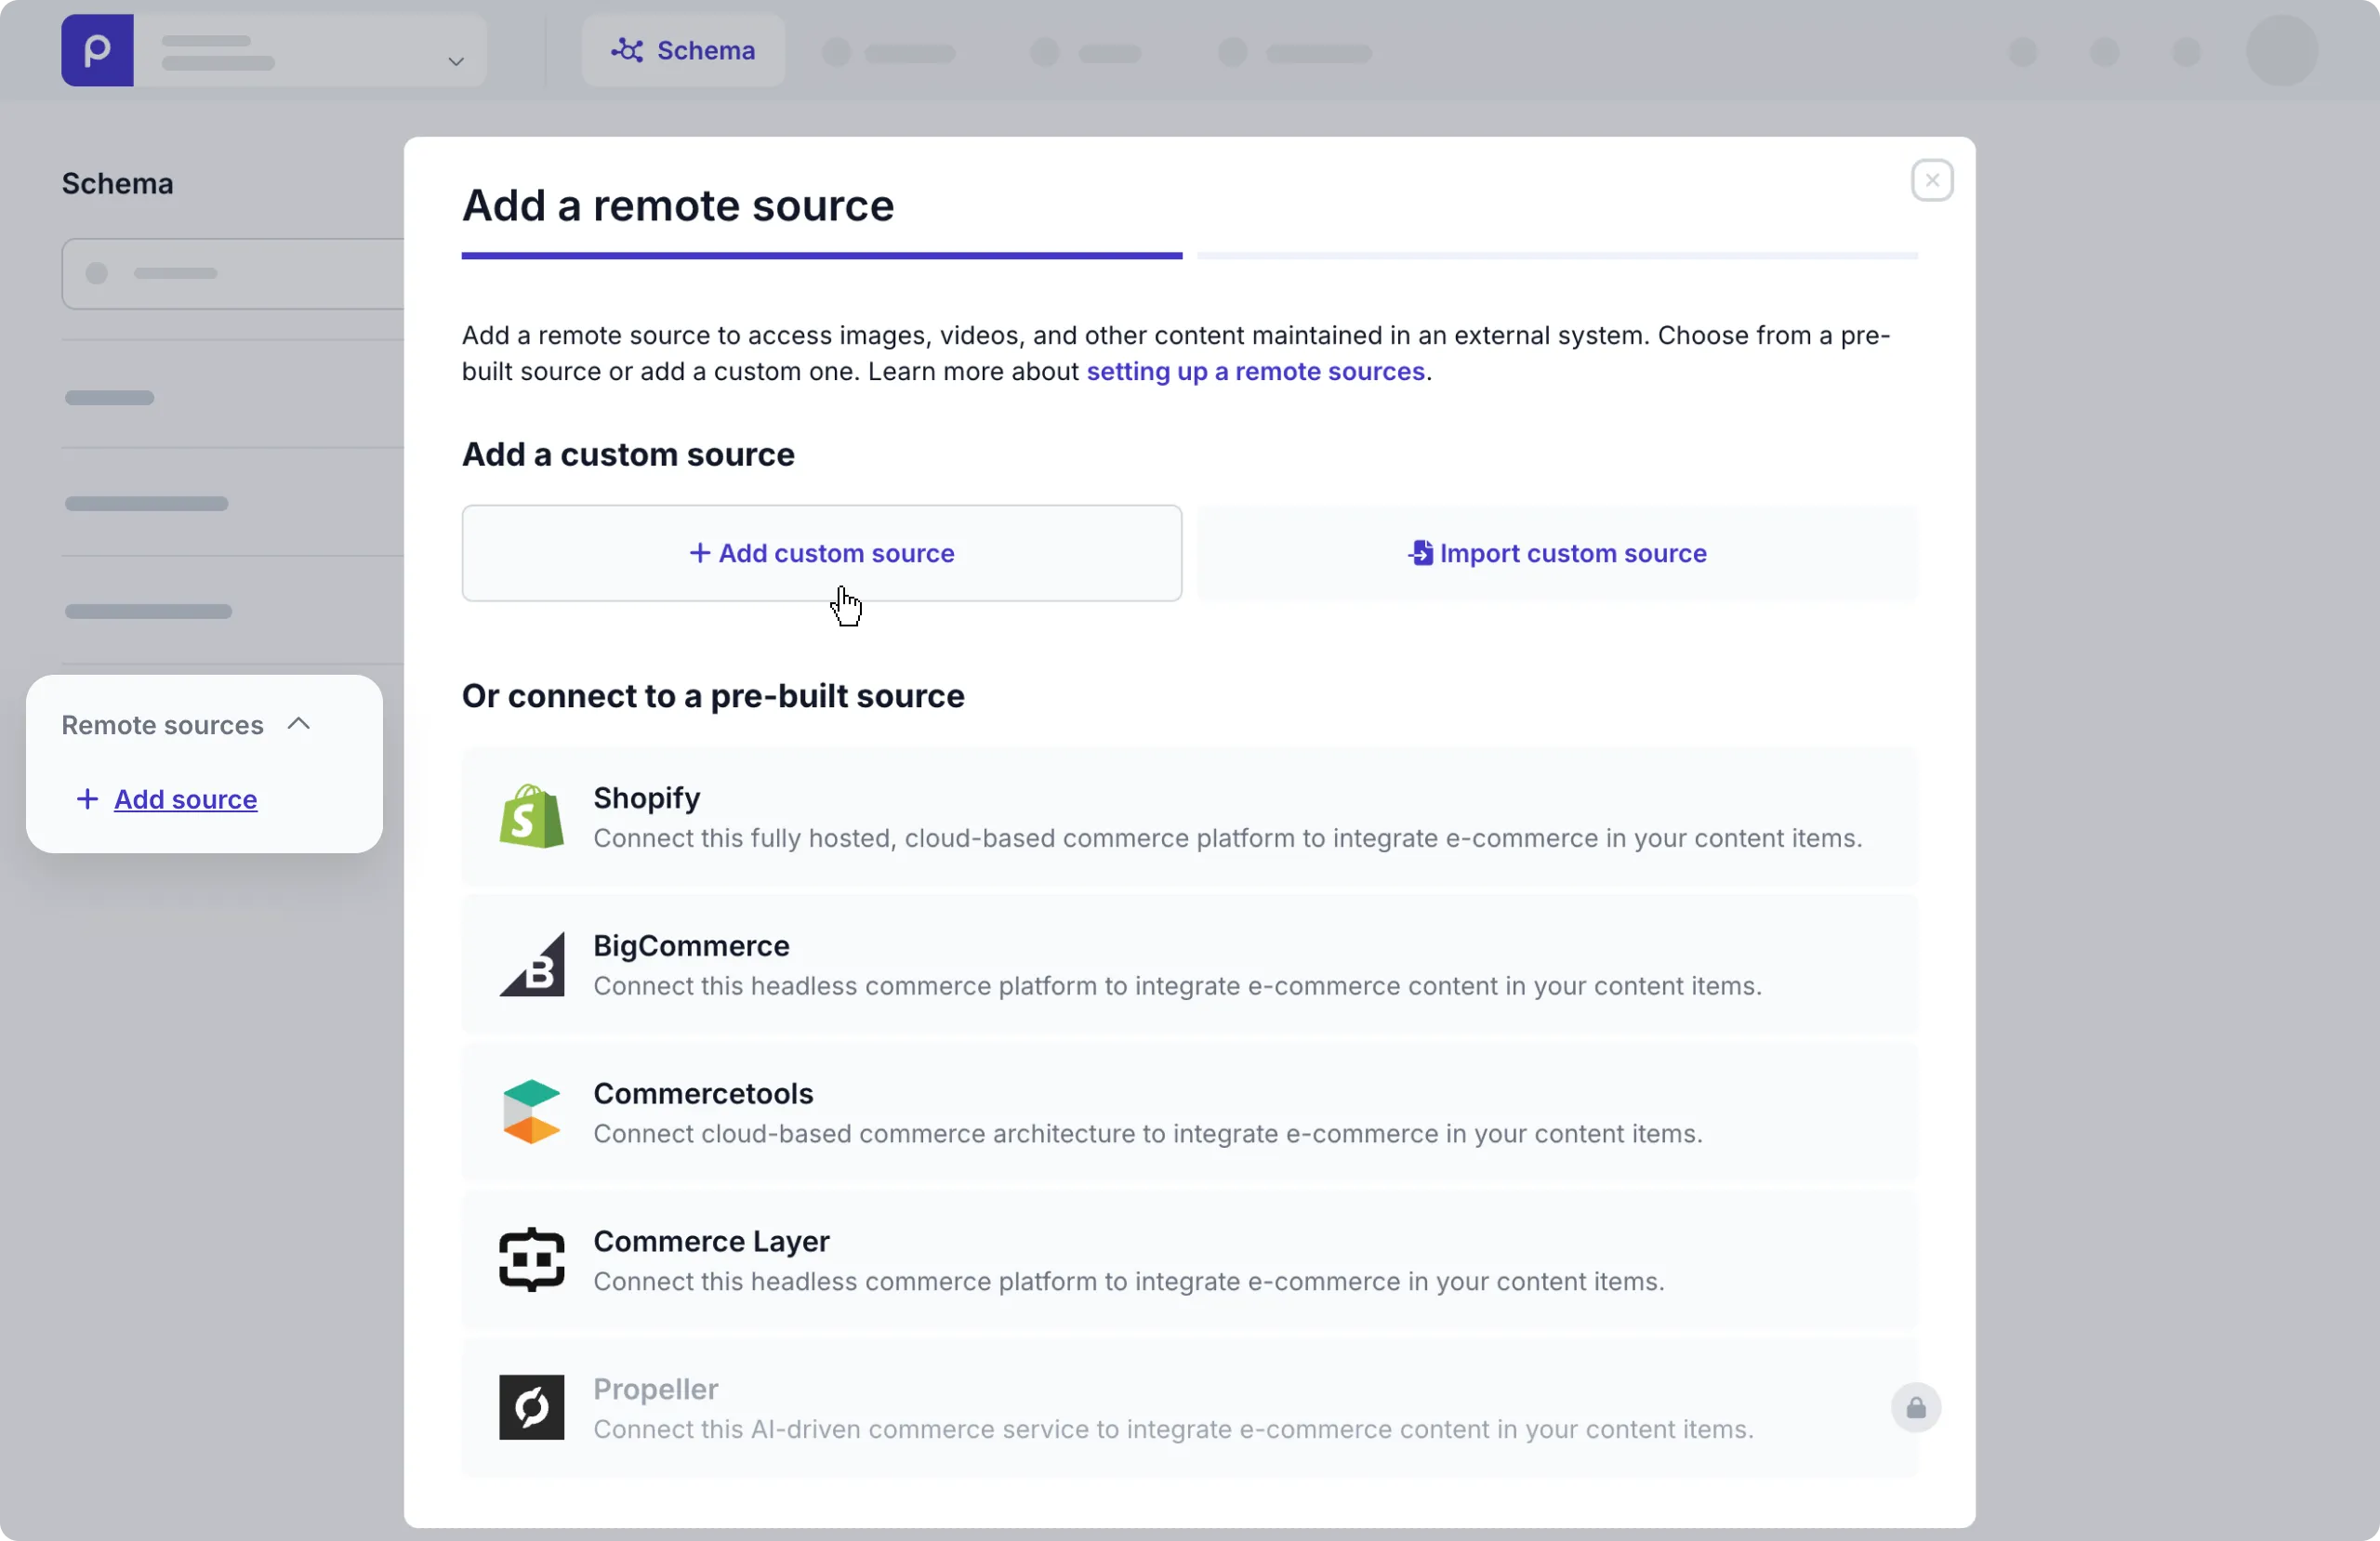
- On the Schema Editor page, navigate to the Remote source section and click the + Add source link.
- In the opened dialog window, click the + Add custom source button.
-
In the next screen, name and describe the source as follows, then click the Save button.
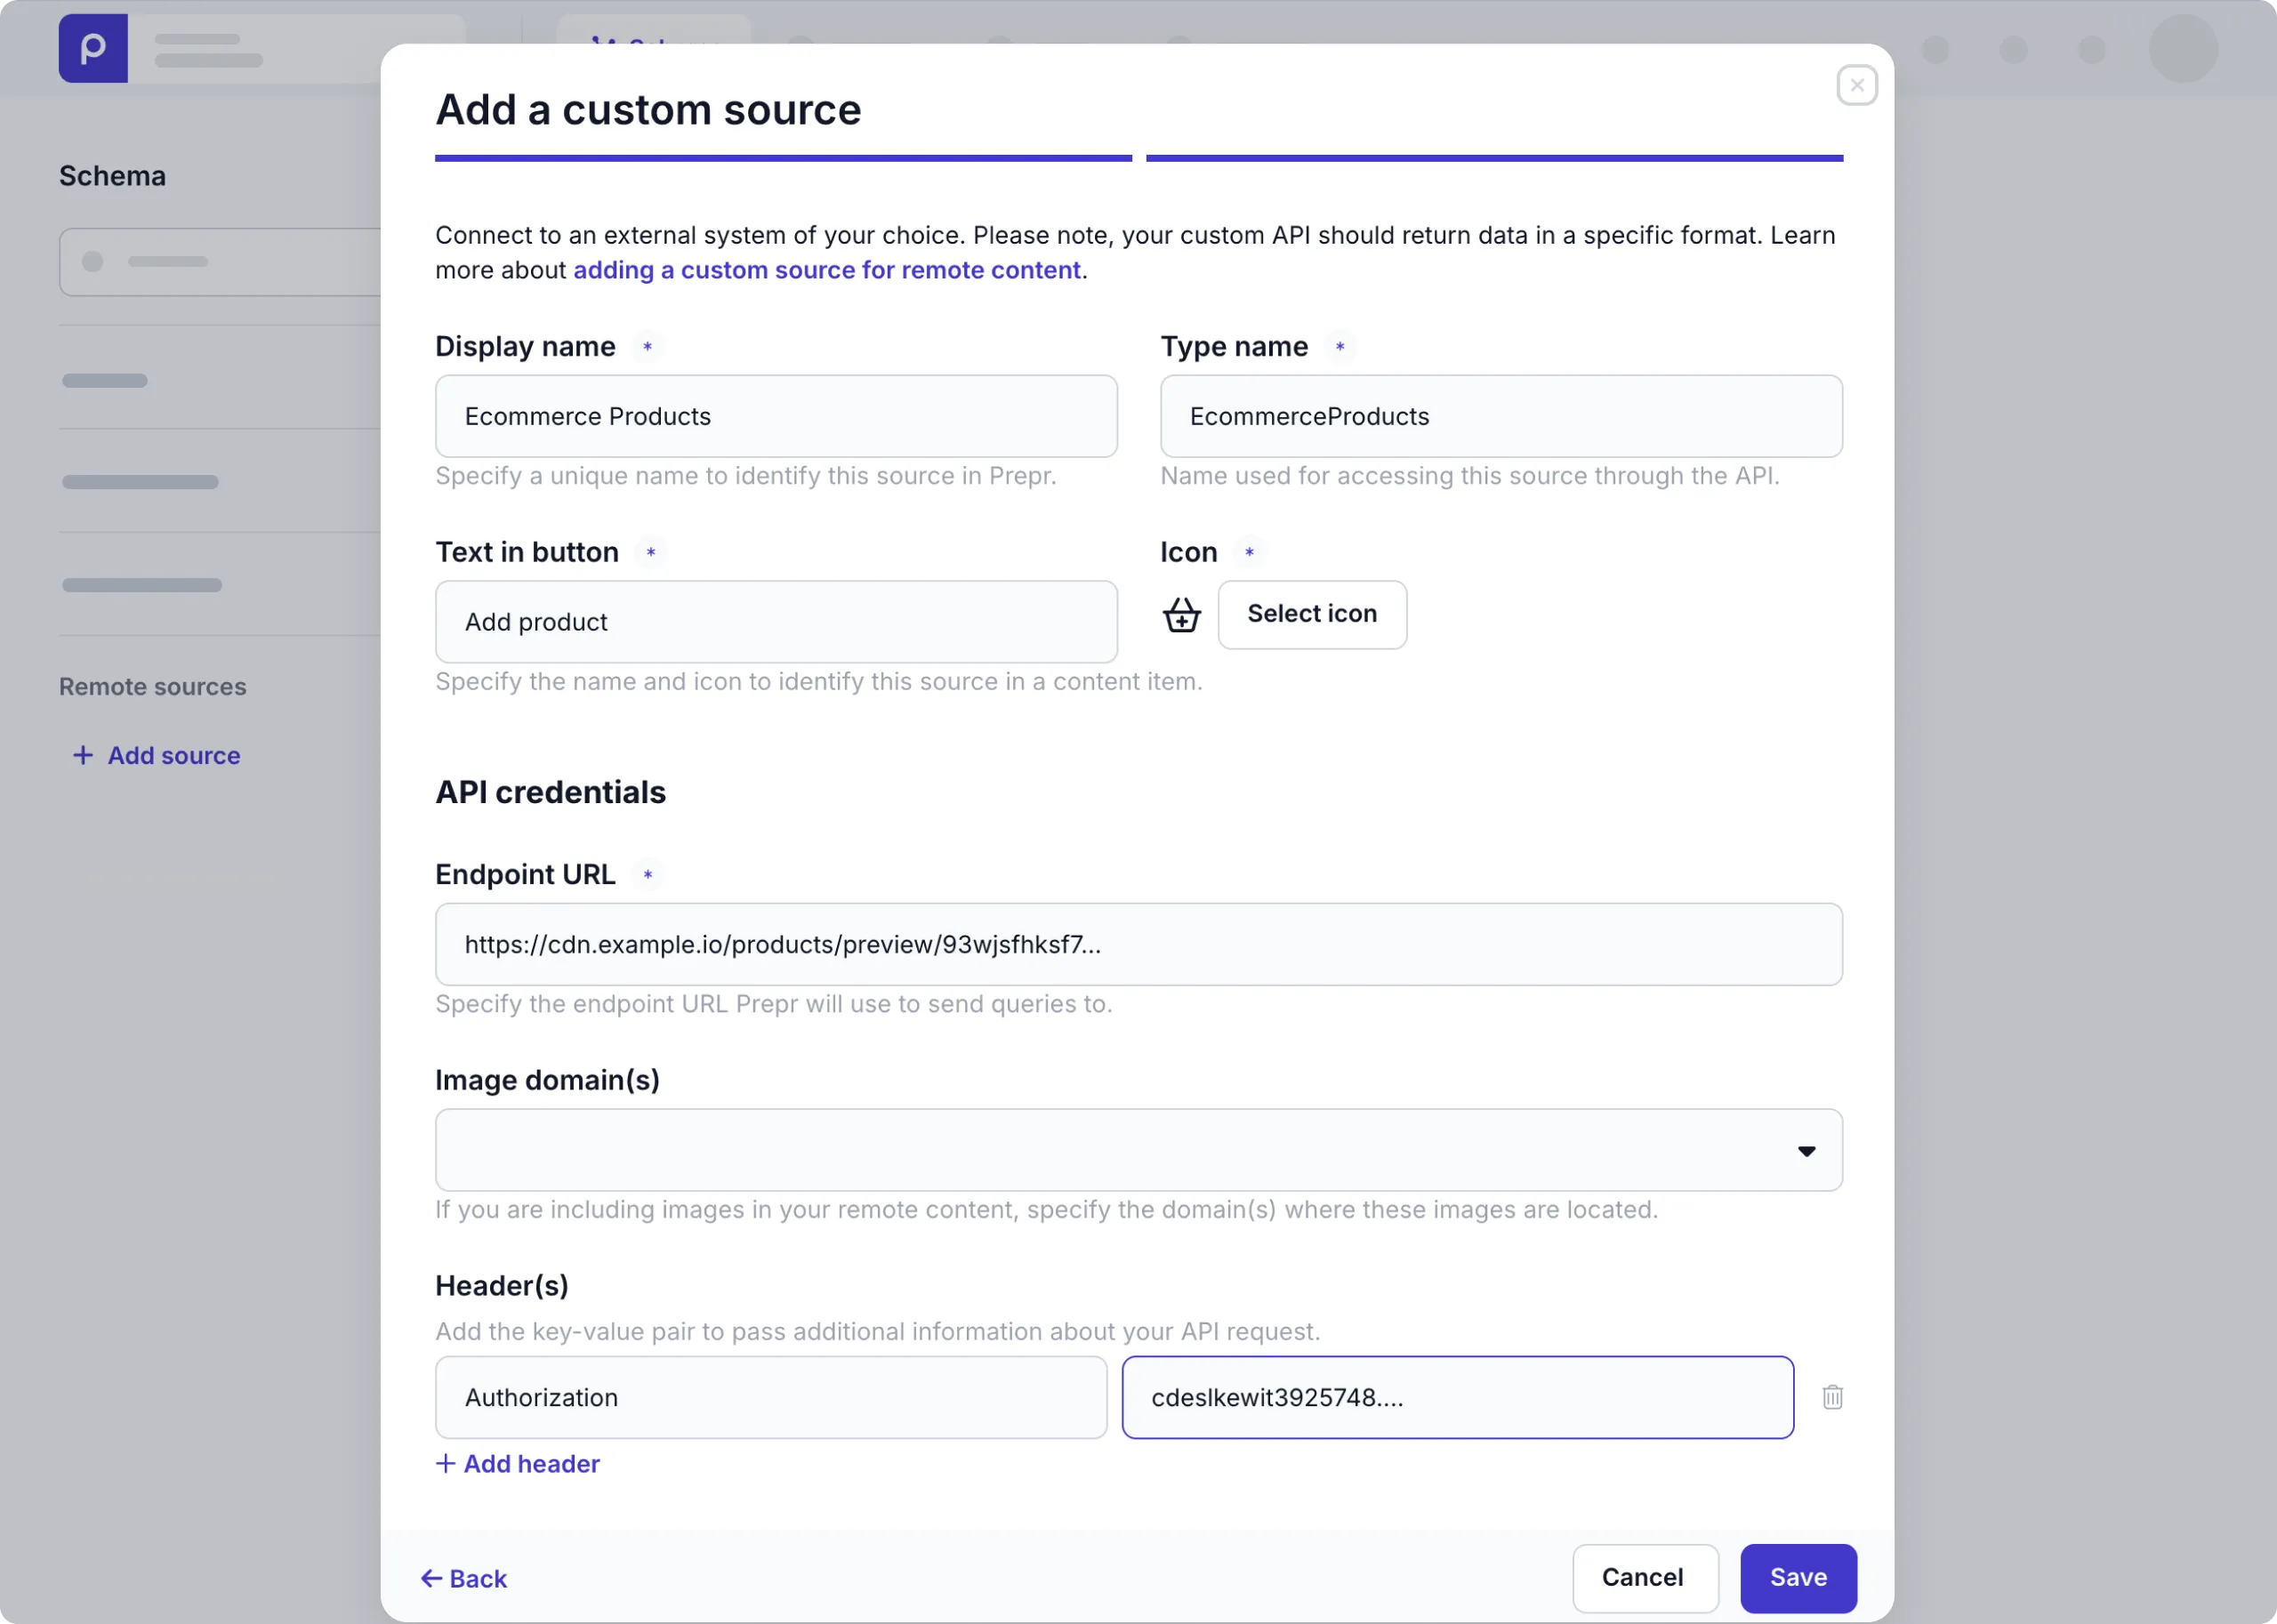
| Field | Description |
|---|---|
| Display name | A unique name to identify this source in Prepr. |
| Type name | A name used for accessing this source through the API. The value is generated automatically based on the Display name you specified. |
| Text in button | The text in the button that will add the items to the content item. |
| Icon | Choose any of the available icons to easily identify the type of remote content in content items. |
| Endpoint URL | The endpoint URL that is used to make the API calls. Refer to your external system API specification. |
| Image domain(s) | An image domain to be allowed in Prepr. Prepr only uses these domains approved for authorized access to images. |
| Header | Add the key-value pair to pass additional information about your API request such as the authorization token. This key-value list will be sent in the header of the API request. |
-
Add fields to your remote source in Prepr and map them to the corresponding fields in the external system as defined in the
dataobject above. You can then fetch these fields using the GraphQL API to deliver remote content in your front end.
a. To add fields to the remote source, drag and drop the desired field type from the list on the right into your source. You add a Text, Boolean or Number field.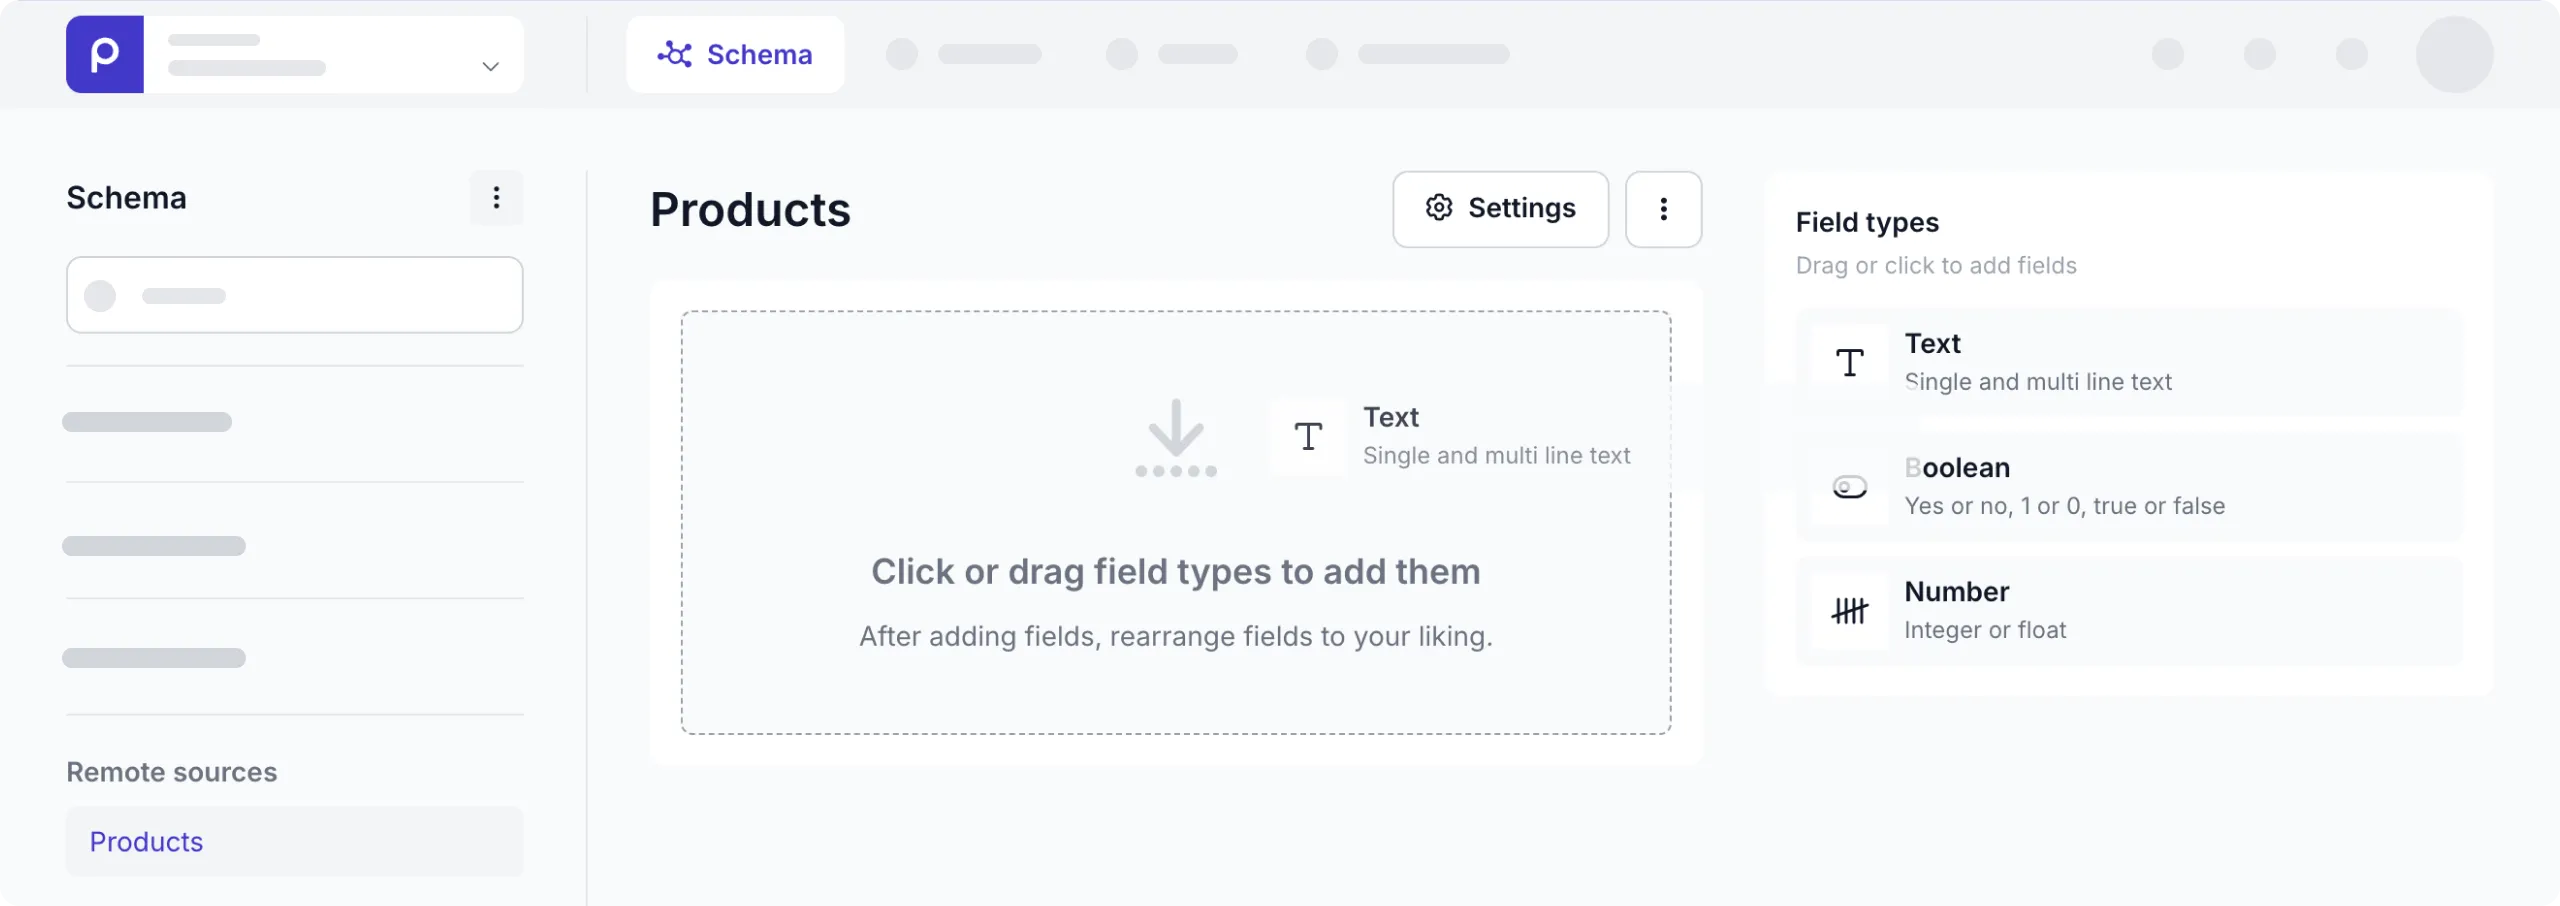
b. Then, set the Name to the Prepr field name and set the Source API Key to the corresponding field name from your external system:
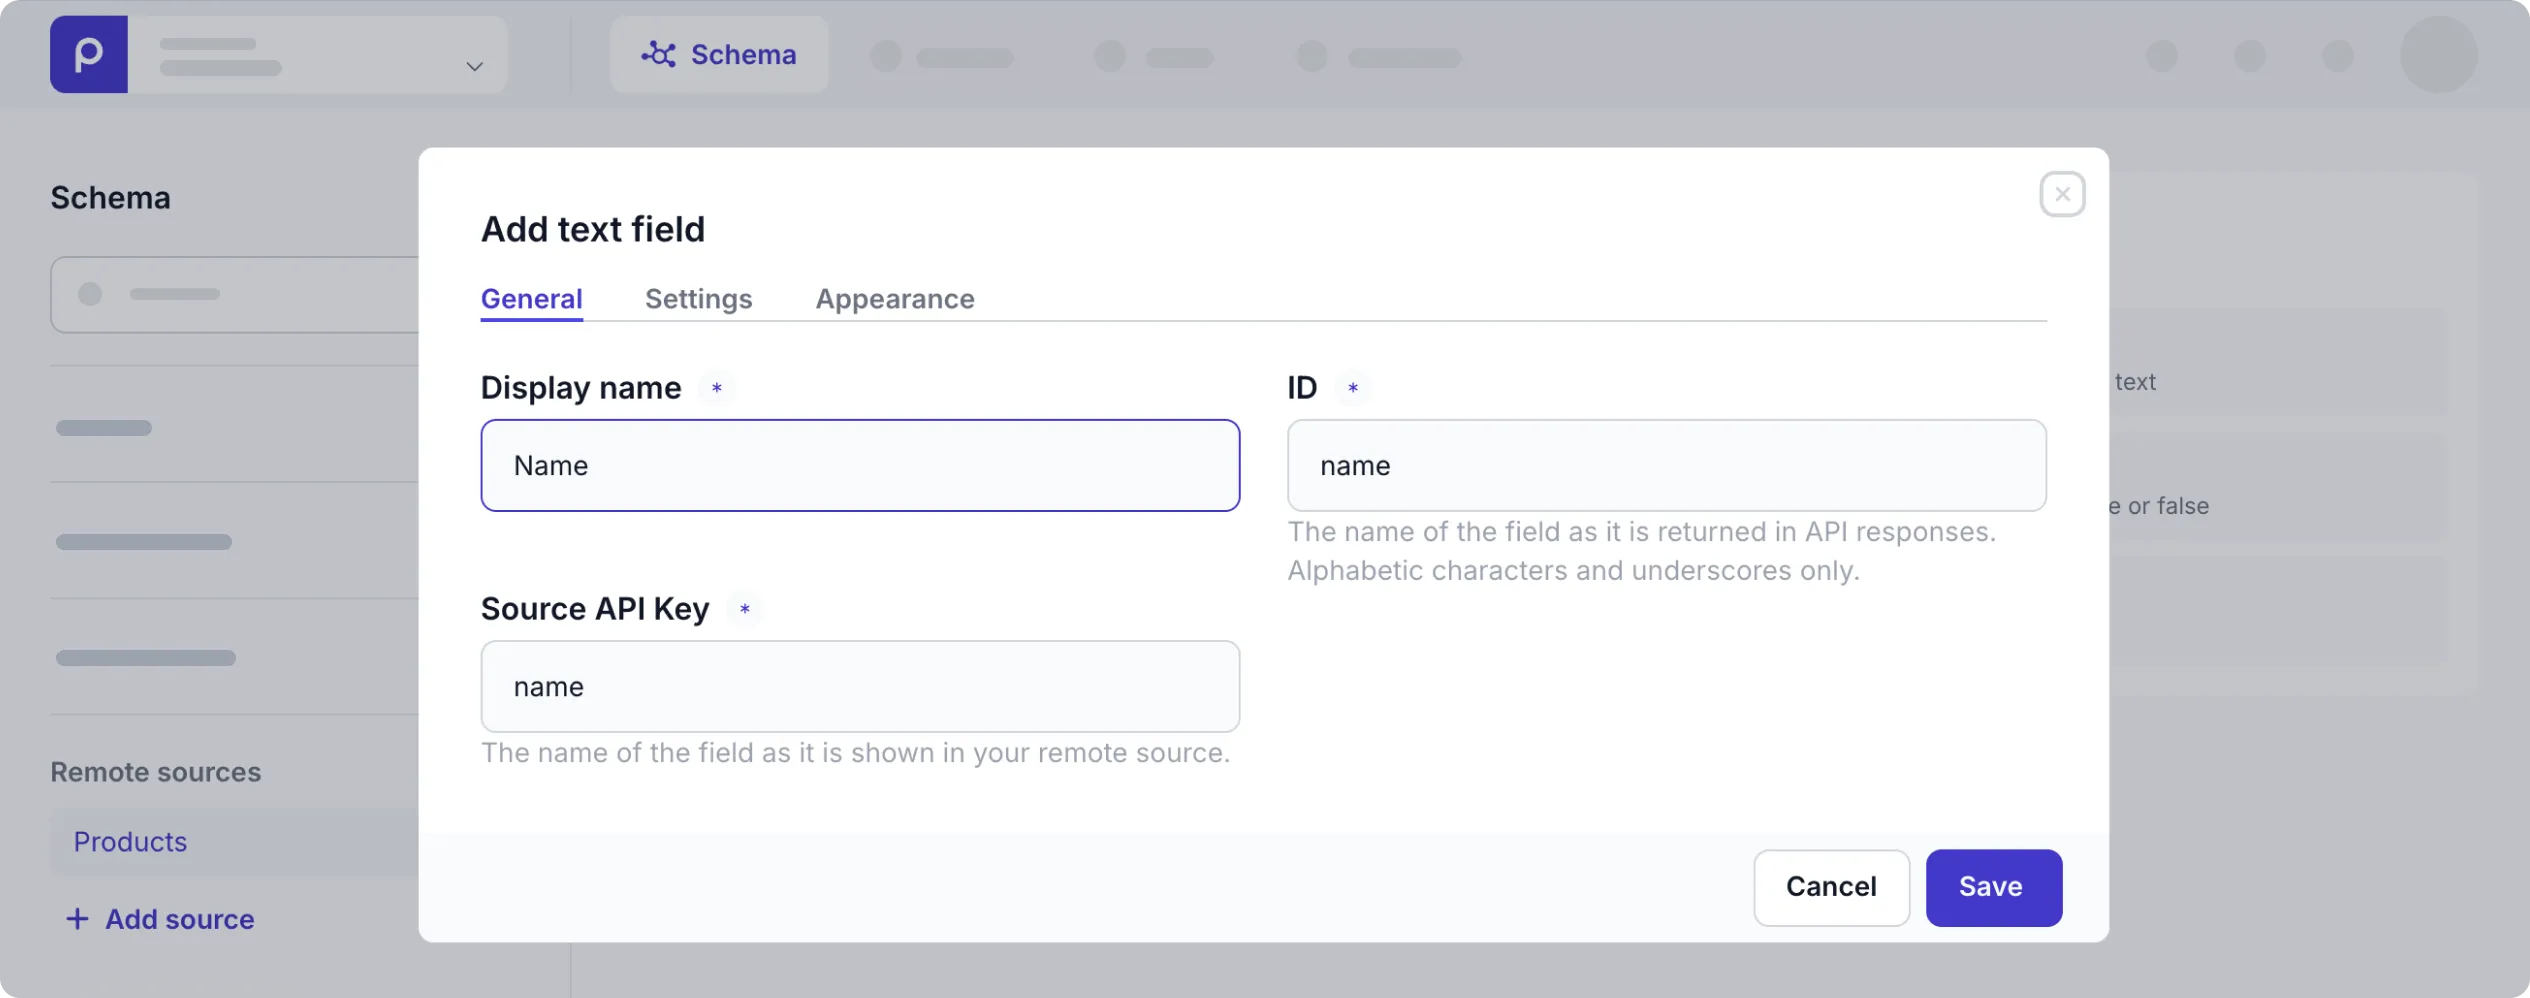
Once you set up the custom remote source in Prepr, an access token will be generated automatically. You can find it by clicking the icon and choosing the Access tokens option. Prepr will use the token as a credential when making API requests.
Now you can add the Remote content field to the applicable model to allow content editors to include remote content in their content items.
Next steps
Once the remote source is set up and editors have included the remote content in their content items, you can retrieve the remote content for those content items using the GraphQL API.