Managing roles & permissions
Prepr CMS uses Role-based access control to manage user permissions in the application. This approach makes it easy to manage access for large numbers of users. You can create and manage user roles if your user role has Users enabled in the Organization level permissions. For example, if you are an Admin user.
To manage user roles, click the environment dropdown at the top left, go to the organization and click the icon to open the environments overview, then go to User management and click the Roles link to open a list of all roles in your organization like in the image below.
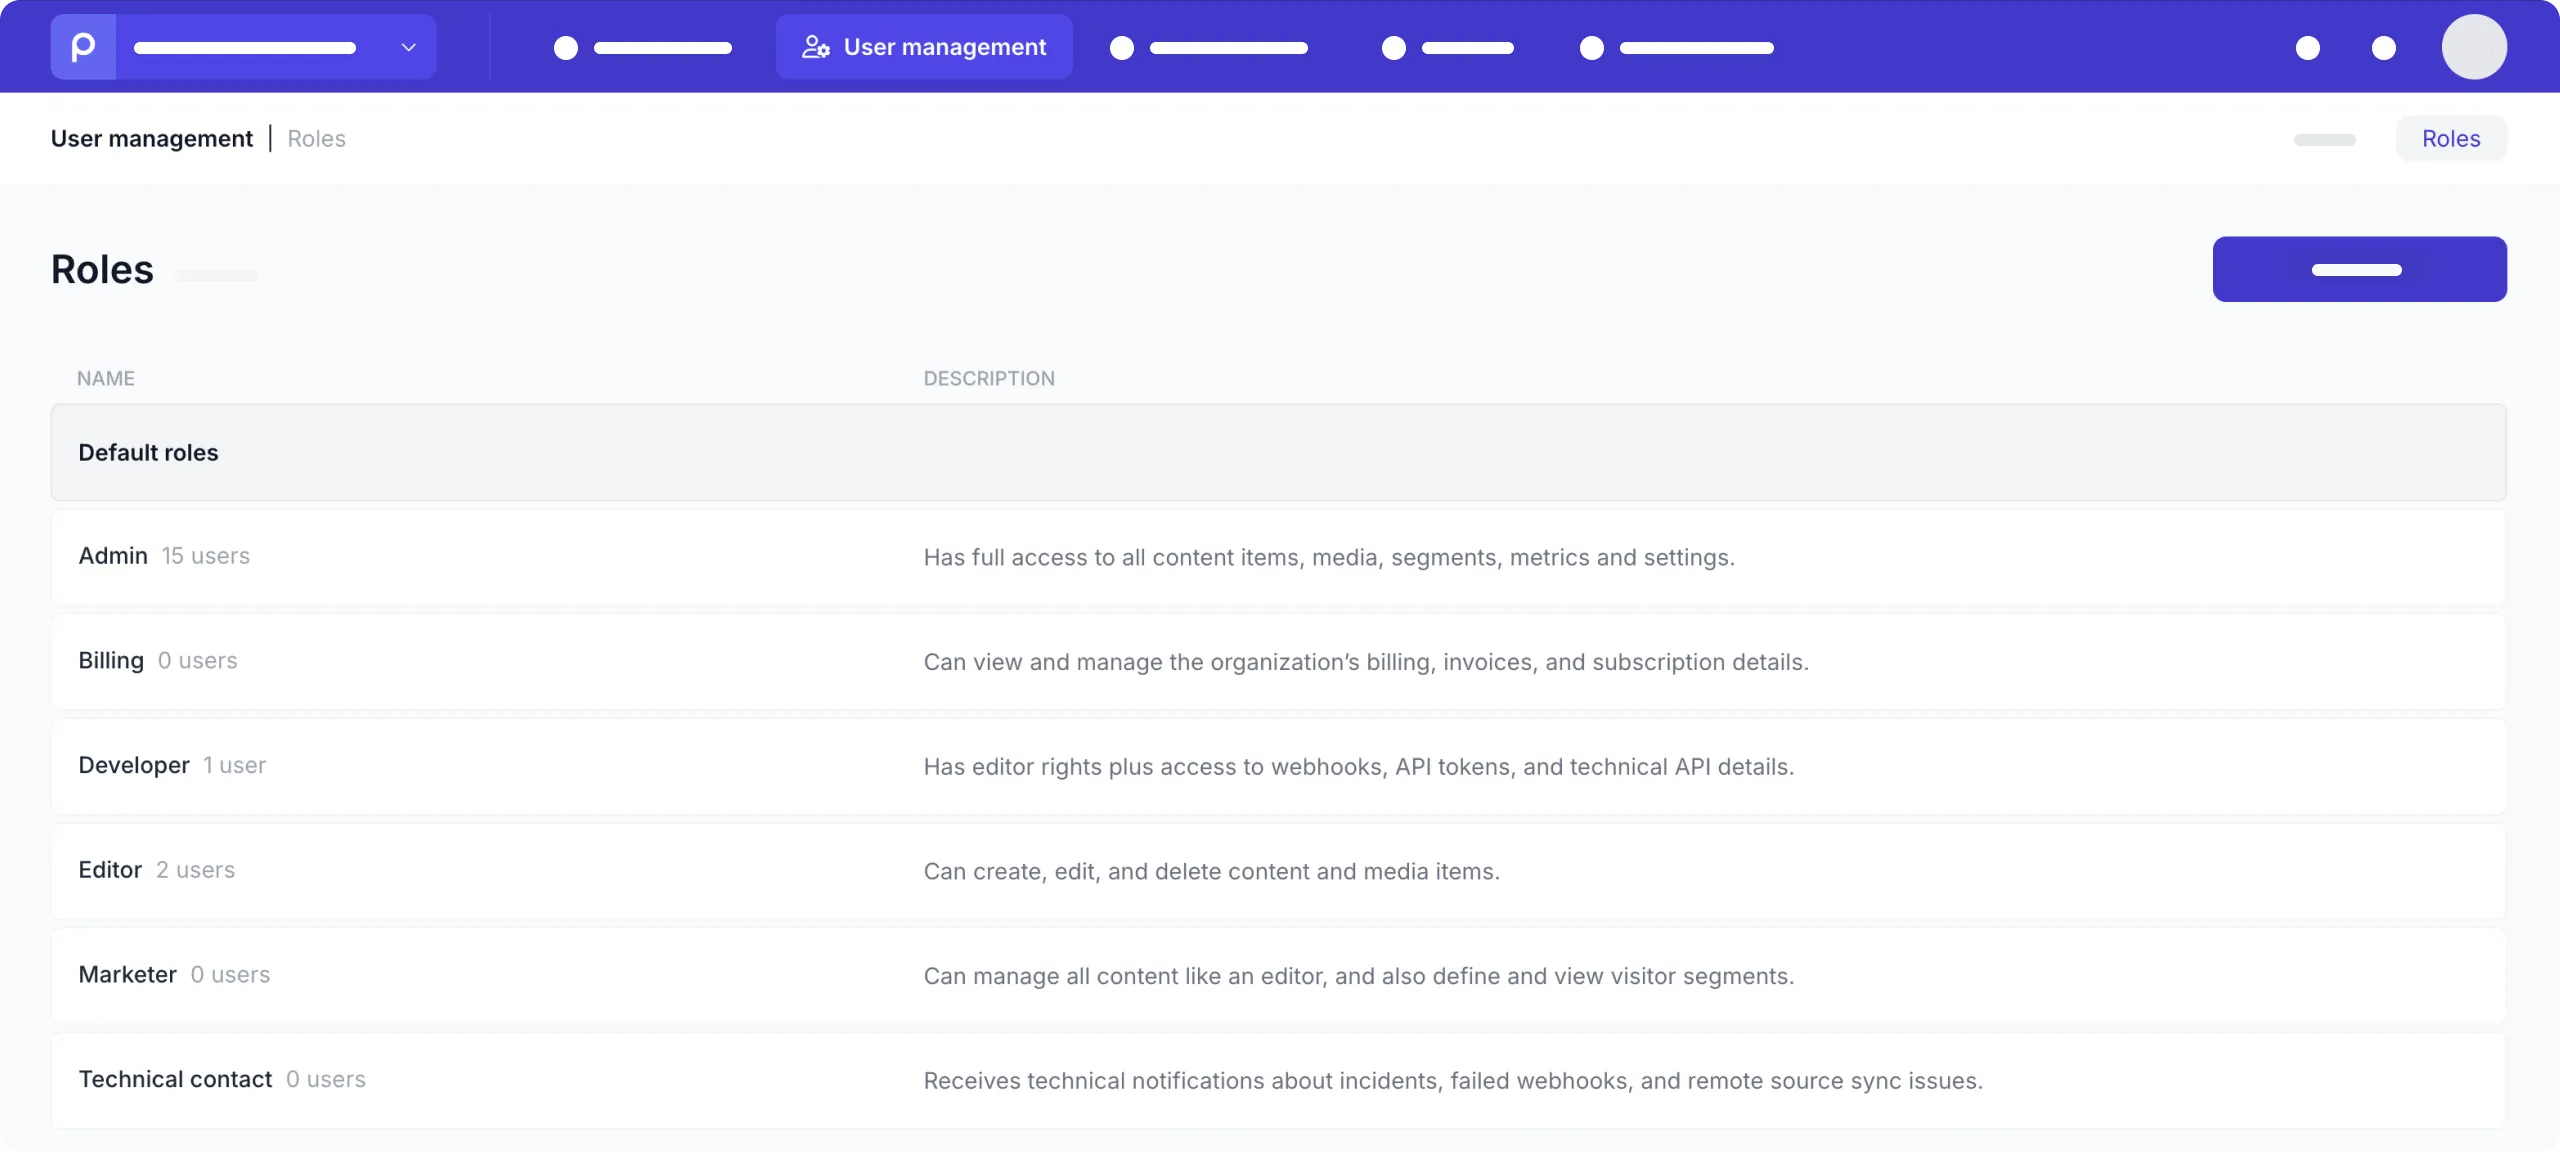
Default roles
You can find the predefined default roles below which can’t be edited or deleted. In addition to these roles, you can create your own.
Admin
Users with the Admin role have access to everything but the billing and plan information. When added to a specific environment, this user has access to everything within this environment, including general settings, locales, and user management. When added to the organization settings, the Admin user can manage users from all environments in the organization.
Billing
Users with the Billing role have access to the organization’s plan and billing information. This includes managing payment information, viewing and handling invoices, and overseeing subscription details.
Developer
Developers have the same content management access as editors, but on top of this they can create and manage webhooks and access tokens. Developers will also see API details of the content items they view.
Editor
Users with the Editor role can create and manage content items and media. This role does not allow access to functions at the organization level, but only at the environment level.
Marketer
The Marketer role is designed for users who manage and optimize audience segmentation within Prepr. This role has the same permissions as the Editor role, allowing users to create and manage content and media. However, a user with the Marketer role also has access to the Segments page, enabling them to define and manage audience segments and impact goals.
Technical contact
Users with the Technical contact role get emailed directly in the event of incidents related to failed webhooks and remote sources failing to sync. They also get an email automatically for announcements on the Status page.
Add or Edit Roles
In addition to the default Prepr roles listed above, you can create and manage your own. To create a role, in the User management → Roles page, click the Add role button and give the role a name (required) and description. On this page, you can specify the permissions of this role. Each permission gives access to the corresponding pages. For example, when you enable the Schema permission, users with this role can access the Schema page to create and manage models, components, remote sources and enumerations.
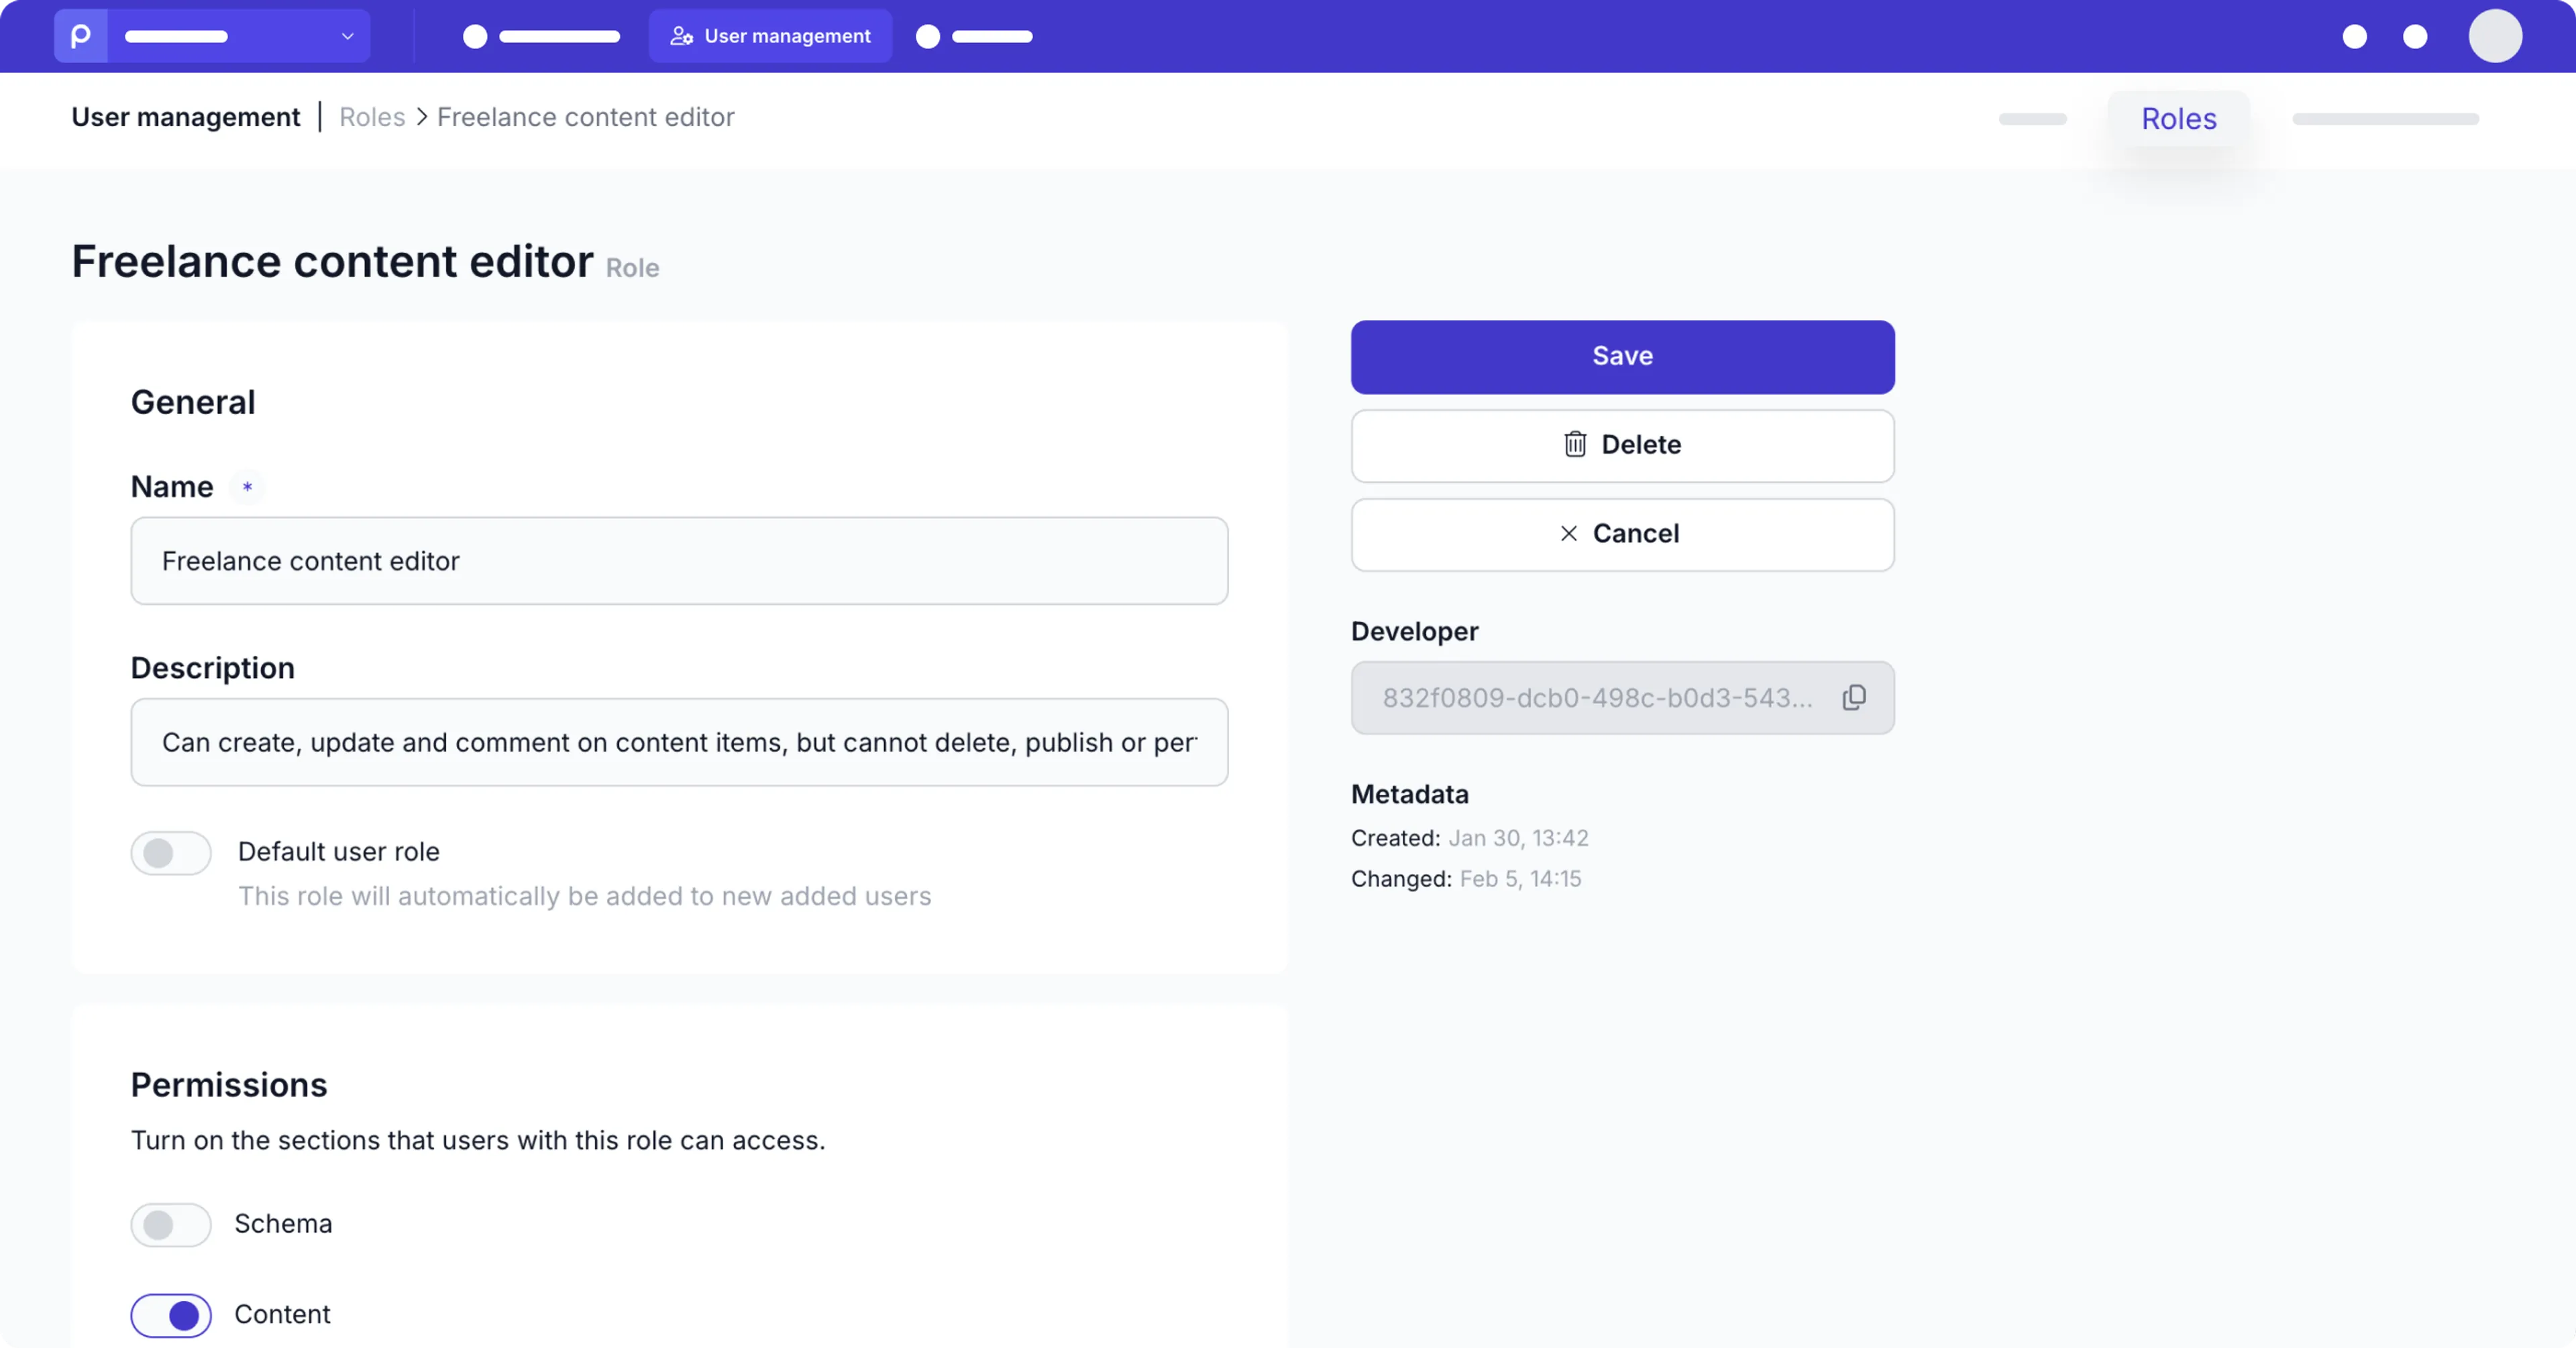
Agencies can create custom roles for all their client environments.
-
When you select the Default user role option, this role will automatically be added when creating a new user.
Content permission
By enabling the Content permission, you give users access to the Content page.
You can further restrict or open content item access at different levels with the granular content management permissions below.
Action-based permissions
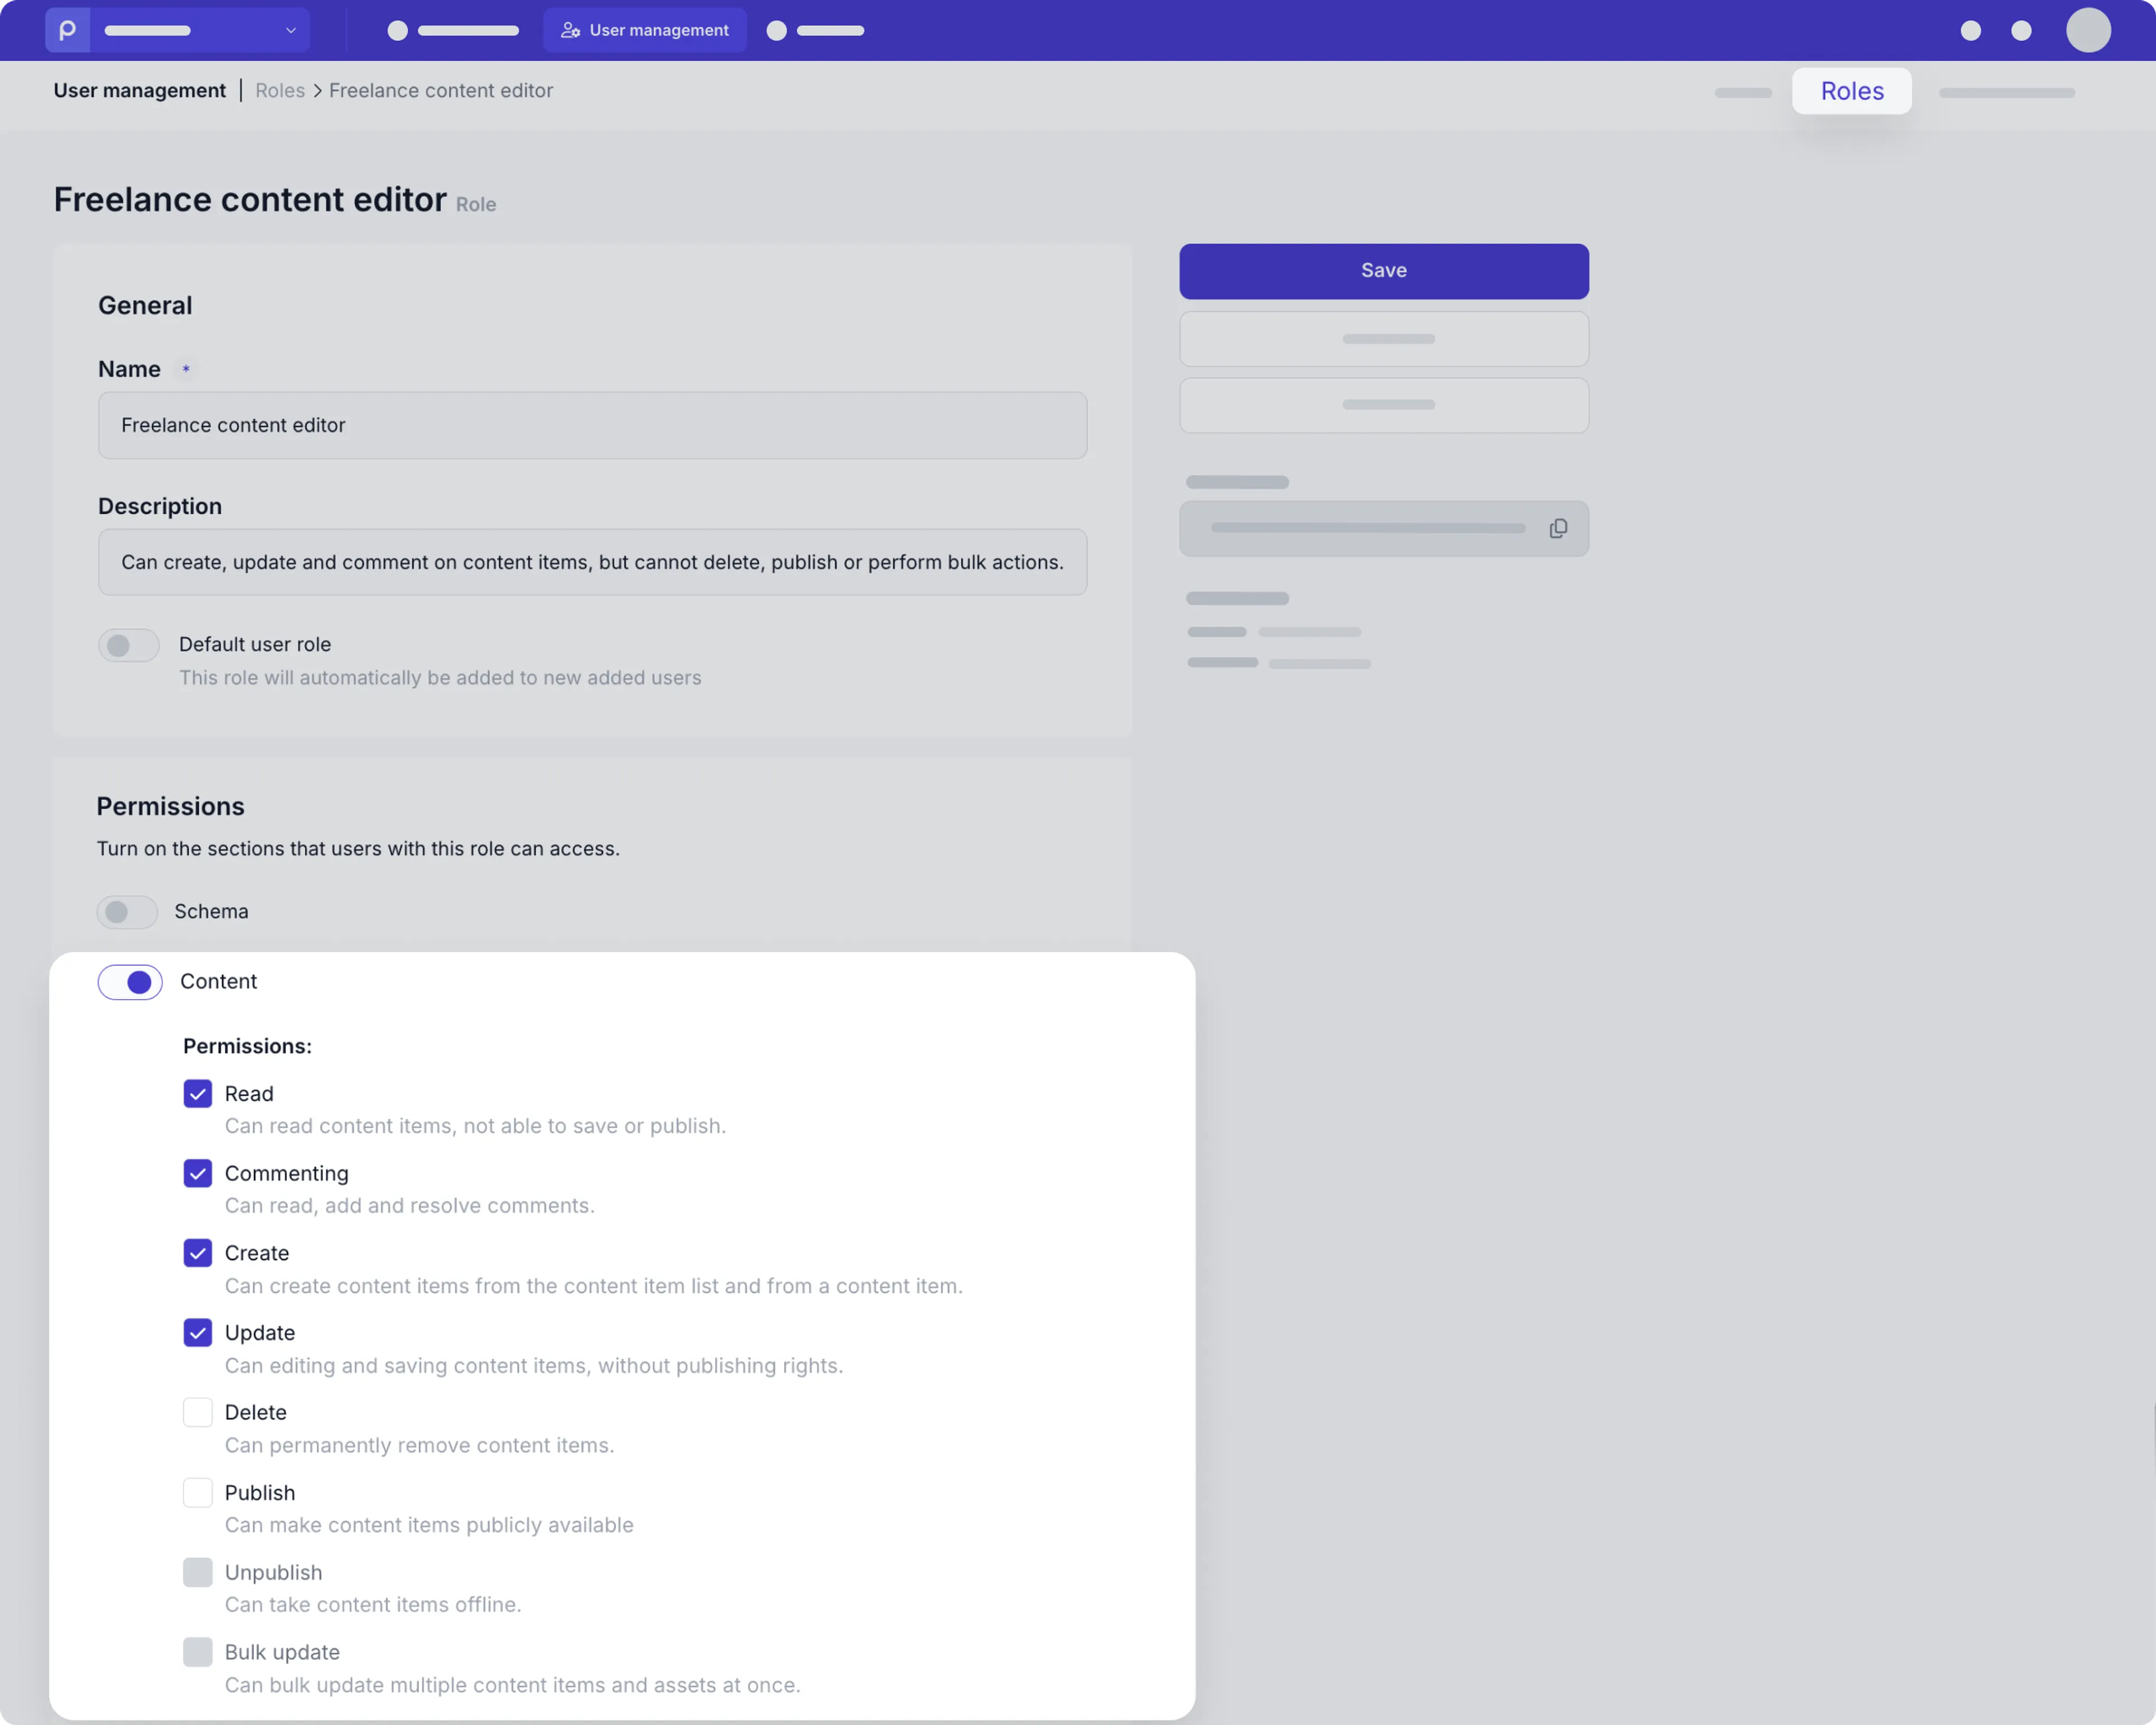
When the Content permission is enabled, you can add the following action-based permissions:
- Read - This option is the most strict access and only allows users can only view content items.
- Commenting - This option allows users to only add, delete or resolve comments. If only this and Read access is enabled, users cannot edit the content item with any other action.
- Update - This option allows users to only edit and save a content item.
- Create - This option allows users in this role to only create and update content items.
- Delete - This option allows users in this role to only delete and update content items.
- Publish - This option allows users in this role to only publish and update content items, but not create, delete, unpublish or comment on them.
- Unpublish - This option allows users in this role to publish, update and unpublish content items, but not create, delete or comment on them.
- Bulk update - This option allows users in this role to perform any action and the corresponding bulk action on content items, except commenting.
Specific content access
In addition to granting access to users to perform specific actions on content items, you can also choose the following specific content access options:
-
Items related to user only
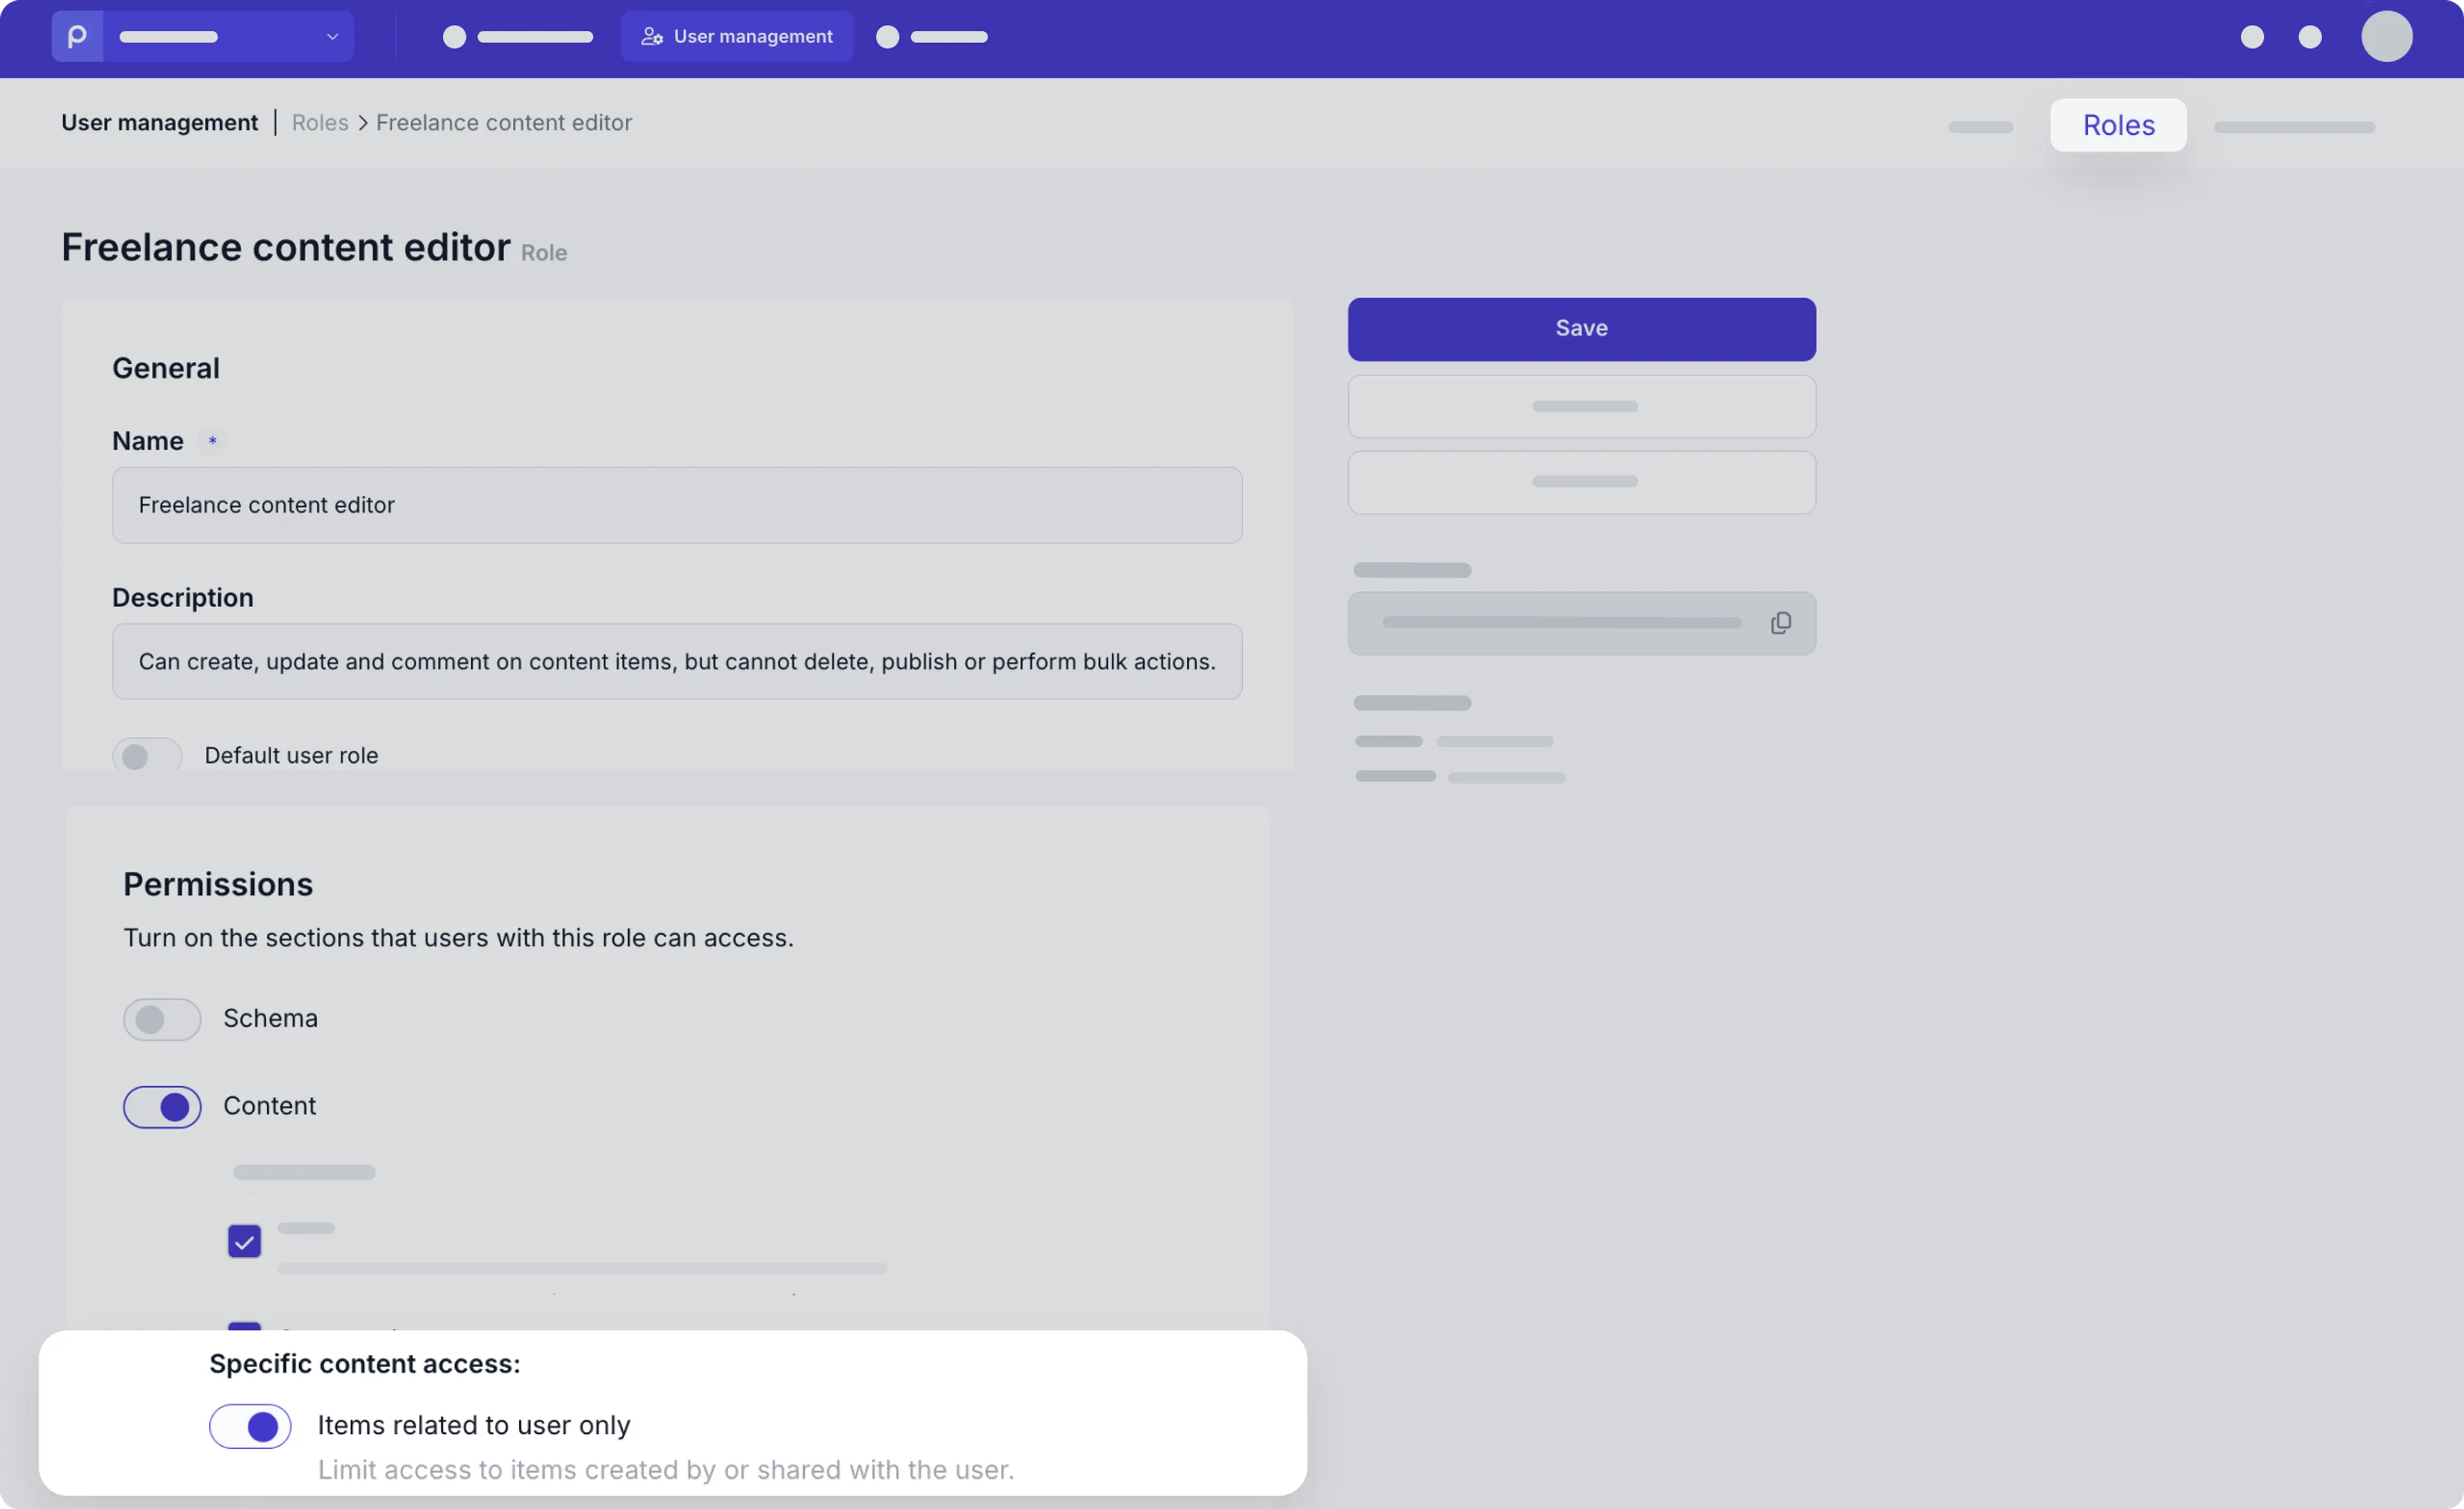
When you enable this option, you allow users to only access content items they created or items explicitly shared with them.
If you don’t have access to this option, contact our Sales team for more details.
-
Content restrictions - These options restrict access on content items by their model, locale and workflow stage.
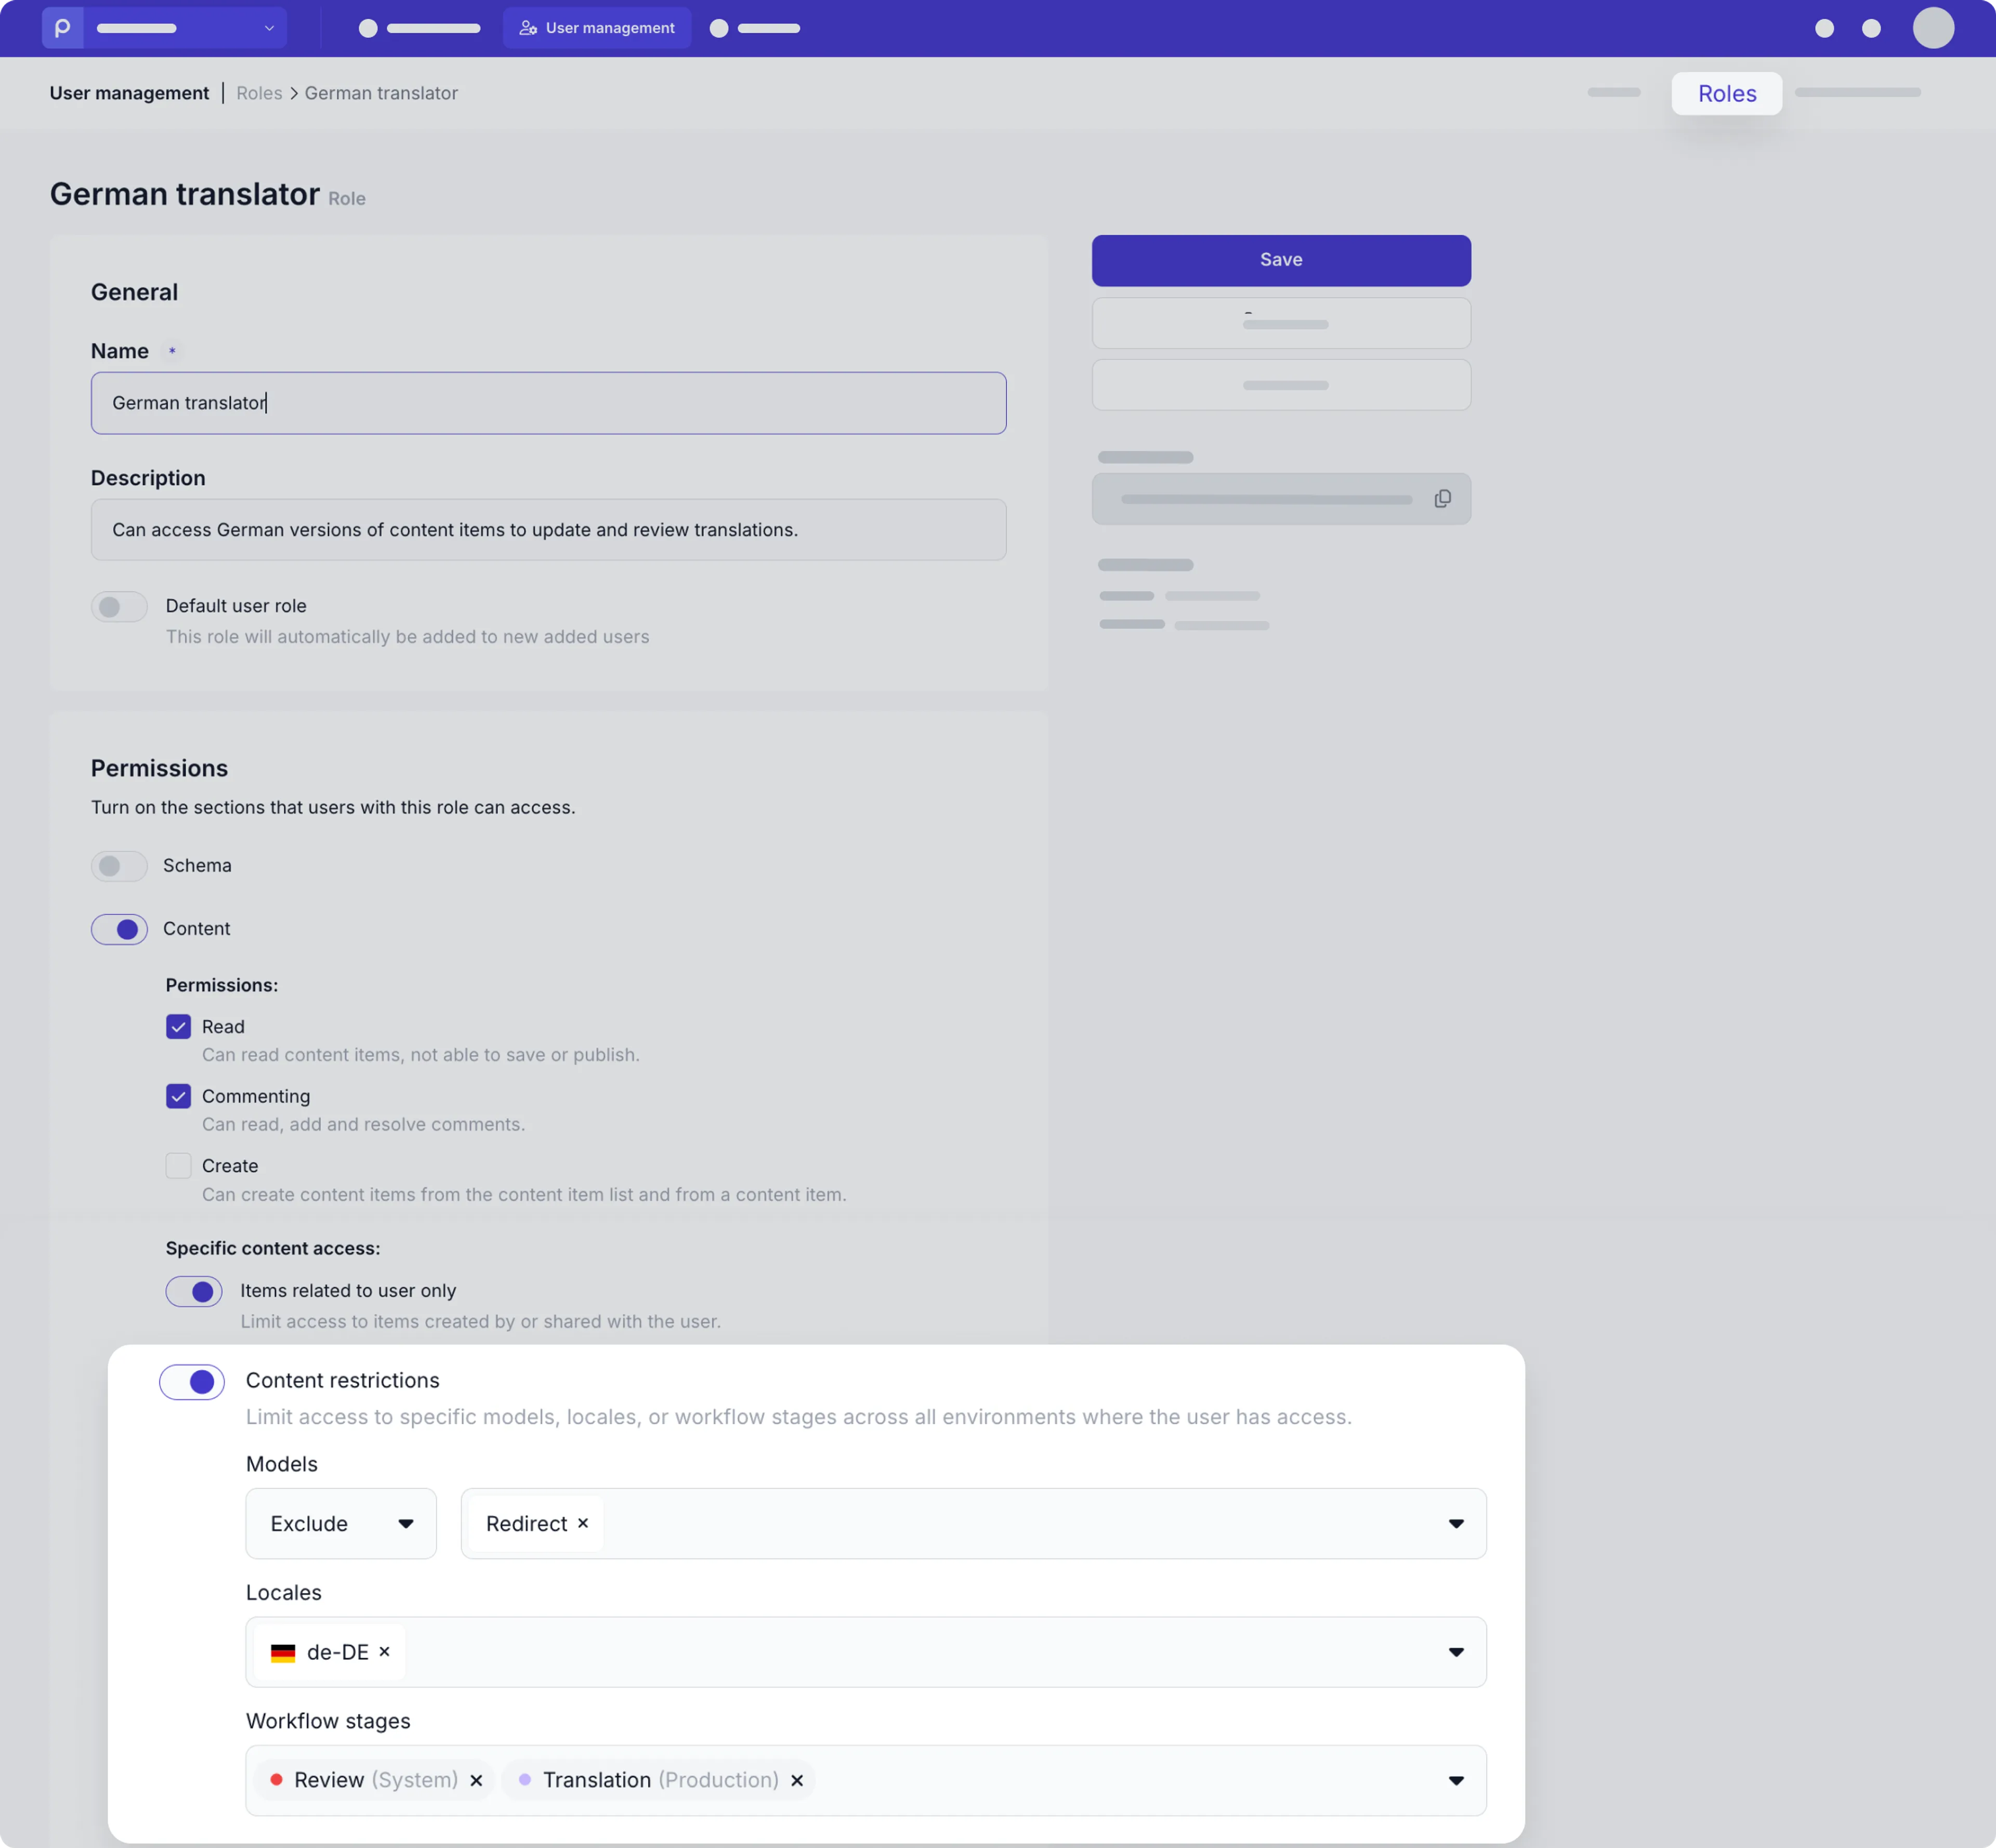
-
Models - You can choose to grant access to content items related to only specific models. For example, for authors who only work on blog posts.
You can also choose to exclude models from the full list. For example, exclude config-related models for content editors who focus on all web page content.
-
Locales - You can choose to grant access to specific content item language versions. For example, only German, to a contractor responsible for German translations only.
-
Workflow stage - You can grant access to content items with specific workflow stages. For example, for a reviewer who only needs to access content items in the Review stage.
-
Guidelines
When creating or editing roles, please be aware of the following principles:
-
Take note of the following behavior when choosing Content permission options:
- The Read option is always enabled when you enable the Content permission.
- You can only enable the Create, Delete and Publish options when Update is enabled.
- You can only enable the Unpublish option when Update and Publish is enabled.
- You can only enable the Bulk update option when Update, Delete, Publish and Unpublish is enabled.
-
When you add multiple roles to a user, the most restrictive role will be applicable. For example, consider a custom Junior editor role that doesn’t allow a user to delete content items. However, the default Editor role allows a user to delete content items. So, if you add both the Junior editor role and the Editor role to a user, they will not be allowed to delete content items.
Changes in a role will take effect within a minute.
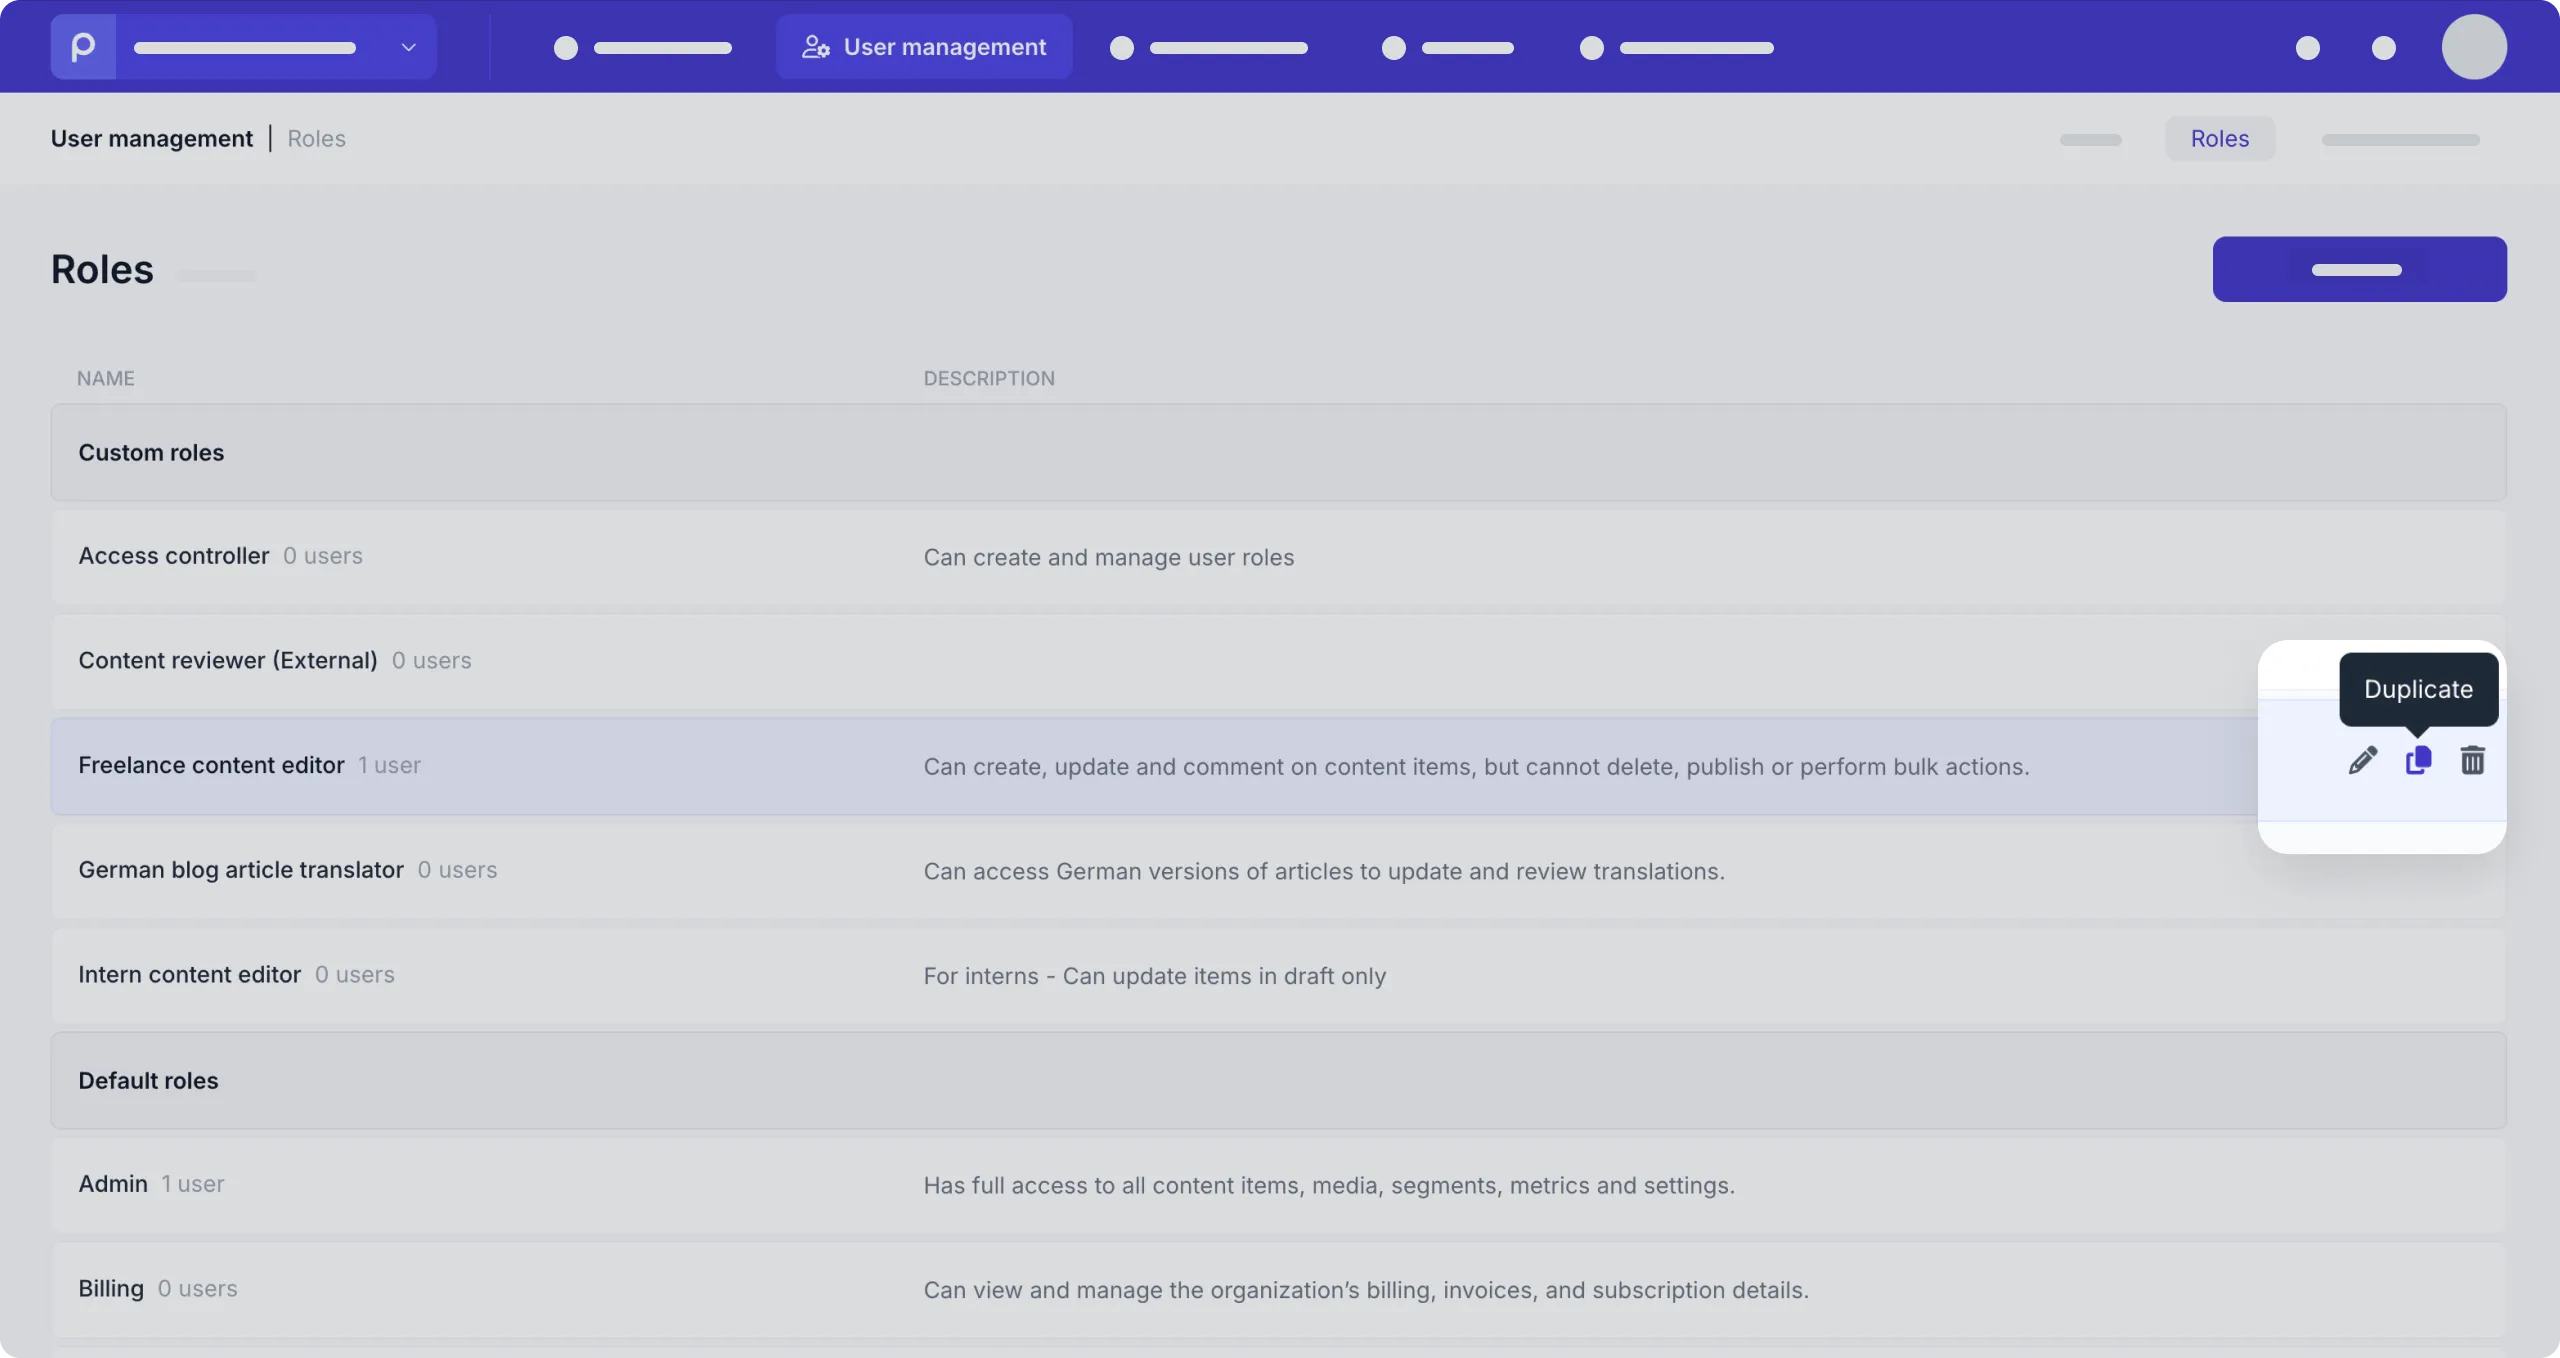
Duplicate roles
When you want to use a specific role as a template for new customized roles, you can duplicate the original role.
You cannot duplicate the Prepr default roles.
To duplicate a user role, follow the steps below.
- Go to the User management tab in your organization.
- Click the Roles link at the top right to open the list of roles.
- Hover over the role you want to duplicate and click the icon to duplicate the role.
Owner(ship)
In addition to other roles, you can manage the Owner role. An organization can have only one Owner and it has administrator rights across all environments. You can transfer ownership to another user in the organization details of your subscription.
-
Click your account profile icon and choose the Subscription option.
-
At the top right, click the Organization details link.
-
In the Contact details section, click the Account owner drop-down menu to change the owner to a different user.
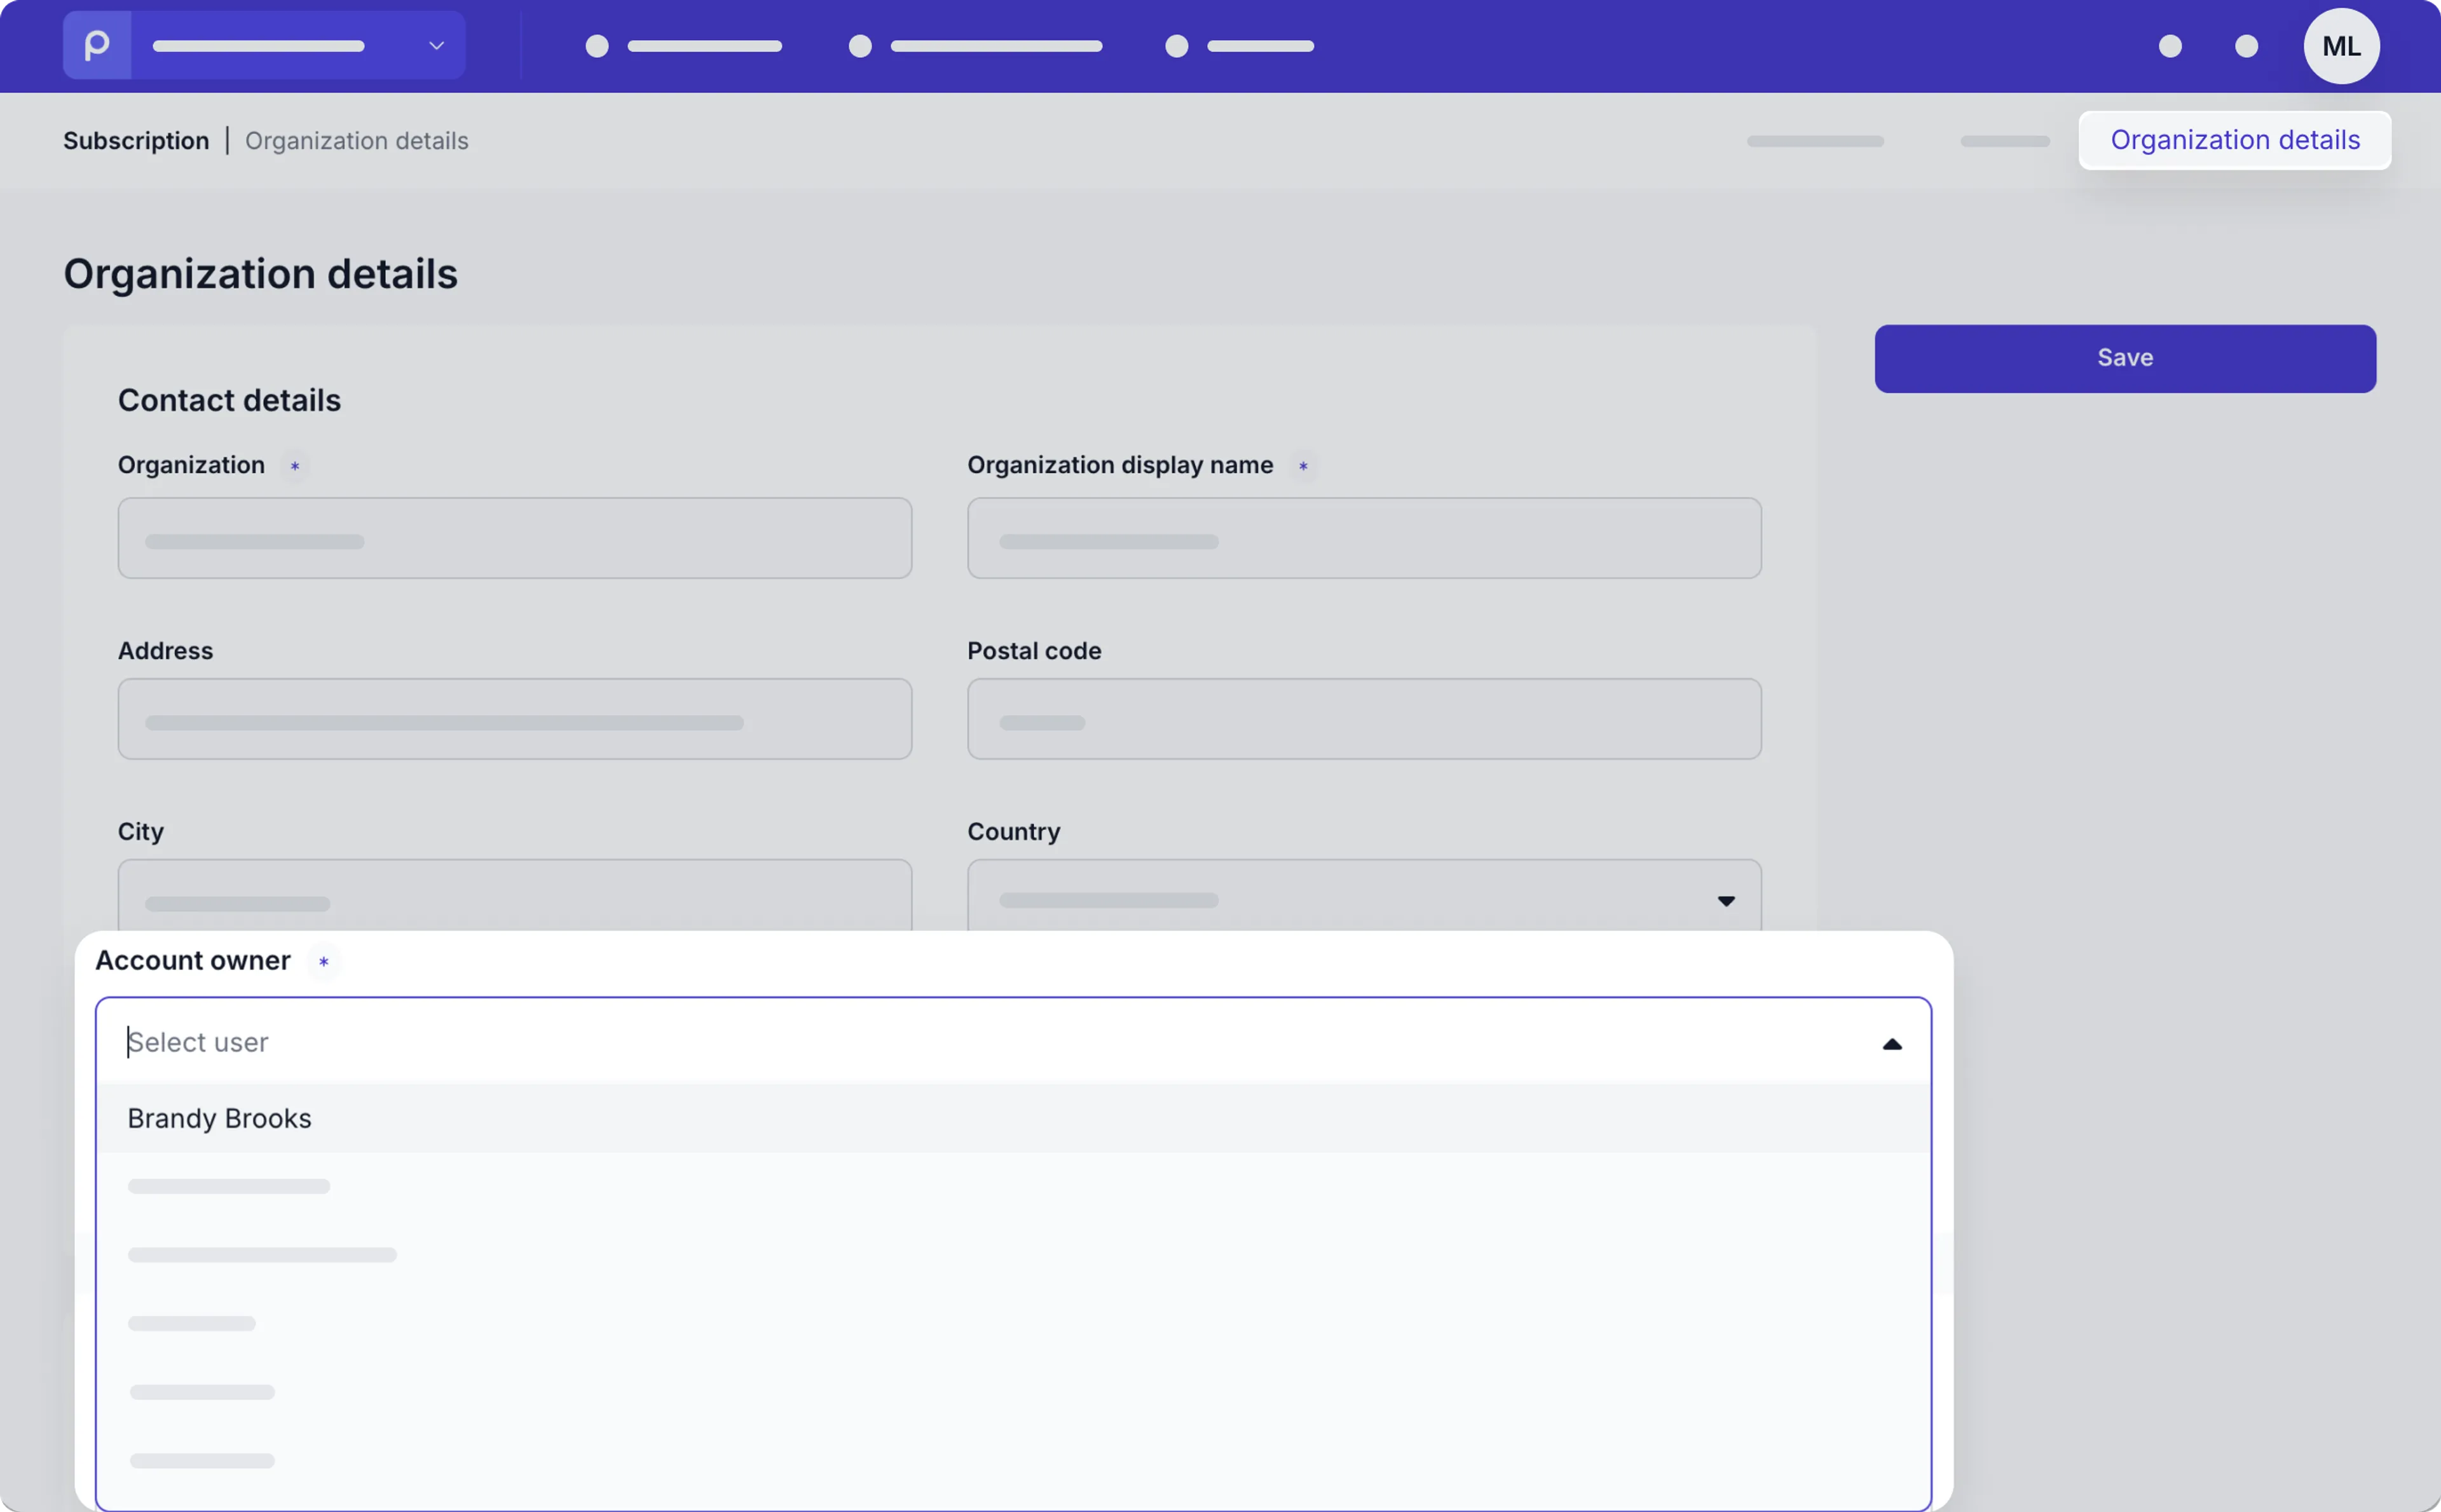
-
Click the Save button to transfer ownership. Your own role has now been set to Admin and you automatically lose access to the page you’re on.
Only the account owner can transfer ownership to another team member. If you’re not the account owner, request the account owner to send us an email from their email address registered in Prepr with the account transfer request.