Algolia
From this guide, you’ll learn how to index Prepr content with the Algolia search engine for an optimized and performant search experience in your web app.
The Algolia integration is available as a paid option on top of your regular subscription. Please contact our Sales team (opens in a new tab) for more details.
Introduction
If you value a good customer experience, you might think about how web visitors search across your app. Can they easily find what they are looking for? Are they receiving the most up-to-date content? Web users have a short attention span, so it's crucial to provide them with relevant search results to maintain their loyalty.
Prepr supports integration with Algolia (opens in a new tab), an AI-powered search service with a high-performance API. It enables your Prepr content items to be indexed using the Algolia algorithm, maximizing the search speed and content discovery in your web app.
First things first
Note the following important factors before setting up the Algolia integration. These give you a good understanding of the impact on record size and related cost, how records are split and the search performance.
Record size limits
There are record size limits (opens in a new tab) based on your Algolia plan. Make sure you understand the impact of exceeding these limits before setting up the Algolia integration.
Your Prepr schema design can influence the size of your data records. With this integration setup, Algolia splits content in Stack fields and Dynamic content fields into separate records to improve the content search results.
Improving search results and performance
You can easily improve search results and performance by configuring Algolia attributes:
- Searchable attributes (opens in a new tab)
- Attributes for the custom ranking (opens in a new tab)
- Attributes for deduplication (opens in a new tab)
For this integration, we recommend configuring the attributes: _body, _level and distinctID as detailed in the guide below:
Setting up the Algolia integration
Follow the steps below to set up your Algolia integration to search Prepr content in your web app.
Get the API credentials from your Algolia app
To connect Prepr to Algolia, you need an Application ID (opens in a new tab) and a valid API key (opens in a new tab) with the following ACL permissions:
settings: Used to verify if the index exists before performing operations.editSettings: Used to edit the index before performing operations.addObject: Used to add new records to your Algolia index.deleteObject: Used to delete outdated or incorrect records in the Algolia index.search: Used to find related records that also need to be updated in the Algolia index.
For more details, check out Rights and restrictions (opens in a new tab) in Algolia docs. Algolia uses these credentials to identify your Prepr application and control access to Algolia’s API.
To get the credentials, navigate to the API Keys (opens in a new tab) section in your Algolia app settings.
Connect Prepr to Algolia
Now that you have the required credentials, you can set up the Algolia integration in Prepr as follows:
- Go to Settings → Integrations and choose Algolia. Click the Activate button.
If you do not have access to the Algolia integration yet, click Request activation. Our Sales team will get in touch with you shortly to activate your request.
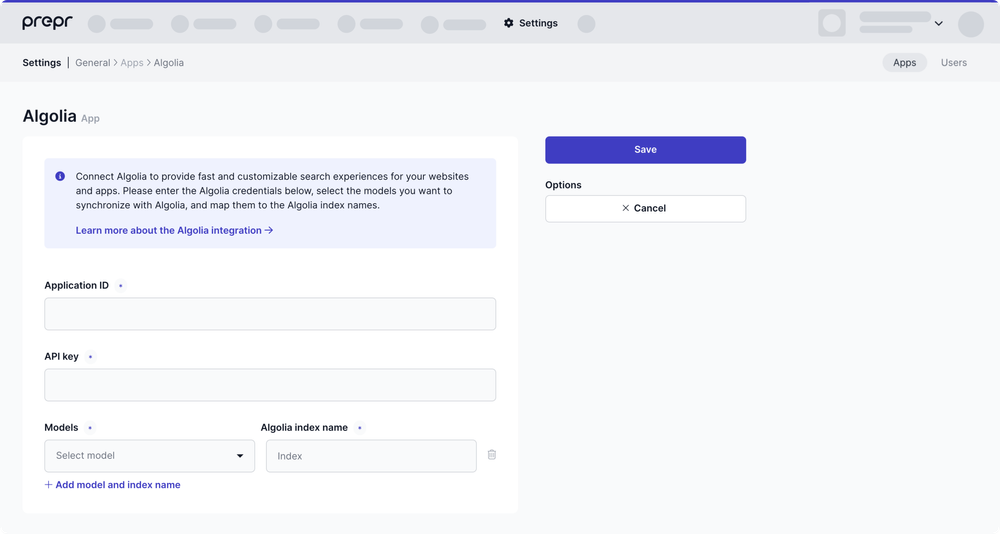
- In the New Algolia app page, enter your Algolia credentials from the previous step.
- Select the models you want to sync to Algolia and map them to the required Algolia index names. You can specify the existing index names you already have in your Algolia, or you can provide new index names from within Prepr. In the latter case, the indices with the relevant names will be created automatically once the data is synced to Algolia. Read more about the Algolia indices (opens in a new tab).
- Click Save to confirm the settings.
That's it. You’ve connected Prepr to Algolia. From now on, Prepr will automatically keep syncing your content items to Algolia for indexing.
When a new content item is published, one or more records will be created in Algolia. Any changes to the published content item result in updating the corresponding Algolia records. Once the content item is unpublished, the Algolia records will be removed.
So you can be sure your data is always-in-sync, and that the most up-to-date content is available to your web app visitors.
Changes to content item structure (i.e., schema) won't be synced to Algolia automatically. In this case, you must run the sync manually. Please read more on how to sync schema updates to Algolia.
Indexed field types
Before sending your content item data to Algolia, Prepr automatically transforms it into a JSON format (opens in a new tab) that Algolia recognizes. Once data is prepared and synced, the corresponding records are created and stored in an Algolia index you specified in Step 2.
The following table shows indexed Prepr field types and the corresponding Algolia records (opens in a new tab) types.
| Prepr field types | Algolia field types | Additional info |
|---|---|---|
| Text | String | |
| Boolean | Boolean | |
| Float | Float | |
| Integer | Integer | |
| Dynamic content | String | All text fields in the Dynamic content field will be merged into a single string. |
| Content reference | String array | It only includes the title of a content item. |
| Asset | JSON object | It contains the Optimized URL for each asset. |
| Tag | String | Will be merged into a single string, comma-seperated. |
| Stack | JSON object | Content within a stack field will be separated into additional Algolia records, and content will be stored in _body. |
| Date and time | Integer | Only single Date or DateTime values are supported. These are converted to Unix timestamps (opens in a new tab). |
| Location | _geoloc[] | All location fields are combined and formatted as an array of objects for Algolia’s _geoloc[] field. |
Configure your Algolia setup
Add the following attributes to your Algolia configuration to enhance your search ranking performance:
_body as a Searchable Attribute
Include _body as a searchable attribute (opens in a new tab) in Algolia, which holds content potentially relevant to your customers' searches.
- Log in to your Algolia account, and navigate to Search in the sidebar.
- Select your index at the top.
- Click the Configuration tab.
- Click the Searchable Attributes side menu.
- Click the Add a Searchable Attribute button, type
_bodyand press enter. - Drag
_bodyto your desired position, to change the priority order (opens in a new tab). - Click the Review and Save Settings button to save your changes.
_level as a custom ranking attribute
Configure _level as an ascending custom ranking attribute (opens in a new tab) in Algolia. _level represents the hierarchical level of content, with higher values indicating a more nested position. This setup helps ensure that search results prioritize content hierarchy effectively.
- Log in to your Algolia account, and navigate to Search in the sidebar.
- Select your index at the top.
- Click the Configuration tab.
- Click the Ranking and Sorting side menu.
- Click the Add Custom Ranking Attribute button, type
_leveland press enter. - Important: Change the order setting of
_levelfrom Descending to Ascending. - Drag
_levelto your desired position, to change the priority order (opens in a new tab). For example, above "Ranking Criteria (typo, geo, words, filters, proximity, attribute, exact, custom)". - Click the Review and Save Settings button to save your changes.
distinctID for grouping records
Configure distinctID for grouping records (opens in a new tab) in Algolia. distinctID, representing the locale and ID of the Content Item, prevents multiple results for the same page.
- Log in to your Algolia account, and navigate to Search in the sidebar.
- Select your index at the top.
- Click the Configuration tab.
- Scroll down, click the Deduplication and Grouping side menu.
- Important: Change the setting of Distinct to true or 1.
- Type
distinctIDto Attribute for Distinct and press enter. - Click the Review and Save Settings button to save your changes.
Connect your front end to Algolia
Now that your Prepr data is indexed with Algolia, you’re ready to implement Algolia on your web app.
Follow the Algolia instructions to set up the API client (opens in a new tab) for your programming language. After setting up the API client, you can initialize and connect it to Algolia.
Also, check out how to build a search UI with Algolia (opens in a new tab).
Syncing existing content and schema updates
The setup steps above allow you to index all new content created after enabling the Algolia integration. If you need to index any content you already have, or after a schema update, you need to run the sync action manually.
To sync content items to Algolia manually, you must call the given Prepr endpoint and specify a model ID, which you can find under Schema → Model → → Copy Model ID.
Content items will be synced in batches, the overall time depends on the number of content items you have.
The following API request will sync content items to Algolia:
GET: https://api.eu1.prepr.io/publications/algolia/sync{
"model": {
"id": "YOUR_MODEL_ID"
}
}Make sure to create an access token with the REST API scopes content_items and content_items_publish and bind a user to this token under Settings → Access tokens.
Please note that access tokens with write permissions must not be visible client-side. Read more in the Mutation API Authorization doc.
If you have any questions, please contact our Support team (opens in a new tab).
Was this article helpful?
We’d love to learn from your feedback