Handling SEO in a headless CMS
This article details how to solve SEO challenges when implementing a headless CMS.
Introduction
SEO is the process of making a website easy to find through search engines like Google. So, setting up SEO measures is a necessary activity when implementing a front end. And this process has been made easier with the introduction of the CMS.
Headless CMSs are becoming the more popular choice over traditional CMSs because of consistency across multiple platforms, flexibility, improved performance, and scalability. Despite these benefits, the very nature of a headless CMS that decouples the front end from the content means that there are some challenges when taking measures to improve SEO.
SEO challenges with a headless CMS
Traditional CMS platforms often come with built-in SEO tools that headless CMSs don't usually have. This means that developers need to implement an SEO strategy in the front-end application to deal with challenges when implementing a headless CMS.
When you prepare an SEO strategy, consider the following topics:
- Managing metadata
- Setting up URLs
- Managing redirects
- Generating a sitemap
- Reviewing content for SEO
Let's look at each of these SEO topics in detail and how to handle them in Prepr CMS.
Managing Metadata
Metadata are elements like title and meta description with keywords that provide information about a webpage to search engines and web browsers. These elements are placed in the head HTML of a webpage and are used to help search engines understand the content and context of the page. Unlike headless CMSs, traditional CMSs usually include plugins that can customize and update meta tags for pages. So, some once-off development effort is needed to set these up dynamically in a headless CMS.
How to manage metadata in a headless CMS
Headless CMSs decouple content from the front-end presentation. Before implementing a headless CMS project, you will typically model the content first. During this stage you will model the SEO metadata.
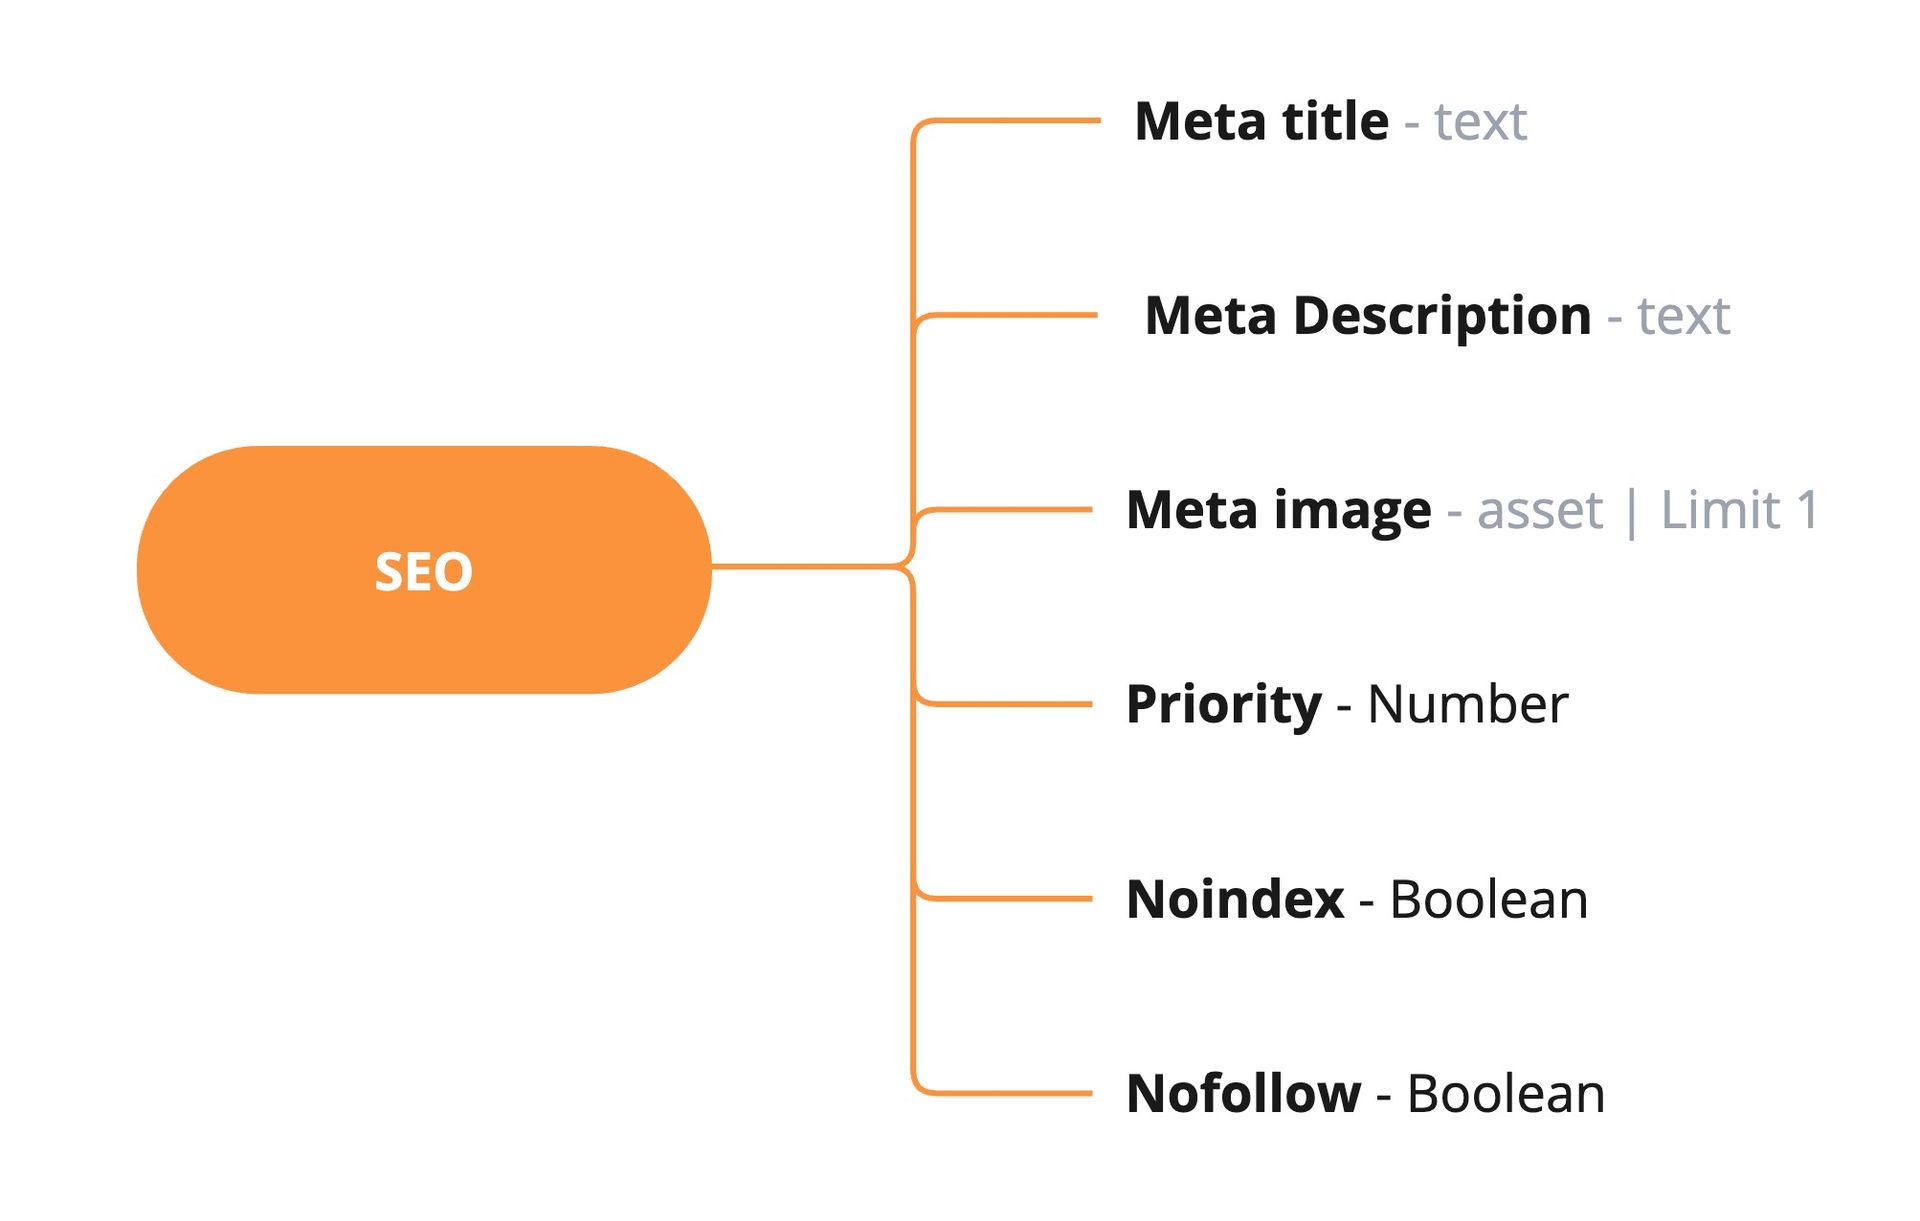
Important metadata include fields like the Meta title and Meta description like in the example above. For the purposes of sharing content on social media, you could also include a Meta image. You could even include a priority to indicate the pages that are most important for crawling and indexing. Use indicators like nofollow and noindex for content that should be ignored by searchbots.
Use the guidelines below to set up the SEO metadata structure:
- Keep the title tag short. Restrict the number of characters to 60.
- Keep the metadata description to under 140 characters.
- Use robots metadata (opens in a new tab) to tell search engines which pages to avoid and not index. By default, Googlebot will index a page and follow links to it.
- Prevent content editors from using the same metadata description for multiple pages in your website
- Include some help text on the SEO fields to guide content editors with the following tips:
- Use a persuasive metadata description to get searchers to click your page.
- Include keywords in your metadata description.
- Set the metadata title tag to the H1 (title) of the page where it makes sense to do so.
- Show intent in the metadata title tag.
- Marketers should revise the title and meta description on pages based on the CTR for those pages.
Once your structure is defined in the CMS, it's available to content editors and marketers to fill in values for fields like the title and the description. In the front end, it's then possible to retrieve the metadata to set the necessary tags for each page.
How to set up metadata in Prepr CMS
You can easily manage SEO metadata in Prepr CMS in a few steps.
- Set up a template structure for the SEO metadata by creating an SEO component.
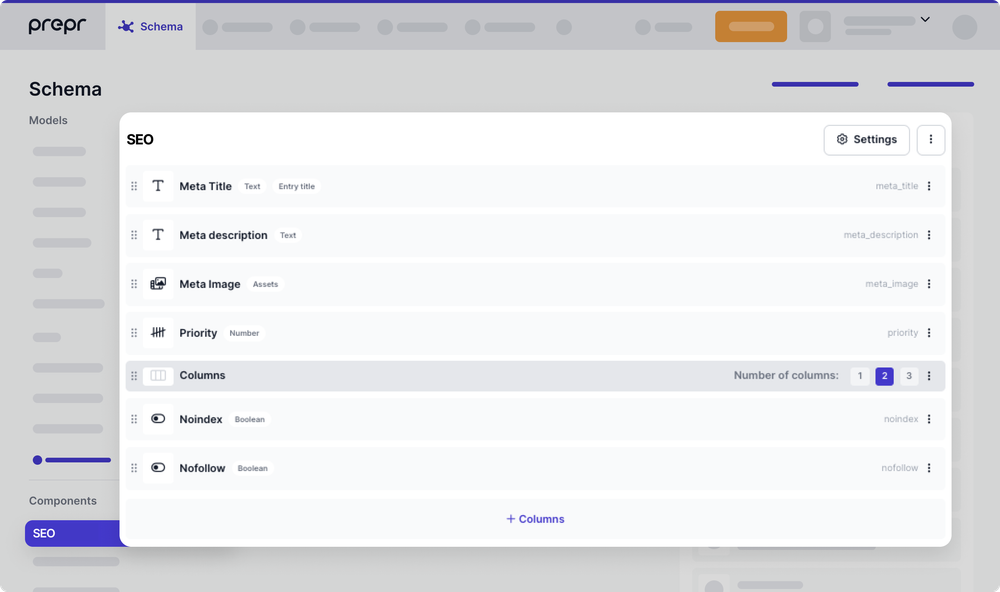
- Include the SEO component in relevant models. These are the models that need to be rendered as pages in the front end.
- The content editor can then store SEO metadata like the title, meta description, and set
NoindexandNofollowtags. - In the front end, include code that makes a GraphQL API request to get the SEO metadata for the relevant page and map the values to their relevant HTML meta tags. Check out the Google meta tags and attributes doc (opens in a new tab) for attributes that are relevant to search engines.
It's useful to know that many front-end frameworks abstract the creation of the meta tags and allow you to set meta tags dynamically. See the example code snippets below on how to set meta tags.
import type { Metadata, ResolvingMetadata } from 'next'

type Props = {
  params: { id: string }
  searchParams: { [key: string]: string | string[] | undefined }
}

export async function generateMetadata(
  { params, searchParams }: Props,
  parent: ResolvingMetadata
): Promise<Metadata> {
  // read route params
  const id = params.id

  // fetch data
  const product = await fetch(`https://.../${id}`).then((res) => res.json())

  // optionally access and extend (rather than replace) parent metadata
  const previousImages = (await parent).openGraph?.images || []

  return {
    title: product.title,
    openGraph: {
      images: ['/some-specific-page-image.jpg', ...previousImages],
    },
  }
}

export default function Page({ params, searchParams }: Props) {}
Setting up URLs
Search engines like Google use URLs as one of the factors for website ranking and to understand what the content of a page is about. SEO-friendly URLs improve indexing by search engines. Also, when visitors see a URL, they are more likely to click a URL they understand compared to a URL that has a bunch of numbers.
Unlike headless CMSs, traditional CMSs include plugins that set URLs automatically. For instance, they offer built-in support for creating language-specific URLs, which is crucial for SEO. This can be easier to manage because the system automatically handles URL structures based on language settings. On the other hand, headless CMSs need custom development to manage URLs. You need to explicitly configure and maintain URL structures which is a more flexible solution but needs more technical input.
How to set up URLs in a headless CMS
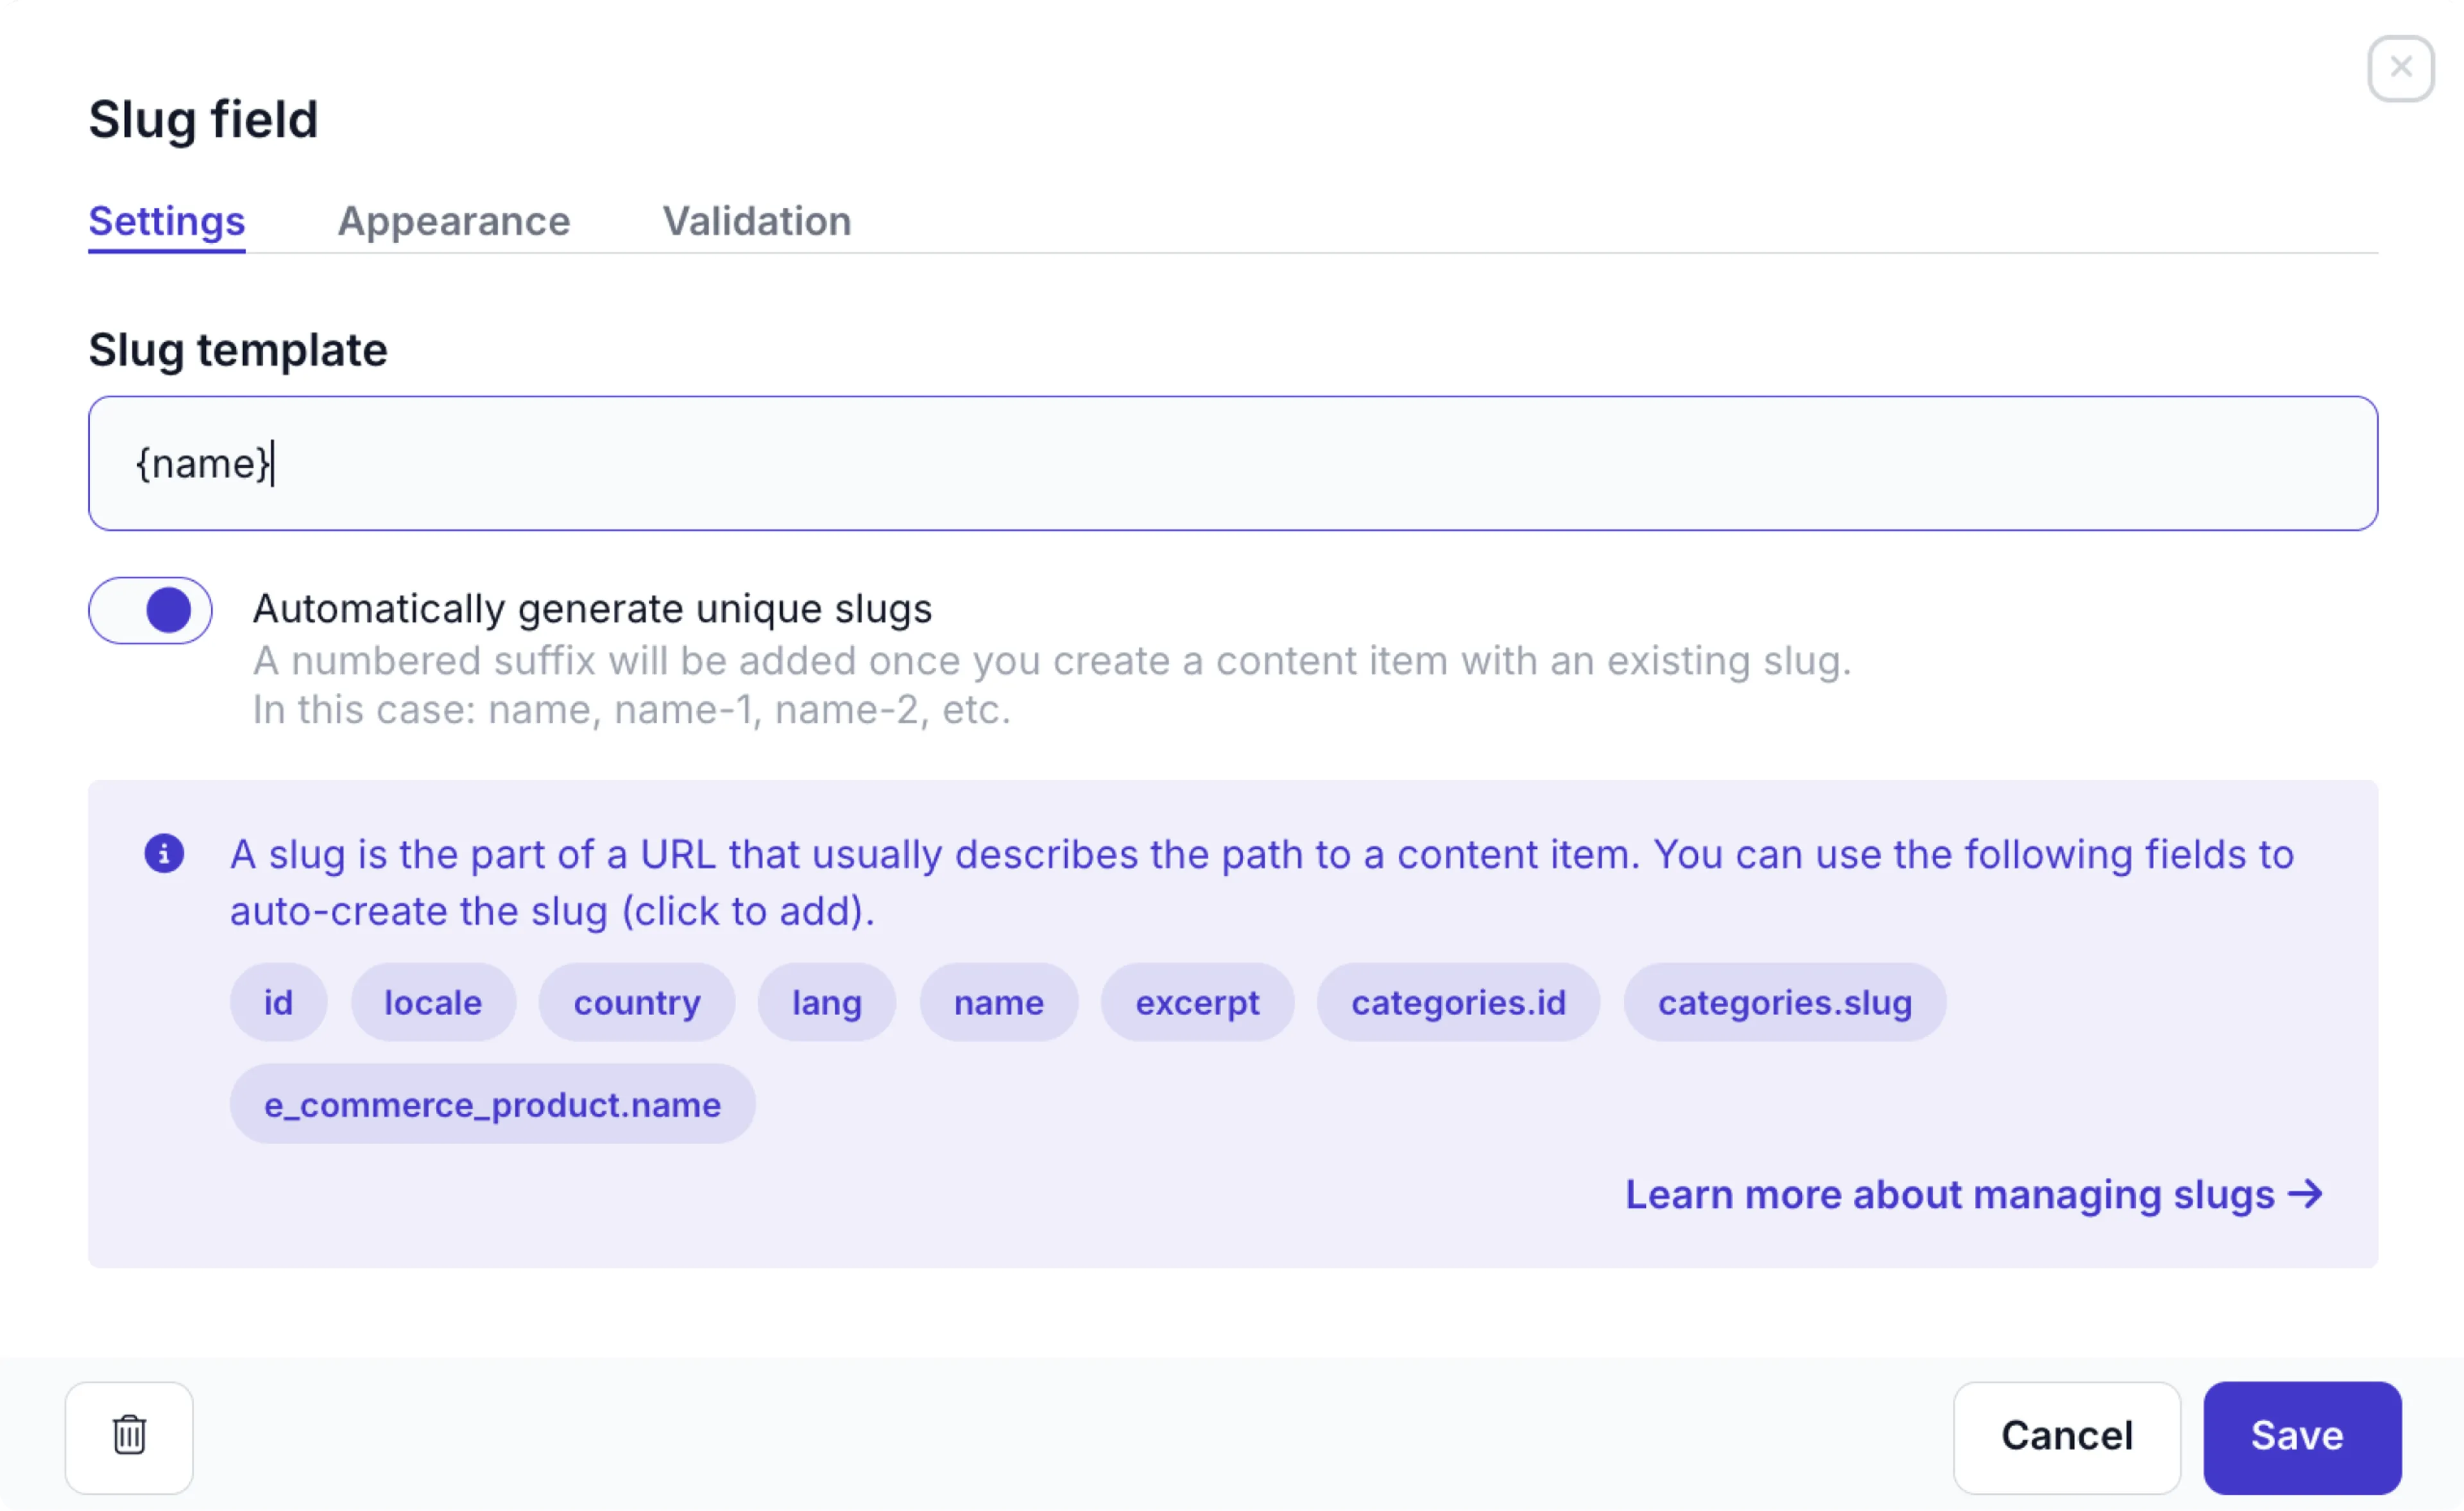
Many headless CMSs allow editors to include a URL or slug for the page. The slug is the last part of the URL address that uniquely identifies a page. If possible, auto-generate this slug field value based on existing fields in the page content such as the page name or an article headline. The front-end can then get this slug value to set up the URL for a page.
To improve SEO, make sure that the generation of the slug follows the guidelines below.
- Use short descriptive URLs that are easy to read like
example.com/best-practices/how-to-handle-SEO. - Avoid complicated URLs with unrecognizable words or numbers like
example.com/products/page-id-1231/2019-09. - Keep URLs constant. Search engines consider a new URL to be a link to a new page. If a URL changes for an existing page, the ranking of the page starts from scratch and it will take time for the page to regain its ranking in searches.
- Use hyphens '-' in URLs and not underscores '_' as separators.
- Only use lowercase in URLs.
- Use primary keywords in the URL, but don't repeat the keyword.
Follow the guidelines below for SEO when setting up URLs in the front-end.
- Organize your URLs into categories and sub-categories like
blogorbest–practicesto improve content ranking. - Handle not-found pages and use redirects.
In the case of language-specific URLs, it's useful to note that many front-end frameworks include dynamic routing for internationalization. Check out the Next.js docs (opens in a new tab) for an example.
Managing Redirects
Redirects send visitors from a requested URL to another. You need redirects for pages that are broken or pages that were moved to ensure visitors and search engines access the most relevant or current page. Without the usual front-end management that you find in a traditional CMS, handling redirects can be more complex for a headless CMS.
How to handle redirects in a headless CMS
You can set up a simple content structure in the CMS to hold the original URL and the new URL for a page that needs to be redirected. In this structure, include an indicator field to define the redirect as permanent or temporary.
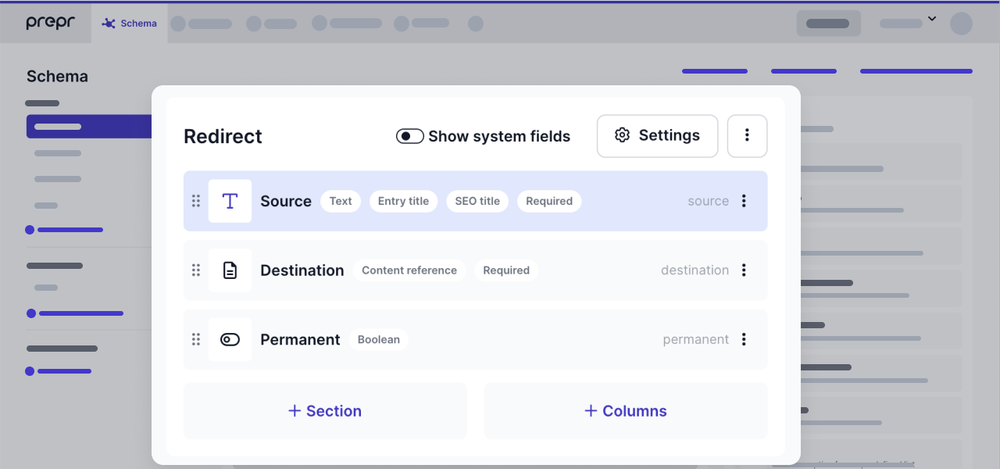
Once the redirect structure is modeled, add a list of redirects to the CMS content. The front end can then query and send the redirect info to the deployment service.
Check out the Prepr Redirects guide for example code snippets on how to handle redirects using Prepr CMS.
Generating a sitemap
A sitemap is a file that helps visitors and web crawlers navigate your website to discover and index pages. With a sitemap, you can ensure that search engines can discover your pages quickly and when a crawler finds a URL in your sitemap, it knows you want it in the search results.
Traditional CMSs often include built-in support to generate a sitemap automatically. While headless CMSs don't include automatic sitemap generation for search engine crawling. Additional development effort is therefore needed for a headless setup.
How to generate a sitemap in a headless CMS
The sitemap structure should follow the guidelines below:
- The XML sitemap format provides additional information about images, video, and localized versions of your pages.
- The sitemap should include fully-qualified, absolute URLs.
- The
<lastmod>tag must be consistently updated to indicate when the content last changed.
A sitemap for a project contains a list of all the pages that it wants the search engine to find like in the example below.
<?xml version="1.0" encoding="UTF-8"?>
<urlset xmlns="http://www.sitemaps.org/schemas/sitemap/0.9">
<url>
     <loc>https://www.xmlsitemapgenerator.org/en/</loc>
     <lastmod>2005-01-01</lastmod>
      <changefreq>monthly</changefreq>
      <priority>0.8</priority>
</url>
</urlset>
Headless CMSs allow you to include URL or slug info for each content page. The front end application can then retrieve this info for each page and compile the sitemap structure dynamically during deployment.
Generate a sitemap dynamically from Prepr CMS
You can make use of the available page content in Prepr CMS to generate the sitemap with the steps below.
- Make the
base URLavailable in an environment variable. - Query the slugs for each of your page content items.
- Loop through these items and assign them to an array.
- For each page in the array, set the URL in the sitemap to the
base URL+slugand set thelastmodvalue to the system date field_changed_onof the content item.
See the simple Next.js code snippet example below that automatically generates a sitemap from Prepr CMS during the build of the web app.
import { gql } from '@apollo/client';
import client from '@/services/apollo-client';

export default async function sitemap() {
    let pages = []

    const { data } = await client.query({
        query: gql`
            query {
                Pages {
                    items {
                        _slug
                        _changed_on
                    }
                }
            }
        `,
    })

    data.Pages.items.map((page) => {
        pages.push({
            url: process.env.SITE_URL + '/' + page._slug,
            lastModified: new Date(page._changed_on),
            changeFrequency: 'monthly',
            priority: 1.0,
        })
    })

    return pages
}
In the example above, priority is set to a fixed value, but this value could also be set to a dynamic value in your content item in Prepr. For example, as one of the fields available in the SEO component of the page.
Reviewing Content for SEO
Search engines prioritize fresh and relevant content, so outdated content loses visibility in search engine results. This leads to a decline in organic traffic and a diminished online presence. When using a headless CMS, you can easily publish content updates to the front end whenever the changes are needed. However, a headless CMS usually lacks a WYSIWYG editor and SEO plugins to measure content performance. This makes it difficult to preview how content changes will look and perform before the front end goes live.
How to review content in headless CMSs
Most CMSs do not include tools to review the content for SEO impact. In these cases, you need separate monitoring software to review the content for SEO performance in search engines.
How to review content in Prepr CMS
Prepr CMS includes some basic SEO review features and the ability to include a front end preview for each piece of content. For more advanced SEO performance criteria, consider dedicated Marketing monitoring or SEO website crawler software.
Schedule a free consultation
Do you still have questions on SEO in relation to Prepr? Book a 15-minute call with a Prepr solution engineer right away. Schedule a call (opens in a new tab)
Was this article helpful?
We’d love to learn from your feedback