Handling redirects
This article explains how to handle redirects for your content items in Prepr CMS
Introduction
Redirects send visitors from a requested URL to another. You often set up redirects in your framework-specific front-end app or in a redirects file for a hosting provider for pages that are broken or pages that were moved to new URLs to ensure visitors and search engines access the most relevant or current page.
Handle redirects with a headless CMS
It’s only natural that content items can change. When the changes include the URL that links to the content item, this results in a broken link. To prevent this situation, a developer sets up a redirect to display a working page when an outdated link is visited.
In the case where you have content items that could potentially have changes to the URL that links to it, for example, when updating an existing article with fresher content including the name of the link to the article, follow the steps below to reduce the number of broken links in your front end.
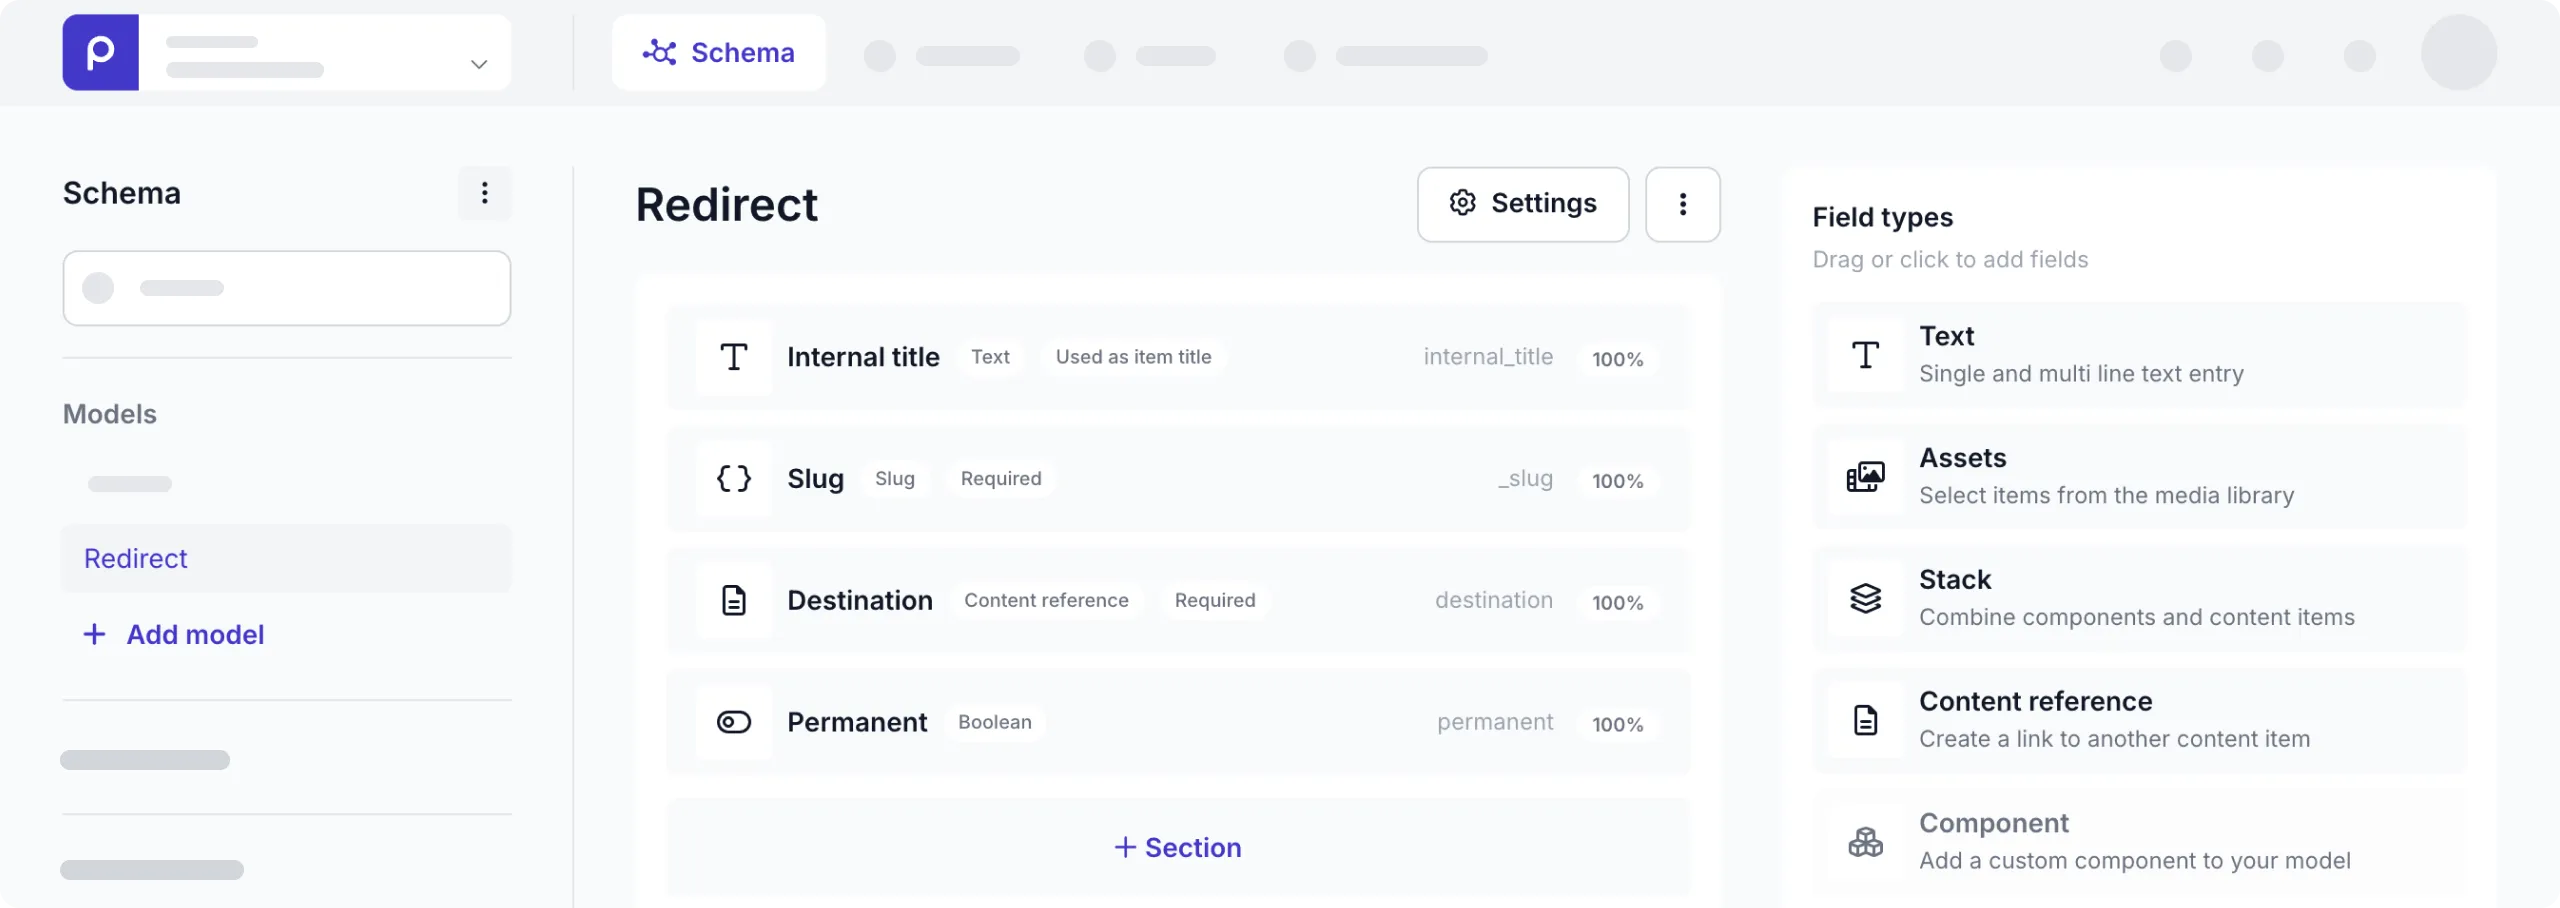
Step 1: Model the redirect in Prepr CMS
The first step is to model the redirect to make it possible to manage redirect entries directly in Prepr CMS.
The Redirect model includes the following fields:
- The outdated URL, often known as the Source.
- The new target URL, known as the Destination.
- An indicator to choose the type of redirect, for example,
permanentortemporary.
See the examples below for typical redirect config in a front-end framework like Next.js and for server redirect config like a Vercel deployment.
Next.js
module.exports = {
  async redirects() {
    return [
      {
        source: '/blog/car-leasing-101',
        destination: '/blog/car-leasing-101-what-you-need-to-know-before-you-sign',
        permanent: true,
      },
    ]
  },
}A slug is the end part of a URL after the last backslash and identifies a unique page in a front end. In Prepr CMS, you can create a slug field in a model to maintain a unique value for each content item. This slug value is then used in your front-end app to set up page routing to that content item. Check out the Next Quick start guide for an example implementation.
With this in mind, follow the steps below to create a Redirect model.
-
Click the Schema tab to open the Schema Editor.
-
Then, click the + Add model button.
-
Click Multi-item model and Next again.
-
Enter Redirect as the Name and click Save.
-
Add a Text field type to save the Internal title to easily identify a redirect record.
-
Drag and drop the Slug field type into your model. Switch to the Validation tab and enable the This field is required toggle.
-
Drag and drop the Content reference field type, from the list on the right into your model.
a. Enter Destination as the Name.
b. Select the models you want to allow to have redirects.
c. Switch to the Validation tab and enable the This field is required toggle.
d. Click the Save button. -
Drag and drop the Boolean field type into your model and enter Permanent as the Name, set a Default value of True and click the Save button.
Now that the Redirect model is done, move on to the next step to add redirect entries in Prepr CMS.
In this example, we are creating redirects to content items. If you need a more generic redirect solution you should add a Text field for the destination URL instead of the Content Reference field.
Step 2: Create a redirect in Prepr CMS
Follow the instructions below to add a redirect entry manually.
- Go to the Content tab.
- Click Add item and select the Redirect model created in the previous step.
- Enter the Slug of the outdated URL in the format expected by your framework or host redirects file.
- For the Destination field, choose the relevant content item for which the slug was changed.
- Enable the permanent field, if applicable, and click the Publish button.
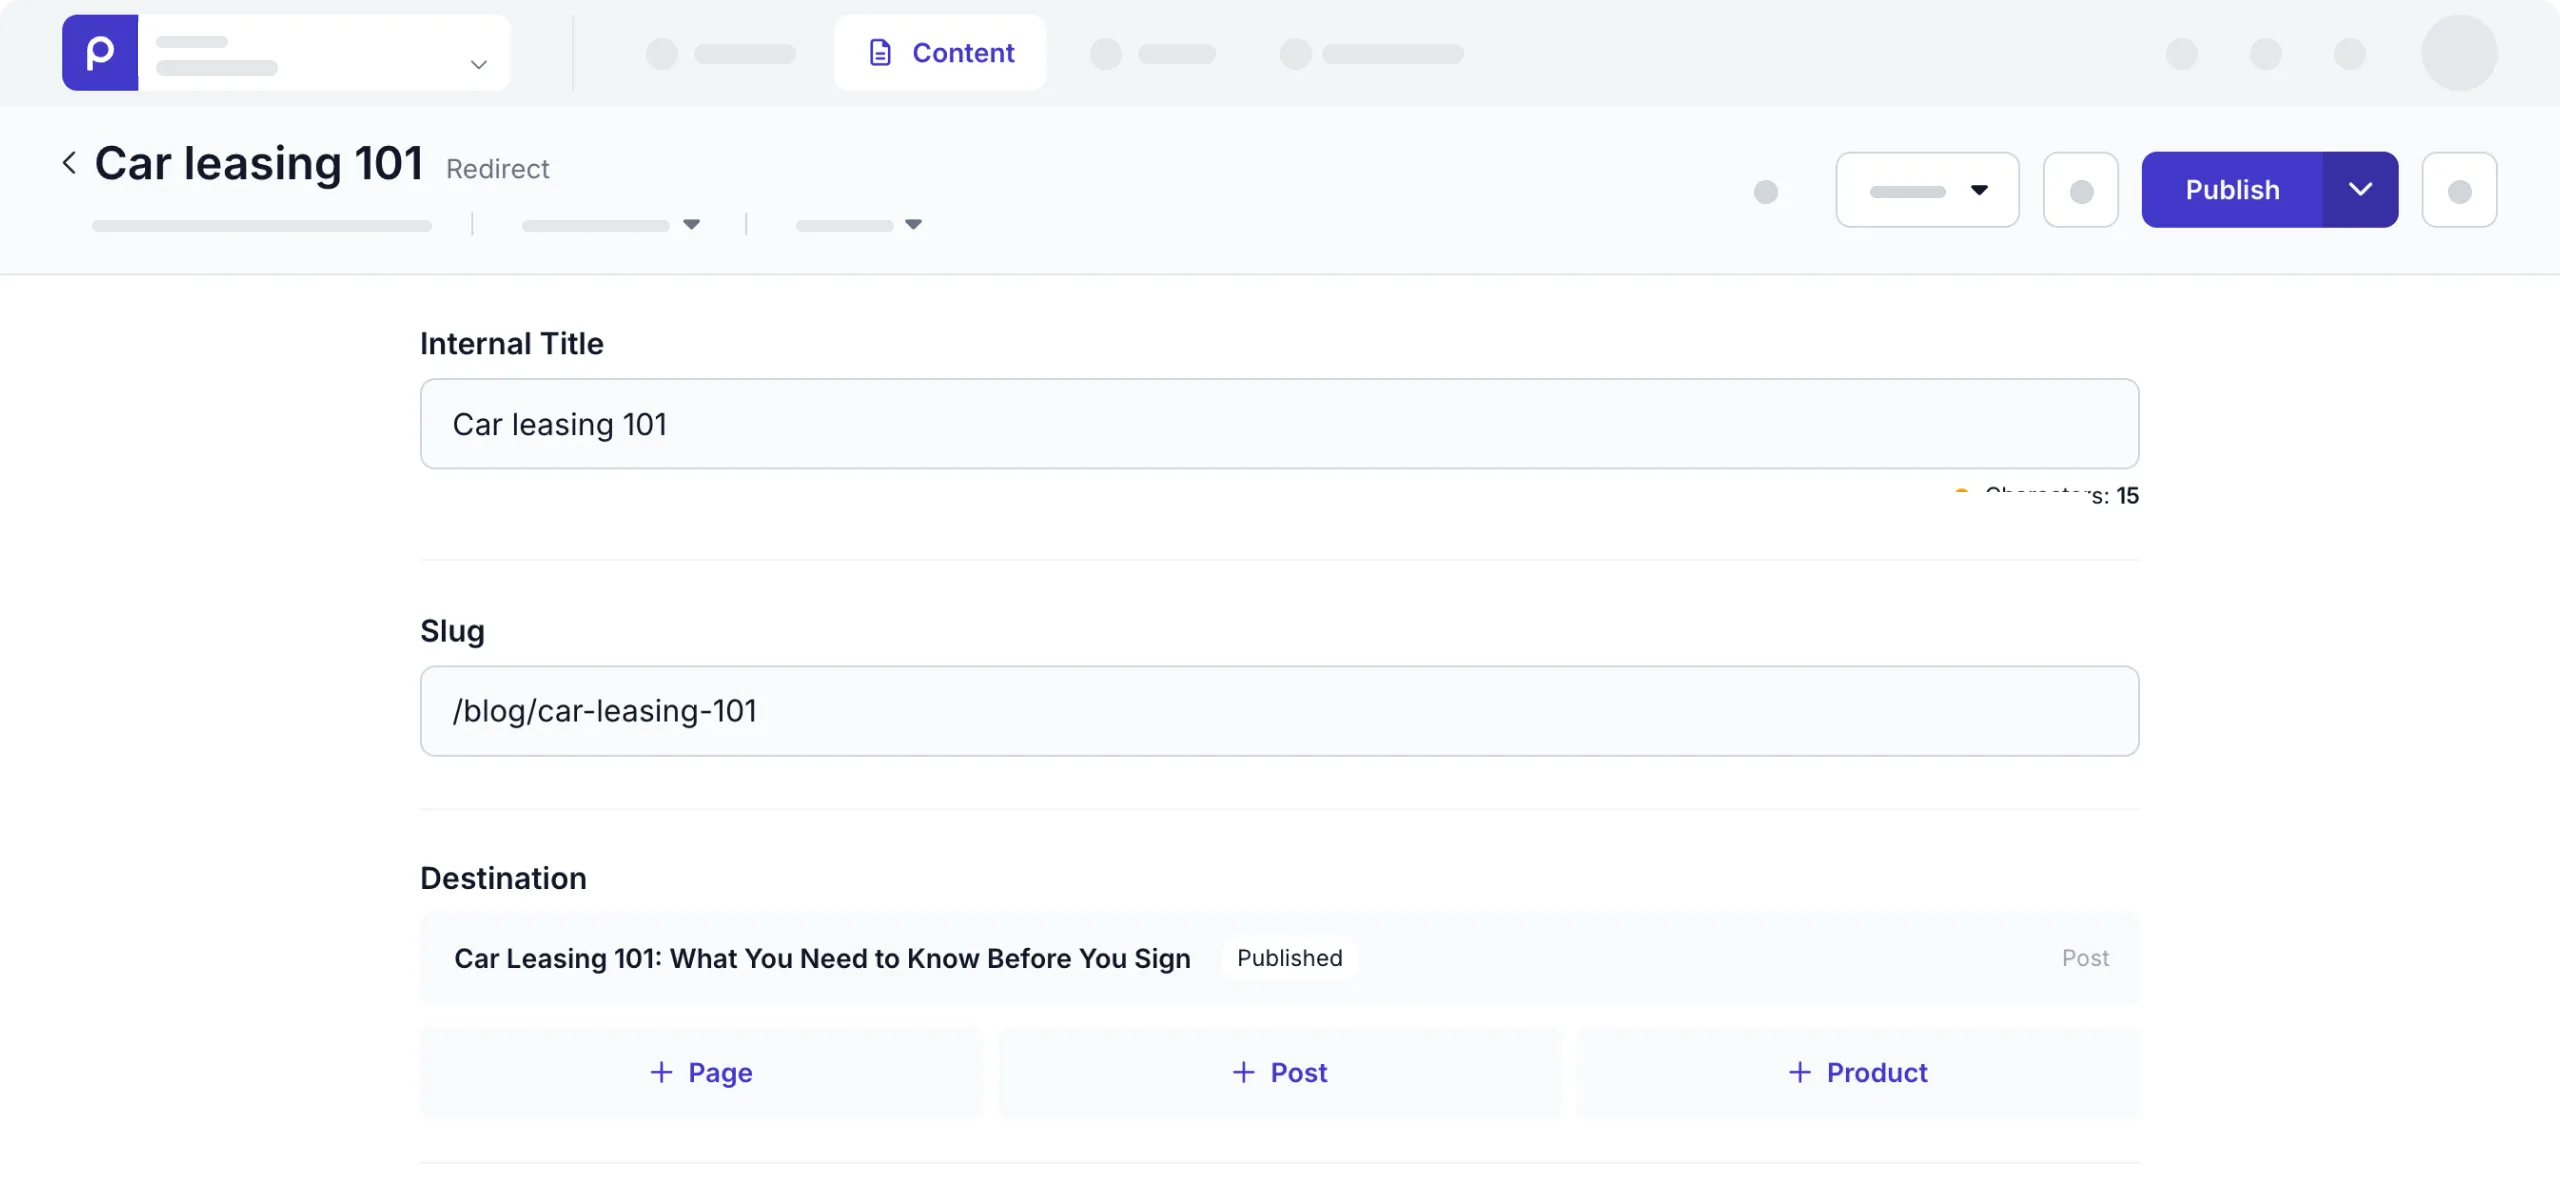
That’s it! Once the redirect entries are added to Prepr, you can then fetch the entries and process them.
Step 3: Handle redirects
This guide outlines two methods to handle redirects. One is based on handling redirects in a Next.js project by dynamically adding the redirects to the next.config.js file. The other is handling redirects in an Astro project by adding the redirects to the vercel.json which gets picked up and processed when the project is deployed in Vercel.
Follow the steps below to create a script to fetch the redirects info from Prepr CMS and generate the redirects to either be included in the next.config.js or written to the vercel.json.
- Create the script
getRedirectsto fetch the redirects like in the code snippets below. Set the placeholder value for<YOUR-PREPR-API-URL>to the API URL from a Prepr access token.
Next.js
module.exports = async () => {
  const response = await fetch("<YOUR-PREPR-API-URL>", {
    method: 'POST',
    headers: {
      'Content-Type': 'application/json',
    },
    body: JSON.stringify({

      /*

      The query below is based on the Redirects model having
      a content reference to a single model (Article)

      */

      query: `
        {
          Redirects {
            items {
              _slug
              destination {
                _slug
              }
              permanent
            }
          }
        }`
    })
  });

  const {data} = await response.json();

  const parsedRedirects = data.Redirects.items.map(
    (element) =>
    {
        return {
            source: element._slug,
            destination: `/articles/${element.destination[0]._slug}`,
            permanent: element.permanent
        }
    }
  )
  return parsedRedirects;
} - Use one of two methods to update the configuration file to handle the redirects.
-
Redirect with Next.js: Add the redirects from Prepr to the built-in
next.config.jsfile. -
Redirect with Vercel: Add the redirects from Prepr to the
vercel.jsonfile during build time so that Vercel processes them after deployment.
Next.js
const getRedirects = require('./get-redirects');

module.exports = {

    // Define the redirects with output from the previous script
    async redirects() {
        return getRedirects();
    },
    ...
}
That’s it! Once you successfully build and deploy your project, the redirects are processed and can be tested by navigating to the outdated links.
What’s next?
Check out our other best practice guides from the list below: