Recording events
This guide walks you through how to record event data in Prepr.
Introduction
Tracking how visitors interact with your content is crucial for gaining insights and optimizing their experience. You can also track events to store visitor profile data when needed.
You can easily track and send events to Prepr, such as views, likes, subscriptions, and custom events, directly from your front end.
If you haven’t yet done so, check out the Fundamentals guide for key data collection concepts. Before recording events, make sure you’ve already enabled Prepr tracking in your web app.
Adding meta tags
By adding meta tags to your front end, you can define the content items or identity provider IDs for your visitors without needing to define them for every event you record.
Tracking content items
To start tracking events on your content items, add one of the following meta tags to the <head> section on these content pages:
HTML
<!-- property tag -->
<meta property="prepr:id" content="{{CONTENT_ITEM_ID}}"/>

<!-- or name tag -->
<meta name="prepr:id" content="{{CONTENT_ITEM_ID}}"/>Set the content value in the property or name tags to the Item ID of the content item, such as a Home page.
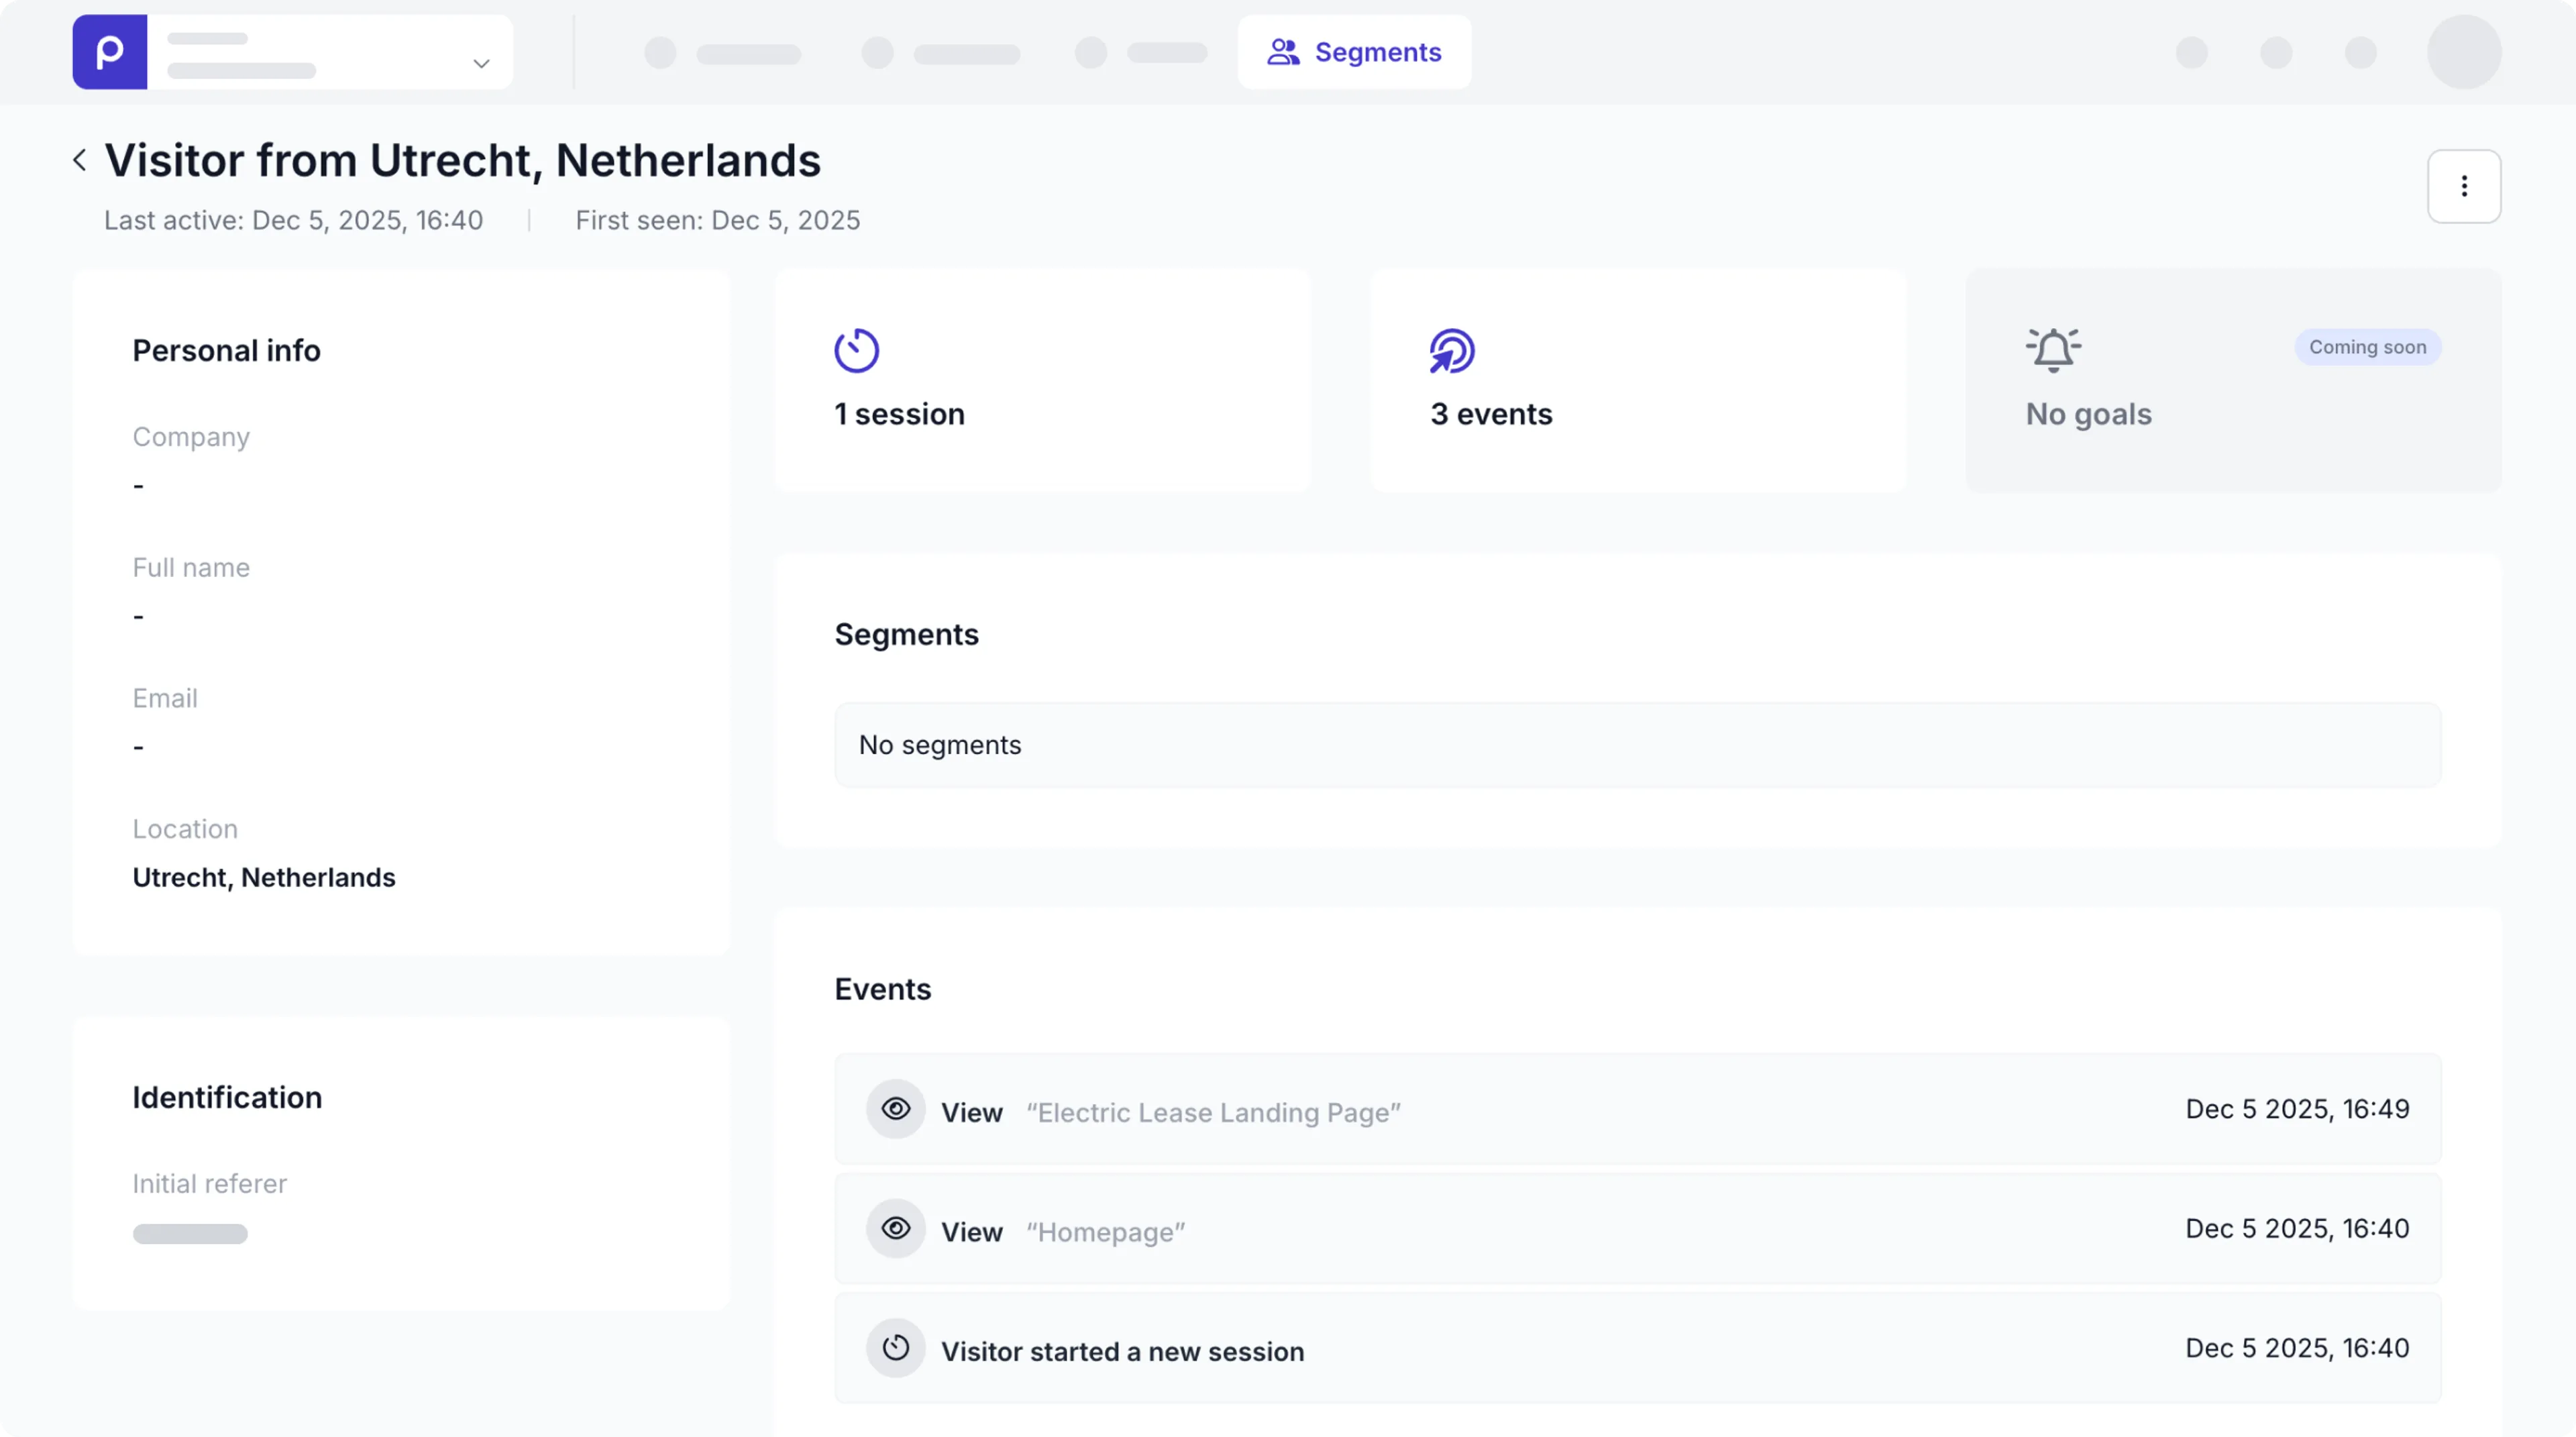
If Prepr tracking is set up and you’ve added a meta tag for specific content items, you can test this setup with the following steps:
- Simply navigate to the page in your web app where you’ve included the meta tag above. This automatically triggers a view event that gets sent to Prepr.
- Log in to your Prepr environment that your web app is connected to.
- Go to the Segments tab.
- Click the visitor at the top of the list. The Date value will match the time that you opened the page.
- On the visitor detail page, you’ll see a View event in the events table, and the details should match the content item that you added in the meta tag.
Now, let’s look at how to set up identity provider IDs for visitors who trigger events.
Tracking identity provider IDs
As you’ve seen in the fundamentals guide, a visitor is linked to an event.
When tracking events using the tracking pixel, Prepr automatically links the event to a visitor by generating a unique ID and storing it in the __prepr_uid cookie.
This default behavior simplifies your code when recording events in Prepr.
On the other hand, if your site uses an identity provider to manage your visitors, you can add a meta tag to the HTML of your web app to link the identity provider ID to any event that occurs in the session.
Replace the content value in the example code below with the known visitor ID from your identity provider.
<!-- property tag -->
<meta property="prepr:customer-id" content={{VISITOR_ID}}/>

<!-- or name tag -->
<meta name="prepr:customer-id" content={{VISITOR_ID}}/>
If the VISITOR_ID you provide does not exist in Prepr when the event gets processed, a new visitor profile will be created automatically.
Now that you know how to link visitors to events, let’s look at how to record specific events.
Tracking for multi-locale environments
If you’re running a multi-locale website, add the locale meta tag to indicate the locale you want to track. For example, to track A/B tests on text fields.
<meta name="prepr:locale" content="en-US"/>Recording predefined events
There are two types of predefined events you can record.
- Events for specific content items to gain insights and optimize visitor experience.
- Events to store visitor characteristics for specific visitors.
Prepr recognizes each of the events below and processes them differently according to their purpose.
View
You can use this event type when you want to record when a visitor opens a web page or when a visitor scrolls to an element in a web page.
If you want to record a view event for an entire page, add the content item meta tag to the HTML in your page to automatically send the View event to Prepr when the page loads.
If you want to record a view event for a content item embedded in a page, you can send the event using the following javascript function:
prepr('event', 'View', { 'id': "{{CONTENT_ITEM_ID}}" });See some example code below for when the visitor moves their mouse over the footer.
HTML
<html>
    ...
    <body>
        ...
        <footer onmouseover="prepr('event', 'View', { 'id': '{{CONTENT_ITEM_ID}}' })">
            ...
        </footer>
    </body>
</html>Replace the {{CONTENT_ITEM_ID}} with the Content item ID of the footer in this case.
Like
You can use the Like event to indicate when a visitor clicks a link or button to indicate their approval or interest.
Send a like event from your front-end with the following javascript function:
prepr('event', 'Like');See some example code below for when a visitor clicks the Like button.
HTML
<html>
    ...
    <body>
        ...
        <button onclick="prepr('event', 'Like')">Like</button>
    </body>
</html>If a Like event is sent to Prepr more than once, the subsequent events are simply ignored.
If you want to indicate that a visitor likes a specific content item in the page, you can send the relevant Content item ID in the event.
prepr('event', 'Like', { 'id': "{{CONTENT_ITEM_ID}}" });If you don’t include a Content Item ID in the send request, the event will be linked to the content item in the content item meta tag you set up earlier.
You can also undo the Like event by sending a corresponding Unlike event for the same visitor and content item.
prepr('event', 'Unlike');Bookmark
You can use the Bookmark event to indicate when a visitor clicks a link or button to save a piece of content to view later.
Send a bookmark event from your front-end with the following javascript function:
prepr('event', 'Bookmark');See some example code below for when the visitor clicks the Bookmark button.
HTML
<html>
    ...
    <body>
        ...
        <button onclick="prepr('event', 'Bookmark')">Bookmark</button>
    </body>
</html>If a Bookmark event is sent to Prepr more than once, the subsequent events are simply ignored.
If you want to indicate that a visitor likes a specific content item in the page, you can send the relevant Content item ID in the event.
prepr('event', 'Bookmark', { 'id': "{{CONTENT_ITEM_ID}}" });If you don’t include a Content Item ID in the send request, the event will be linked to the content item in the content item meta tag you set up earlier.
You can also remove the Bookmark event by sending a corresponding Unbookmark event for the same visitor and content item.
prepr('event', 'Unbookmark');Subscribe
You can use a Subscribe event to indicate when a visitor clicks a link or button to subscribe to a newsletter, content updates, or other recurring content notifications.
Send a subscribe event from your front-end with the following javascript function:
prepr('event', 'Subscribe');See some example code below for when the visitor clicks the Subscribe button.
HTML
<html>
    ...
    <body>
        ...
        <button onclick="prepr('event', 'Subscribe')">Subscribe</button>
    </body>
</html>If a Subscribe event is sent to Prepr more than once, the subsequent events are simply ignored.
If you want to indicate that a visitor likes a specific content item in the page, you can send the relevant content item ID in the event.
prepr('event', 'Subscribe', { 'id': "{{CONTENT_ITEM_ID}}" });If you don’t include a Content Item ID in the send request, the event will be linked to the content item in the content item meta tag you set up earlier.
You can also cancel the Subscribe event by sending a corresponding Unsubscribe event for the same visitor and content item.
prepr('event', 'Unsubscribe');SignUp
You can use a SignUp event to track when a visitor creates a new account or registers on your web app.
This event is not related to a specific content item, but to a specific visitor.
In this case, make sure to add the visitor meta tag.
Send a SignUpevent from your front-end with the following javascript function:
prepr('event', 'SignUp');See some example code below for when the visitor clicks the Sign Up button.
HTML
<html>
    ...
    <body>
        ...
        <button onclick="prepr('event', 'SignUp')">Sign Up</button>
    </body>
</html>If a SignUp event is sent to Prepr more than once, the subsequent events are simply ignored.
Unregistered visitors are automatically deleted from Prepr after 90 days of inactivity.
The SignUp event ensures the visitors who’ve signed up will not be deleted.
Tag
Similar to the events listed above, you can also trigger visitors to volunteer data about themselves through your web app. This could be characteristics like their job title or industry they work in. Knowing if a visitor is a developer, for example, can help you direct them to more technical content.
For example, when a visitor fills a specific value in a form on your page, you can send the entered value as a Tag on the visitor profile.
Use the javascript function below to store a tag for the visitor, for example, to indicate that they are a health care worker.
prepr('event', 'Tag', ['healthcareworker']); In the example code below we send a Tag to indicate when the visitor chooses a job title from a drop-down field.
HTML
<html>
    ...
    <body>
        ...
        <select onchange="prepr('event', 'Tag', ['healthcareworker']);">...</select>
    </body>
</html>Similar to the Tag event above, you can trigger an event to store the email address of a visitor.
For example, when a visitor fills in a form on your page, you can add the entered email address to the visitor profile. This makes it easier to track the visitor events in other platforms you might be using.
Use the javascript function below to store the email address for the visitor.
prepr('event', 'Email', '[email protected]');Recording custom events
You can enhance your A/B tests and adaptive content by setting up custom events in your web app.
For example, if you want to track when a visitor makes a Purchase or clicks to Start a video or livestream.
Define conversion metrics
You can use custom events to set up conversions in your web app to get more valuable metrics for A/B tests or adaptive content. To do this, simply add HTML attributes to your A/B tests or when you set up personalization. By adding these HTML attributes, these custom events are automatically stored in Prepr.
Once done, marketers can then define customer segments and goals using these custom events.
Record custom events
Depending on the purpose of your custom events, these can be recorded in Prepr in different ways:
If you need to record custom events for customer segments or goals, for instance, you can send a Custom event with the event method.
If you’ve already used custom events to define conversions, then you don’t need to add the below javascript function.
prepr('event', '{{CUSTOM_EVENT_NAME}}');In the example code below we send a Purchase event when a visitor completes a purchase in the web app.
HTML
<html>
    ...
    <body>
        ...
        <button onclick="prepr('event', 'Purchase')">Purchase</button>
    </body>
</html>Before recording custom events, take note of the following rules when naming your custom events.
Naming rules
You can choose any name for the custom event that meets the naming rules below.
- The name has to be one word. In other words, no spaces.
- Don’t include any special characters like %, ˆ, &, etc.
- The name should not start with a number.
- The name cannot be any of the following reserved terms:
View,Like,Bookmark,Subscribe,SignUp,Tag,Email,Merge
Managing custom event types
You can change how custom events appear in segments, goals and in metrics in Prepr.
This feature is useful when you want to set the display name in these screens to something clearer for marketers. For example, instead of the technical event type name Scrolled50, you can set it to something like Scrolled 50% of the page.
Follow the steps below to set the Display name or the Visibility of custom events.
-
Click the icon to open the Settings drop-down menu and choose the Event management option. Go to the Event types list.

-
To change the Display name of the event type, hover over the specific event type in the list and click the icon. In the dialog box, change the Display name value and click the Save button.
-
You can also deselect the Visibility to hide all events for a specific event type. This is useful when you and marketers no longer track and analyze outdated or unused custom events.
Sending events to Google Tag Manager (GTM)
To send experiment-related events (such as impressions of content variants, A/B experiments, or segmented views) to Google Tag Manager, you can enable the built-in GTM integration in the Prepr Tracking Code.
This allows you to reuse the data collected by Prepr for reporting and personalization pipelines in Google Analytics 4 (GA4) or other GTM-connected services.
To activate this, you simply need to update your prepr("init") function in the Prepr Tracking Code with the googleTagManager destination flag:
prepr(
    "init",
    "abc123ecfff2385c9c4fe027d56ea7d544cee78b173",
    {
        destinations: {
            googleTagManager: true
        }
    }
);
Once this is enabled, Prepr automatically sends personalization events to GTM dataLayer under the name prepr_personalize.
{
  event: 'prepr_personalize',
  event_name: 'Impression', // or Click, Conversion, etc.
  prepr_experiment: 'experiment-id',
  prepr_item: 'content-item-id',
  prepr_variant: 'variant-id',
  prepr_segment: 'CUSTOMERS_FROM_GERMANY' // or 'ALL_OTHER_USERS' for control
}
Using identify providers
When a visitor signs in to your website or app and you want to add the user ID from the relevant Identity Provider to the visitor profile in Prepr you
can call the Identify event.
Use the javascript function below to store the external ID for the visitor. If a visitor already exists with this external ID, the profiles will be merged.
prepr('event', 'Identify', 'external-profile-ID');Event deduplication
When recording events, the logic checks for duplicates to ensure data accuracy and prevent skewed metrics. If a new tracked event has the same Event type, the same Content item ID and the same web app visitor ID within 5 seconds of a recorded event, the duplicate is ignored.
This applies to both predefined events (like View and Click) and custom events.
Maximum events per visitor
Up to 1500 events can be stored per visitor profile. When the limit is reached, new events for this visitor are ignored.