Setting up previews and Visual Editing
This article explains how to set up previews and visual editing for content editors to see their changes in real-time in a new tab or with a side-by-side view directly in Prepr CMS.
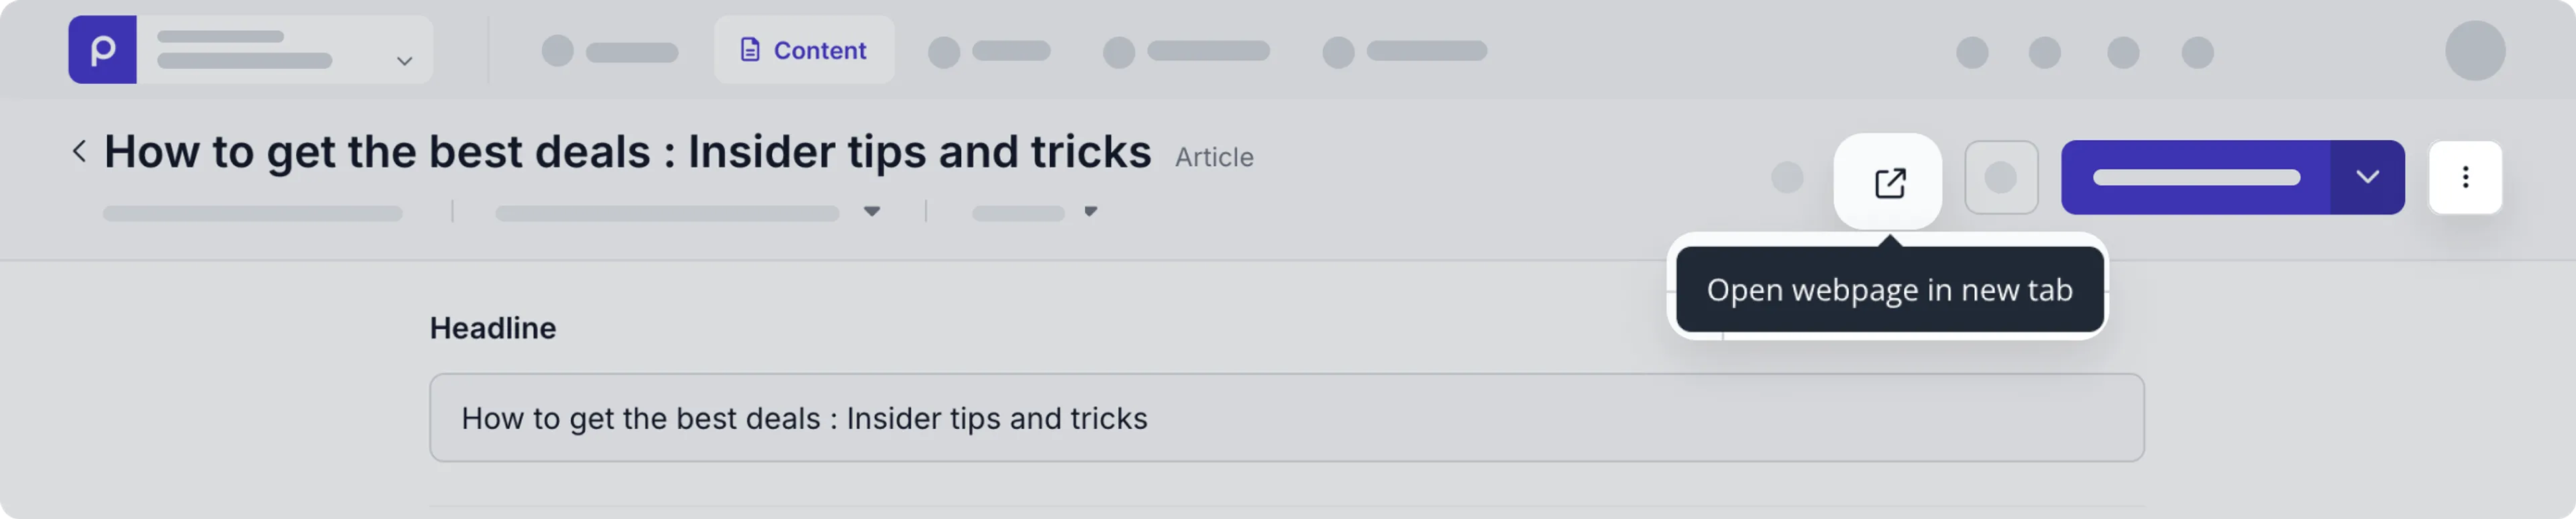
Trigger to preview content item in new tab
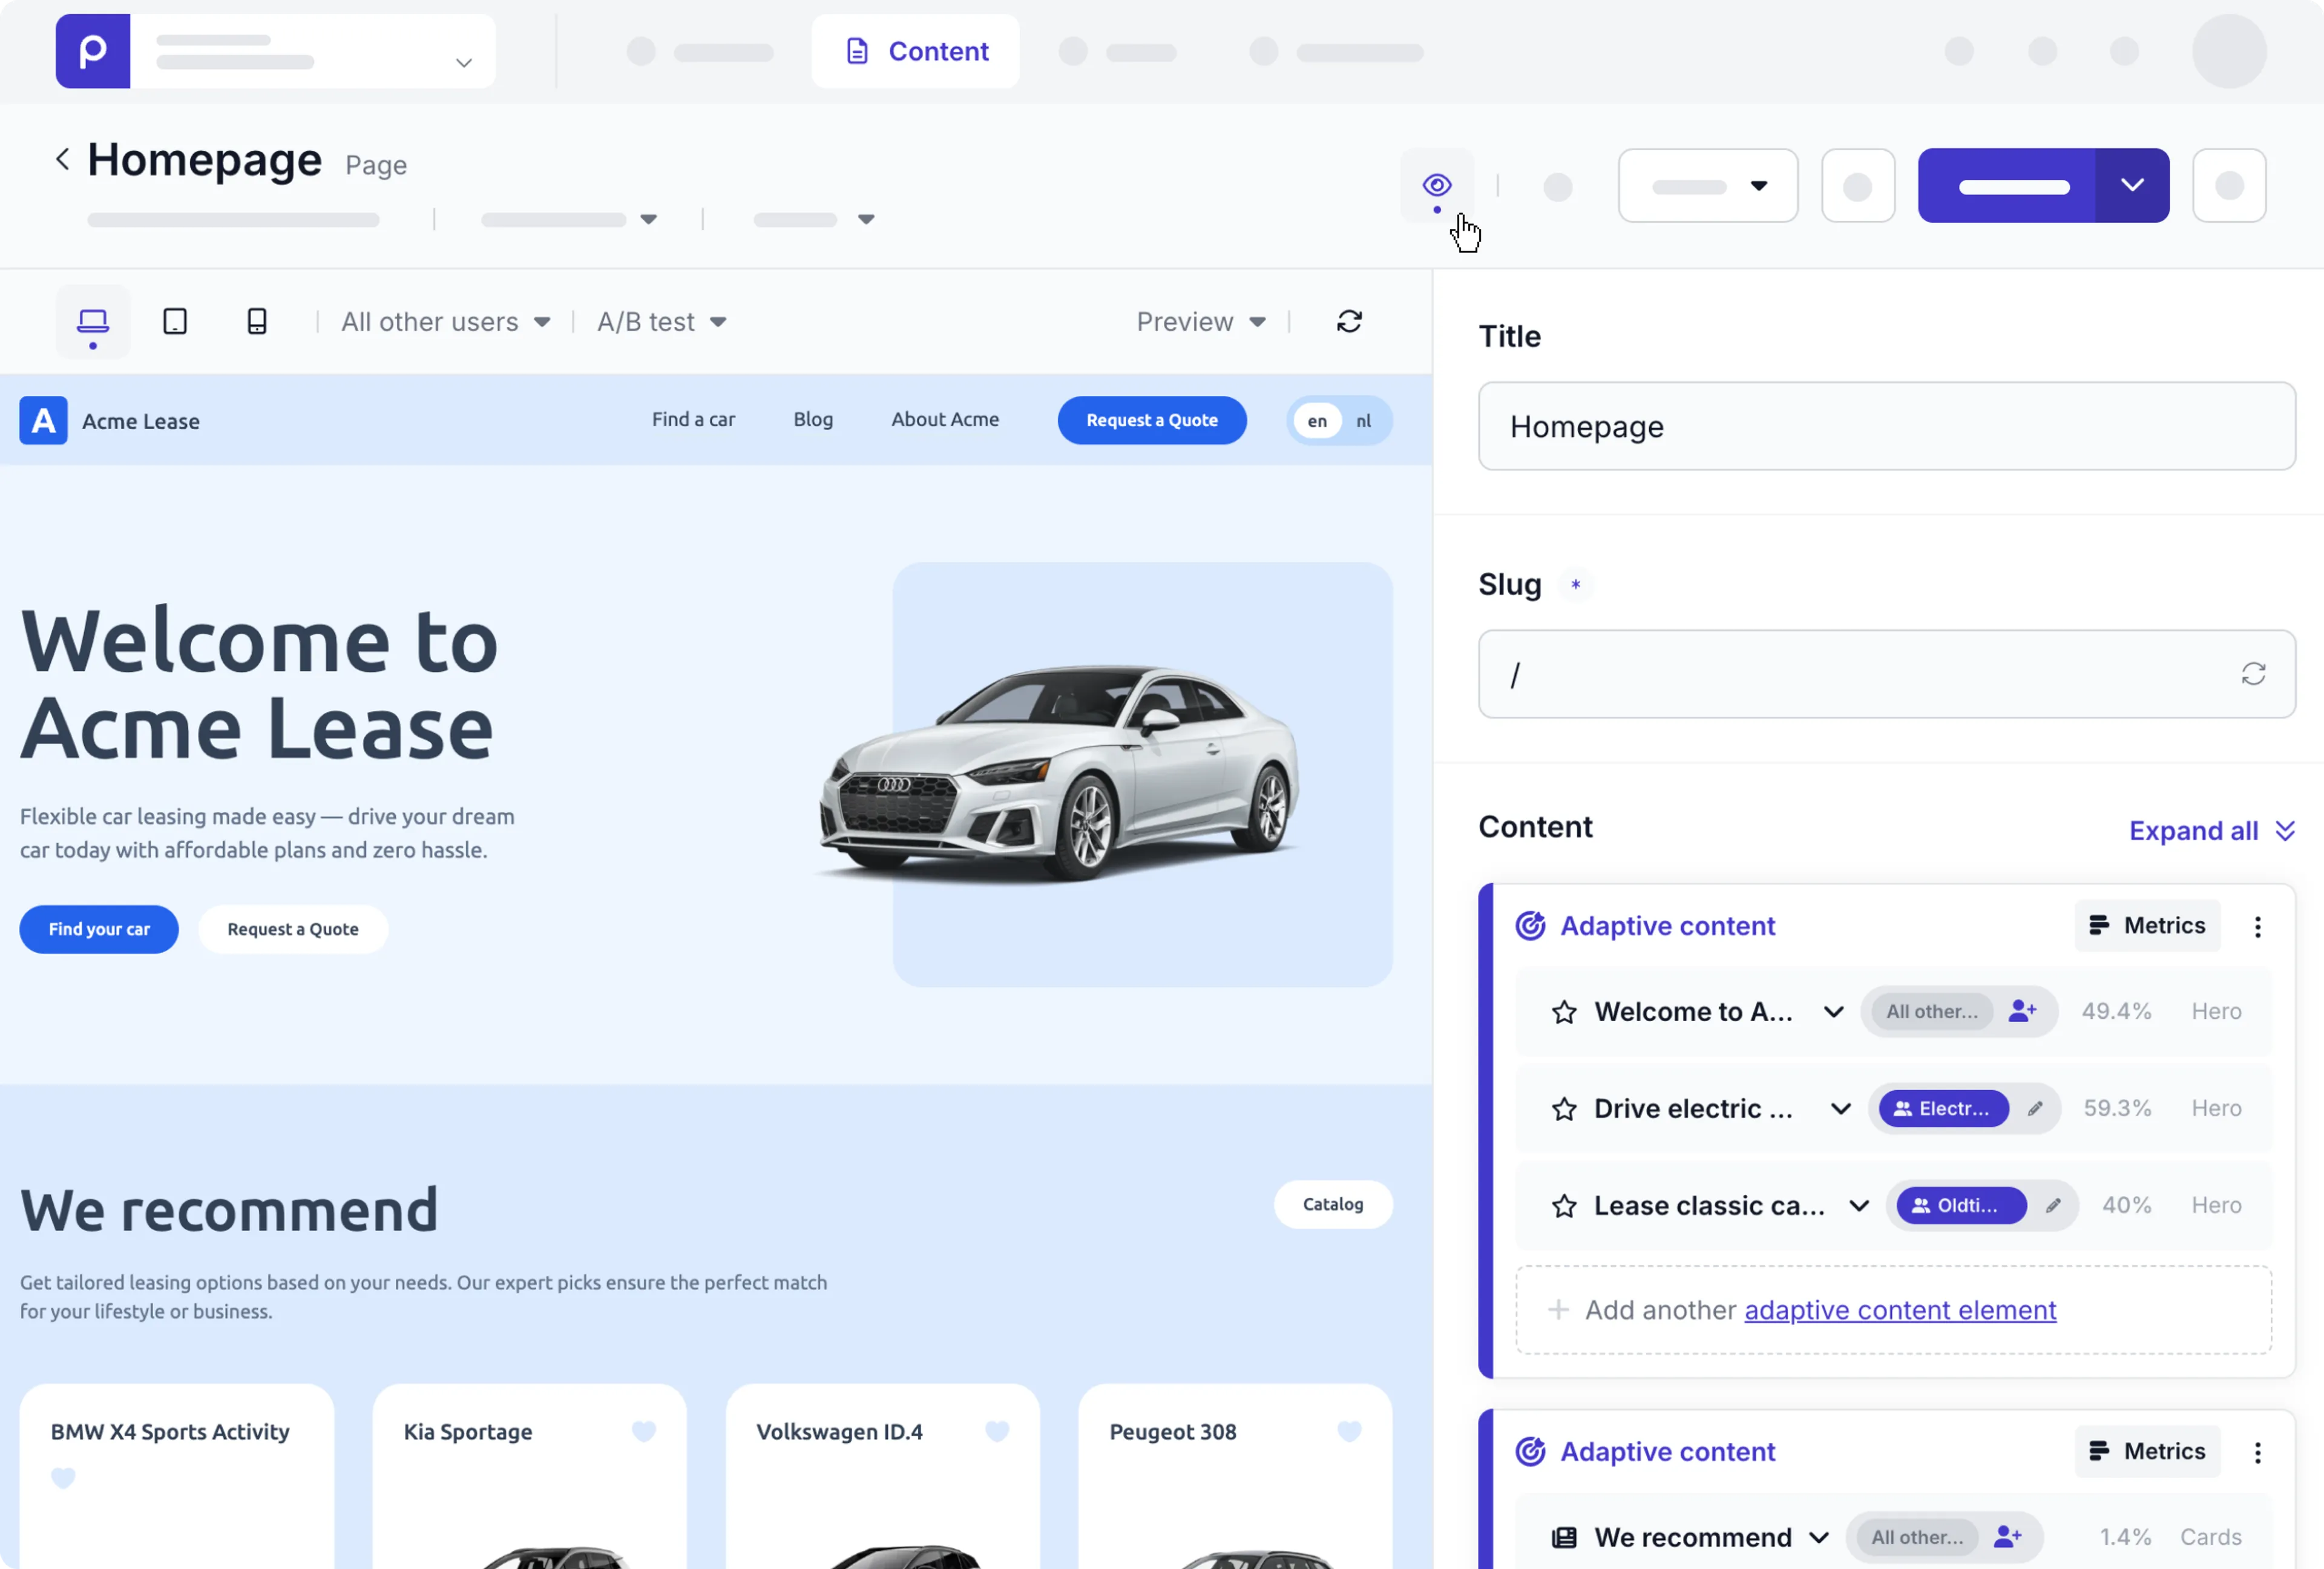
Visual editing side-by-side view
Setting up previews and Visual Editing for web pages
Set up preview URLs
Allow content editors to preview a content item by setting up a preview URL. You can set up preview URLs for multiple environments like production, acceptance, test, and development. Preview URLs are defined for a specific model.
To add one or more preview URLs, follow the steps below.
-
Go to the Schema tab and choose the model you want to update.
-
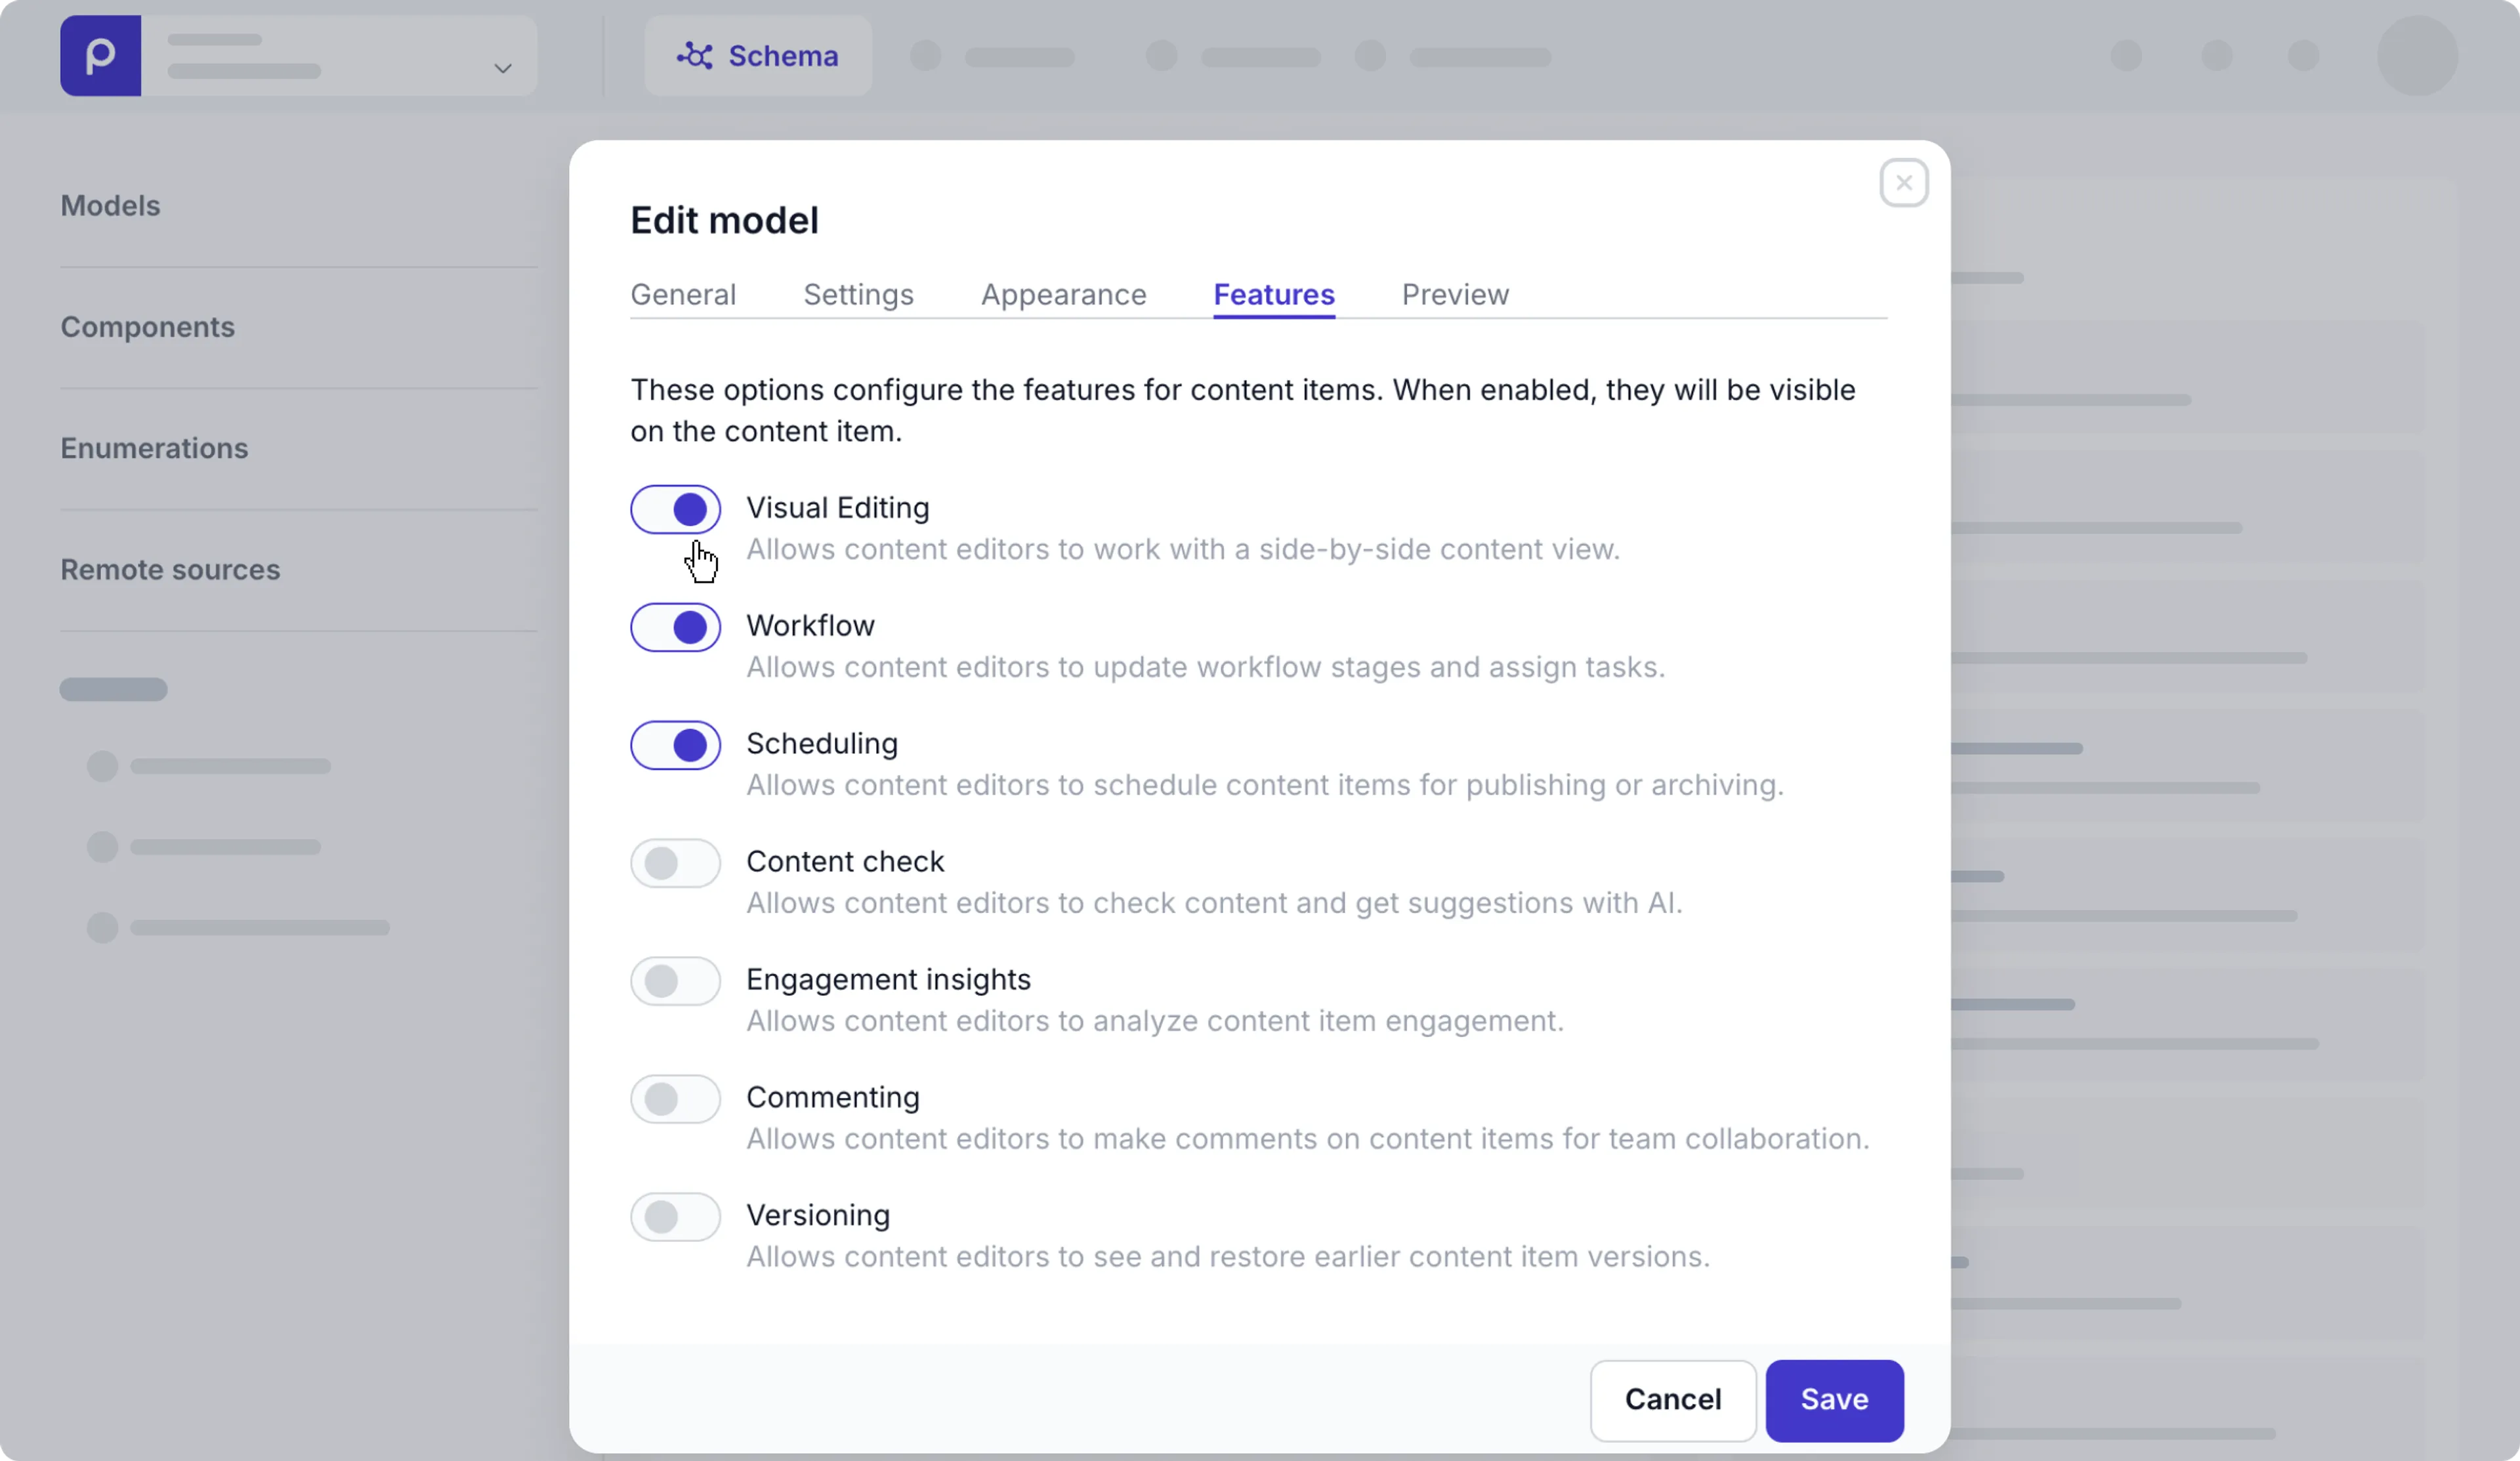
Click the Settings button at the top of the model and click the Features tab.
-
To make the Visual Editing icon visible in content items, make sure the Visual Editing toggle is switched on. Conversely, if you want to hide the icon to avoid confusion, for example, for a model for navigation bar content, then disable this toggle.
-
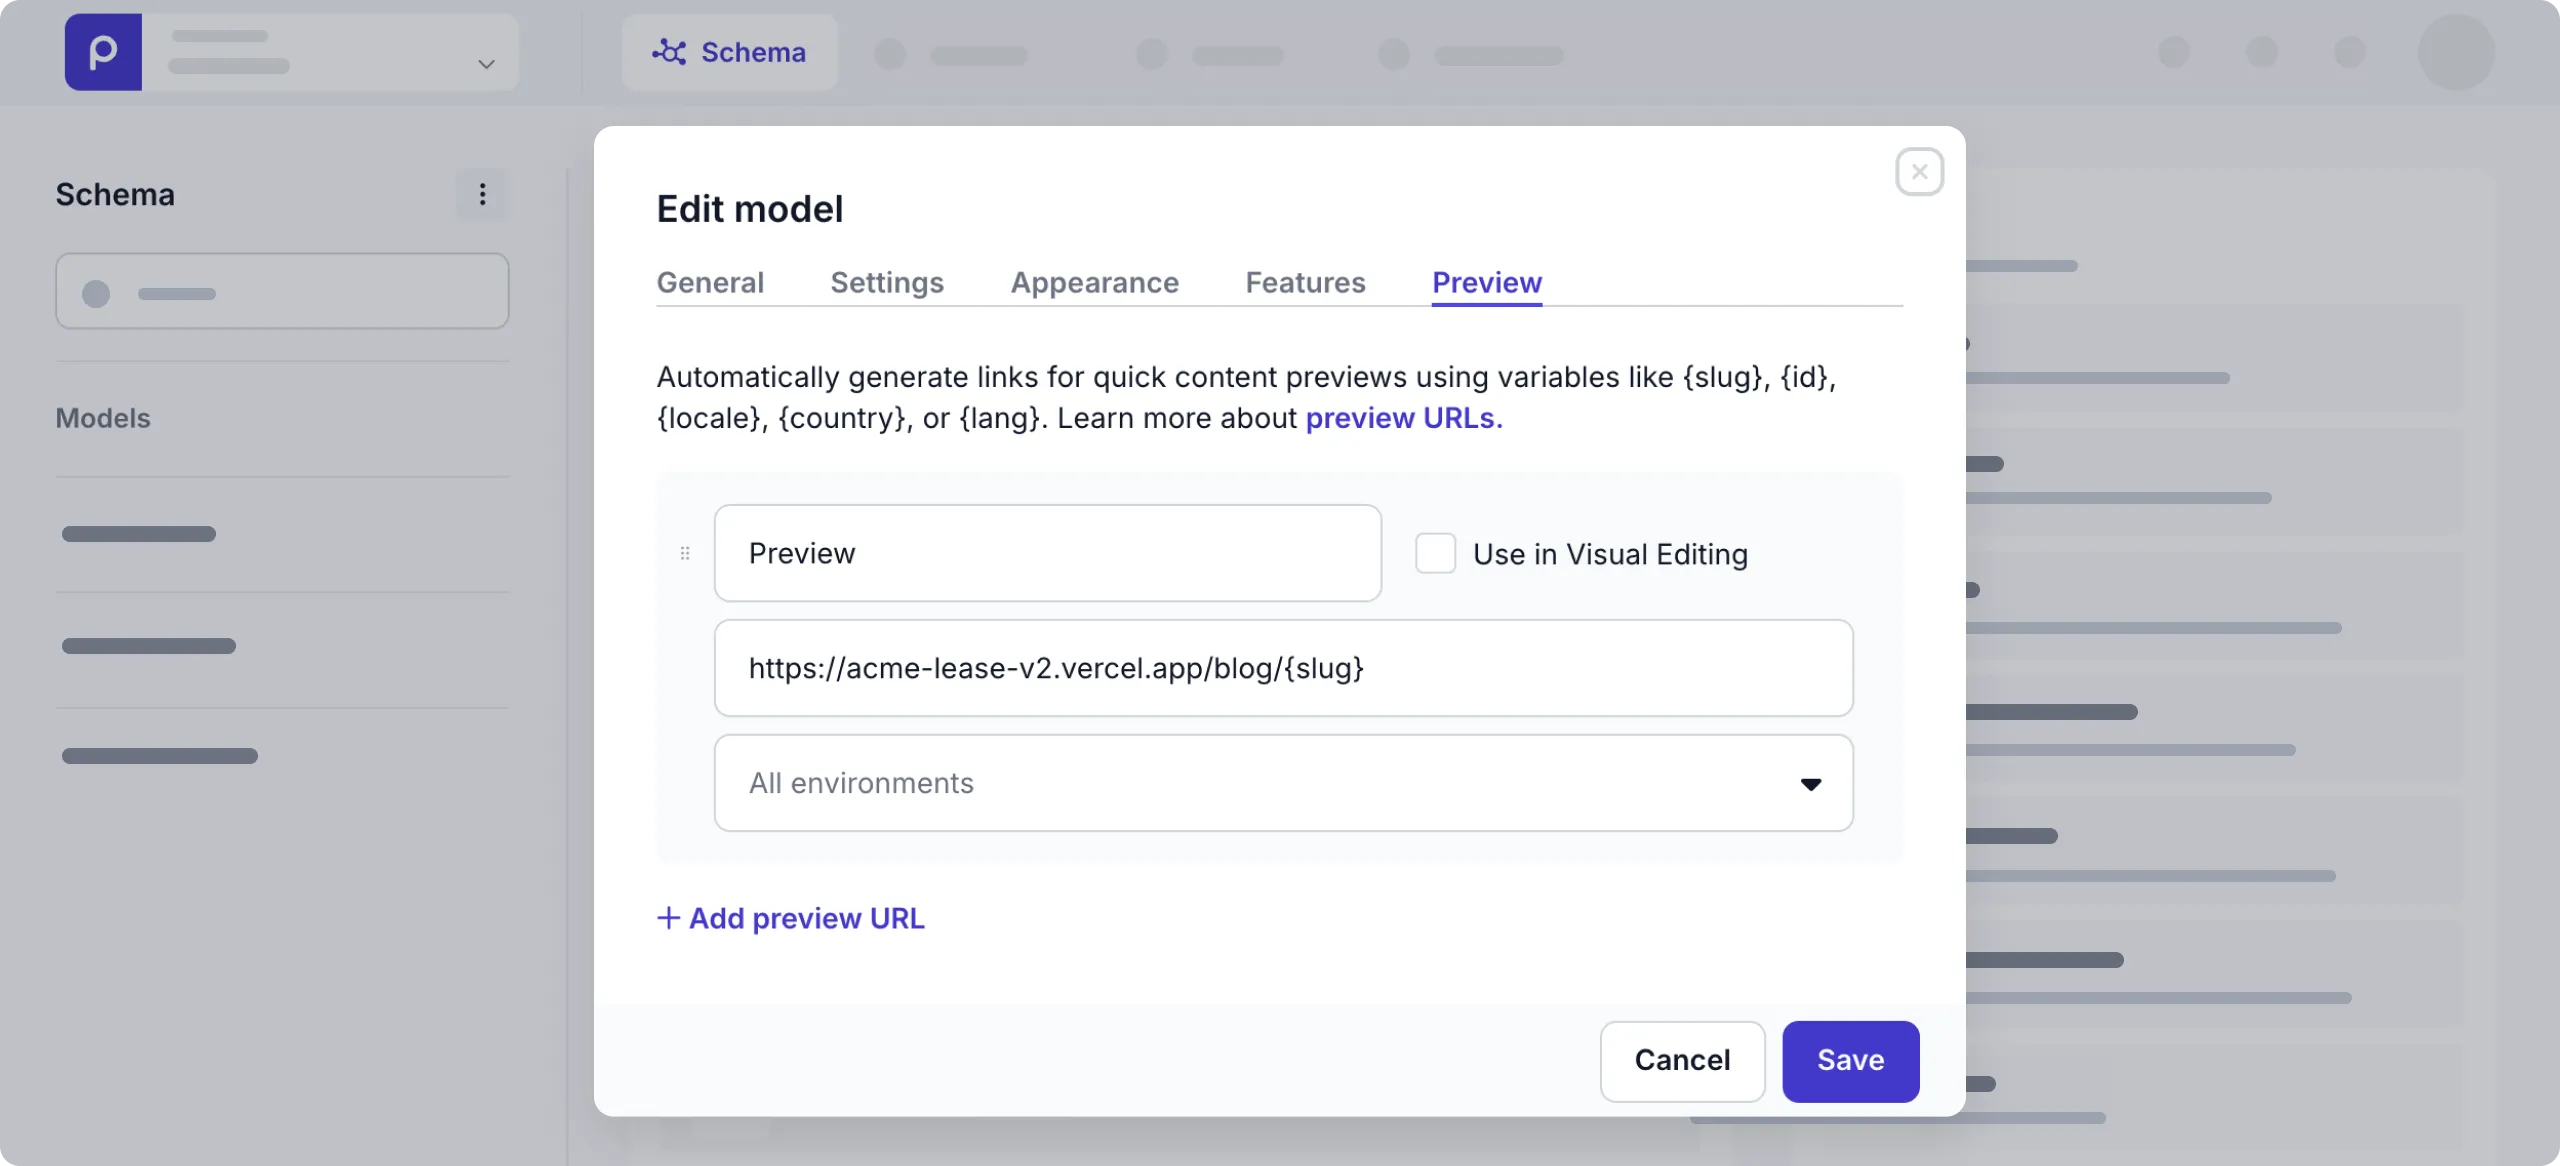
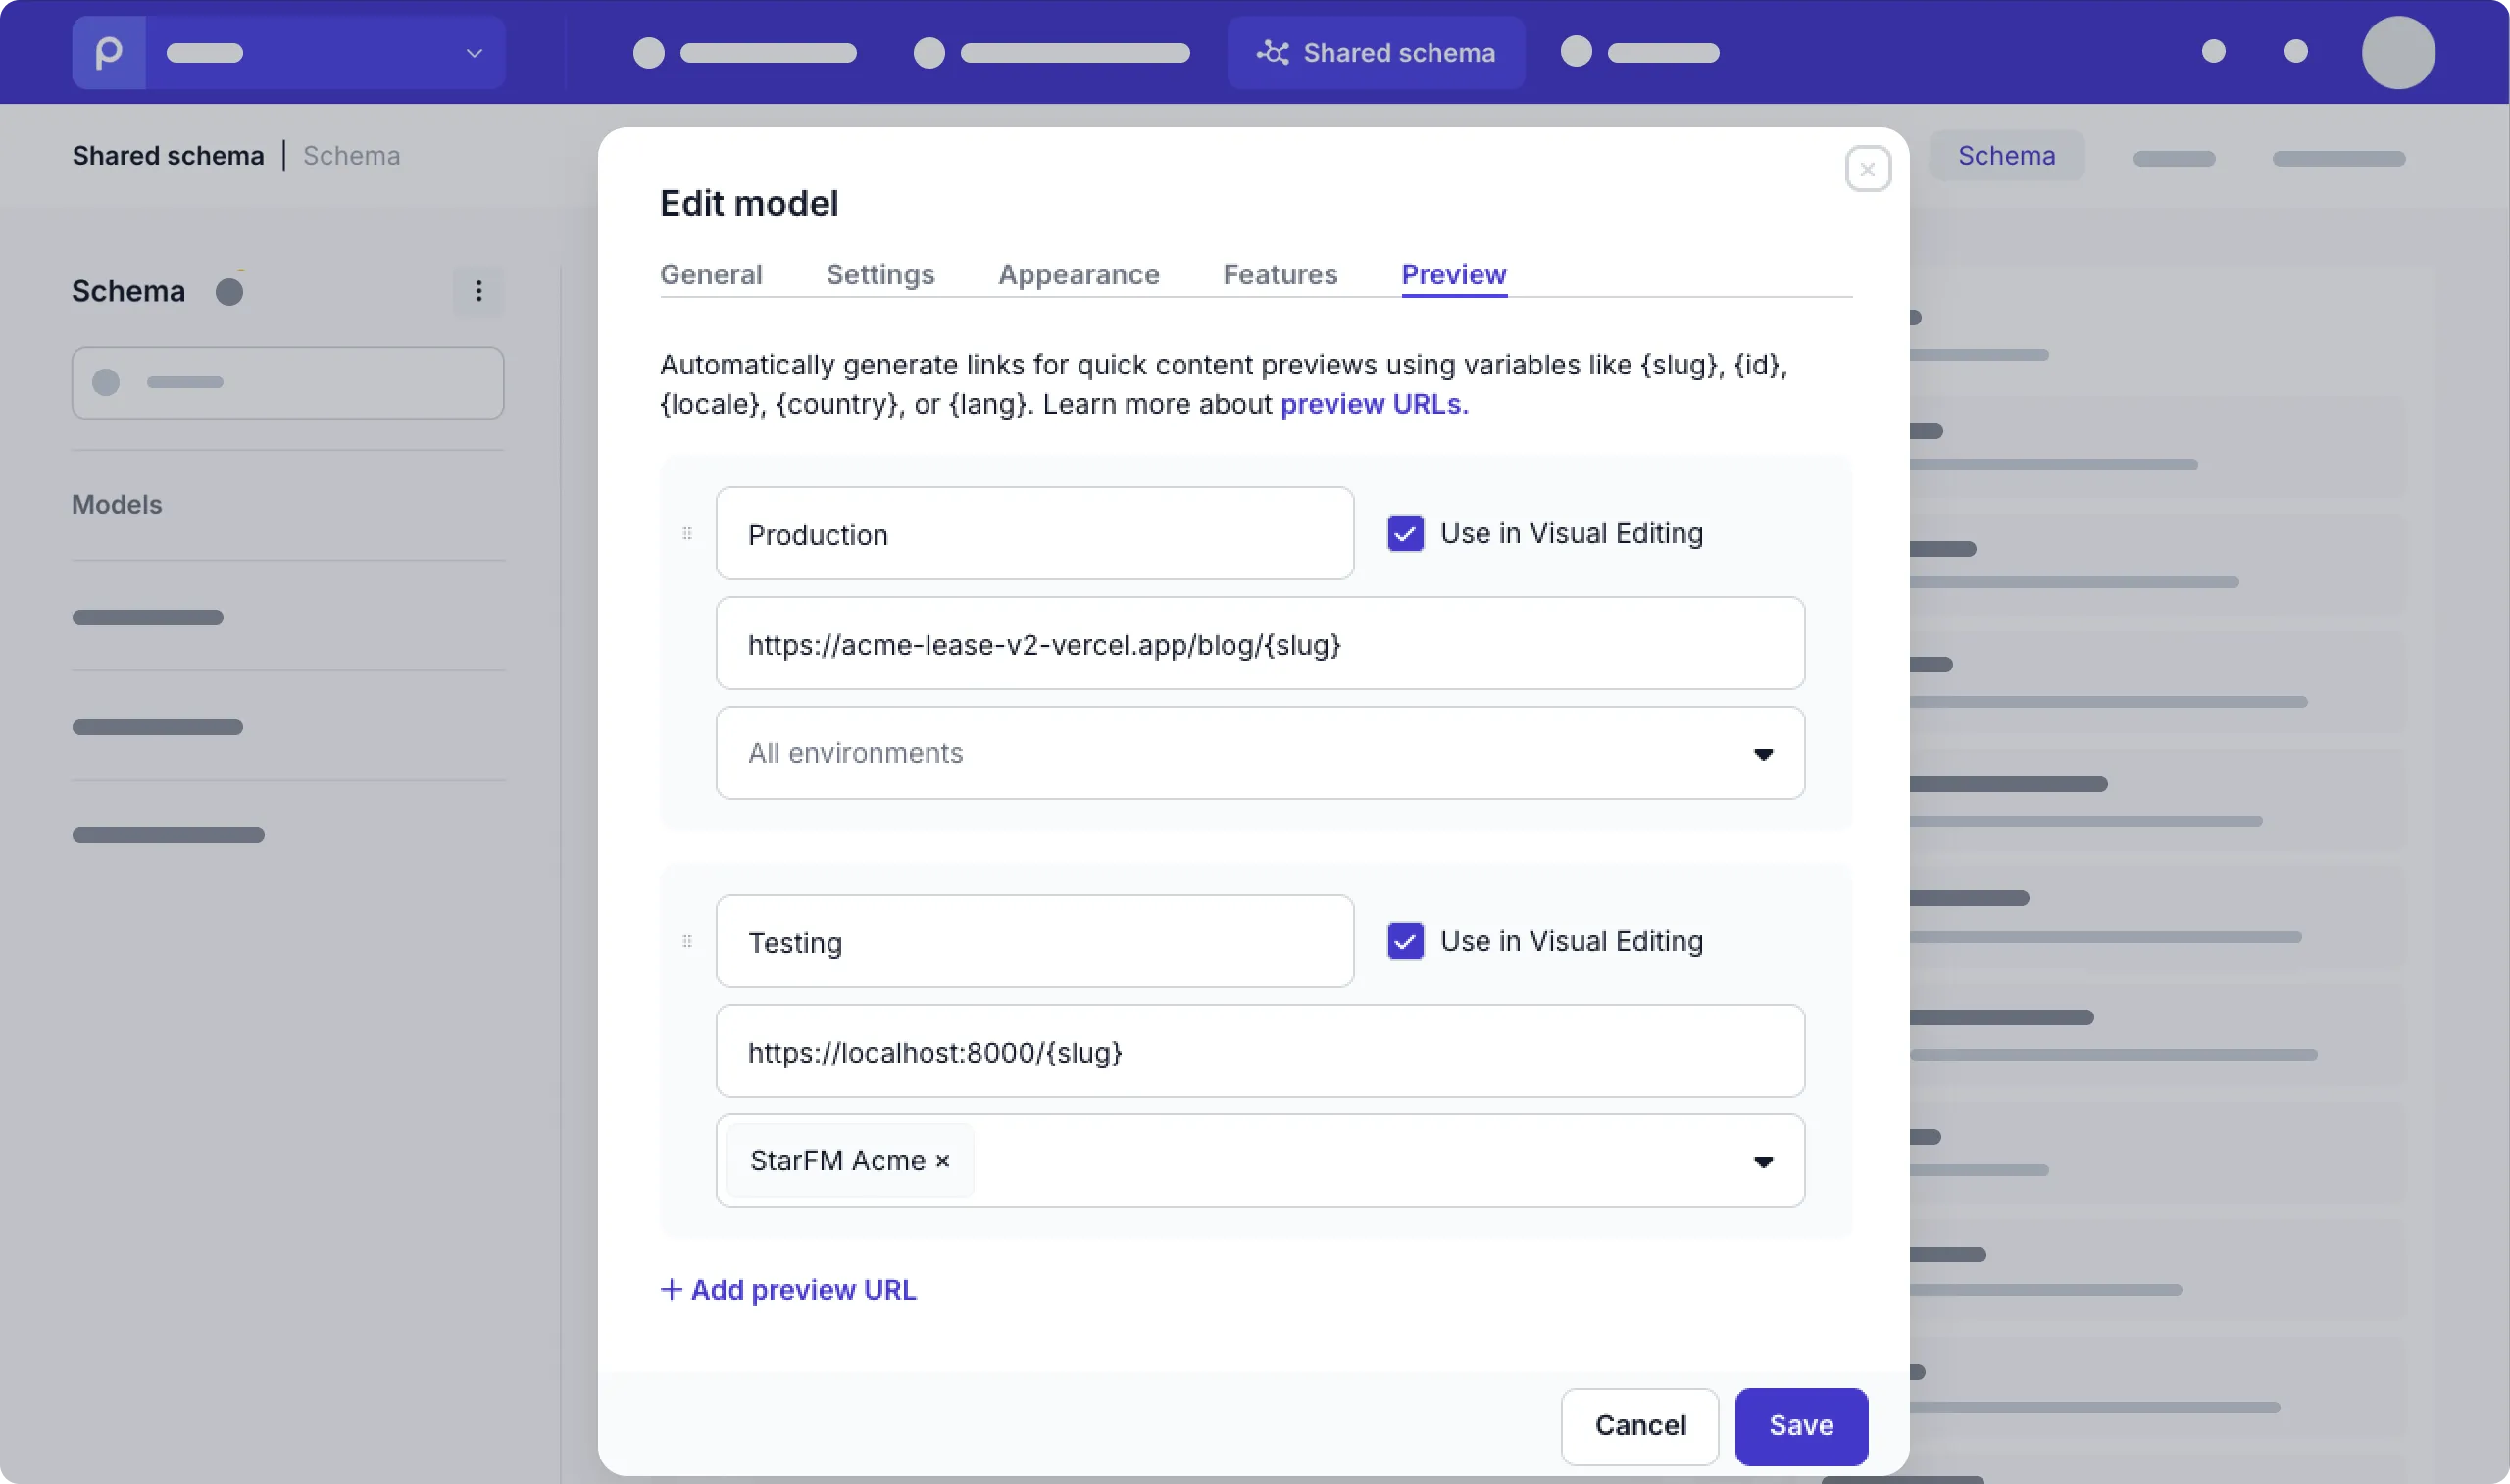
Go to the Preview tab and enter a name and the preview URL construct for this model. You can use
{id}and{slug}variables for your construct. Example:https://example.com/{slug}. -
If you want to make visual editing accessible for this model, then select the Use in Visual Editing option to enable the live side-by-side preview.
You can add an unlimited number of preview URLs to the model. The first name you set will be shown as default in the content items of this model, if applicable for this environment.
If you loaded demo data in your environment then you’ll notice a Preview URL on the Post, Page, and Product models. This URL renders the content item in the Prepr Example site.
Scoping environments for a preview URL
When you set up preview URLs for a model or shared model, you can either choose to make a preview URL available to all environments in the organization or set specific environments this preview URL is relevant for.
When you set a specific environment to a preview URL in the shared model, editors in that environment can choose this relevant URL to preview their content.
Access unpublished content
Accessing unpublished content is useful for previewing new content items before making them available publicly. The Prepr GraphQL API gives you control over whether you want to access published or unpublished content items in the front end.
To show content items that are not yet published in the front end, use the GraphQL Preview access token created by Prepr during the initial environment setup. With this access token, you can retrieve content items in all available workflow stages, including To do, In progress, Review, Done, and Published. The content editor can then review them and make any necessary changes before publishing.
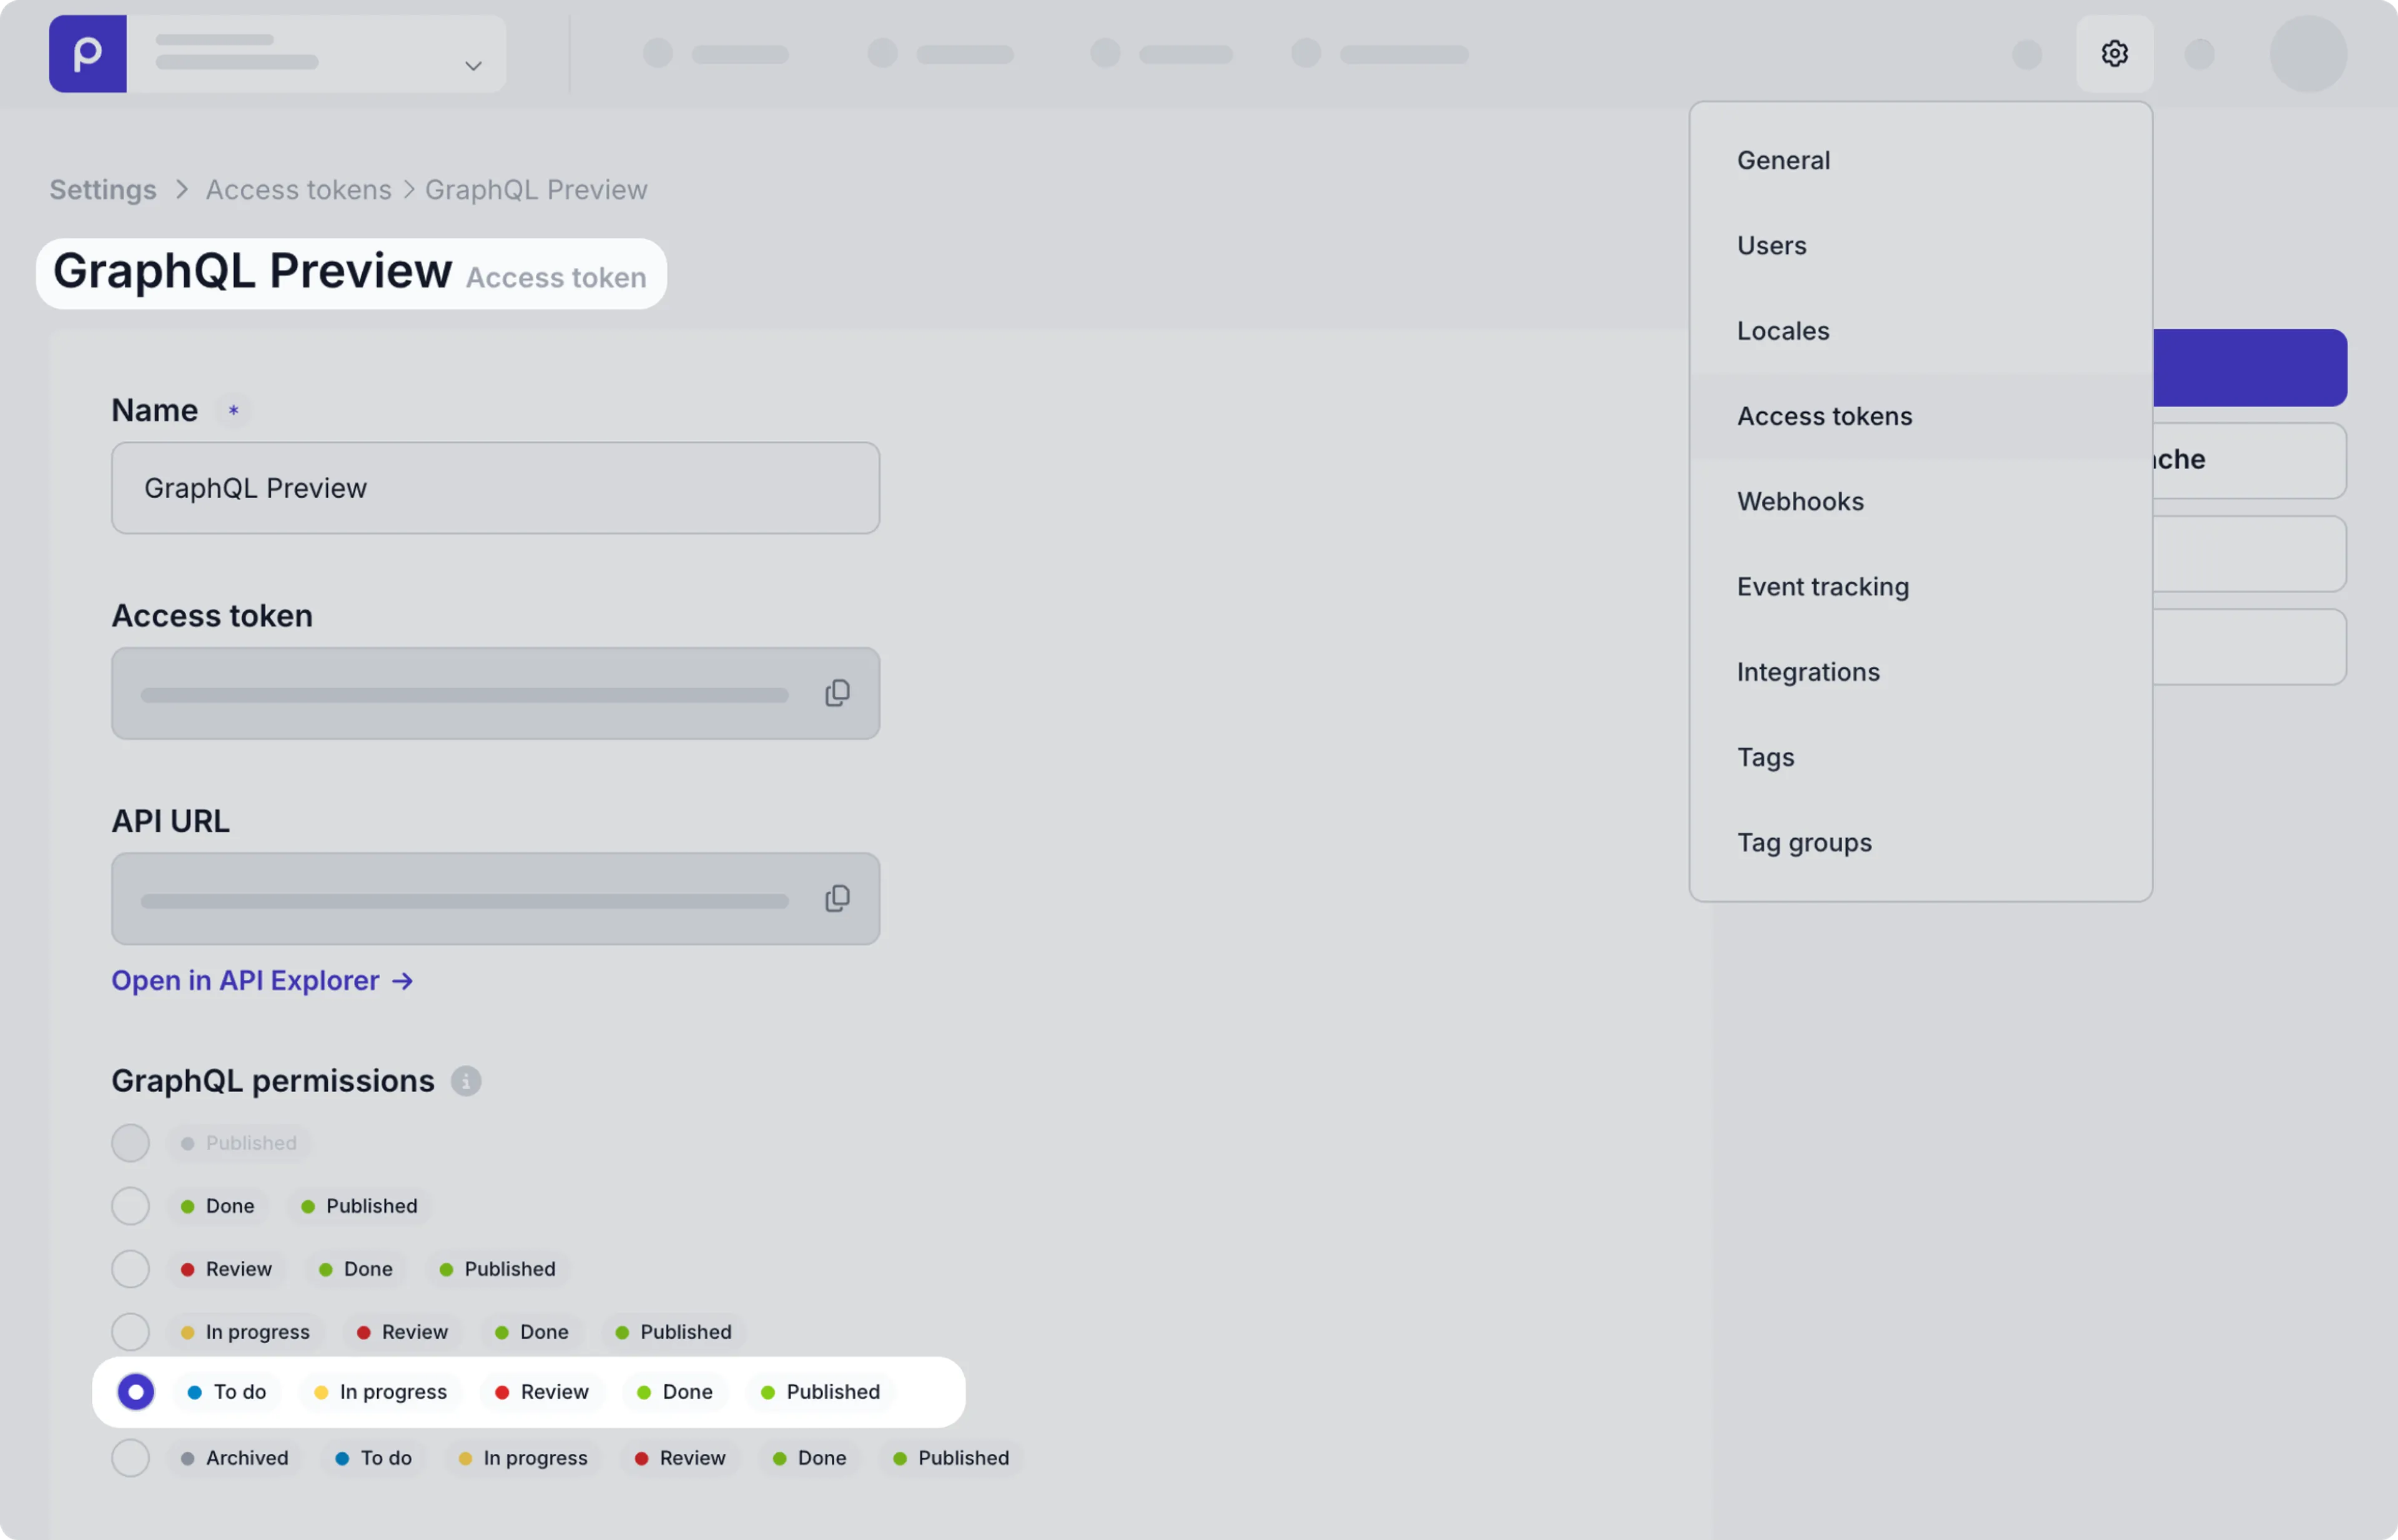
Alternatively, you can create a new access token yourself and define token permissions according to your specific needs. Read more about GraphQL permissions.
Activate Edit Mode in your front end
If you have a Next.js front end, Edit mode is automatically available after you install the Prepr Next.js package in your front end and use an access token with Edit mode enabled.
Alternatively, if your preview web app is deployed on Vercel, Prepr supports the Vercel Content Link.
Vercel Content Link is a special link or URL provided by Vercel that directly serves dynamic content deployed on the platform. This feature allows content editors to edit content directly from the preview web app. When content editors open their preview web app, they can simply hover over elements to reveal a link to the corresponding item for quick updates.

Example preview website with Vercel Content Link enabled.
Vercel Requirement
This feature only works with sites hosted on Vercel with a Pro or Enterprise plan.
To enable Vercel Content Link for your preview environment, follow the steps below.
- Deploy a preview environment on Vercel . When deploying a preview environment, Vercel automatically generates a content link,
https://<project-name>.vercel.appfor your project.
To enable Edit mode in a preview access token, follow the steps below.
-
In your Prepr environment, click the icon and choose the Access tokens option to view all the access tokens.
-
Click your preview access token to open it and select the Enable edit mode checkbox and click the Save button.
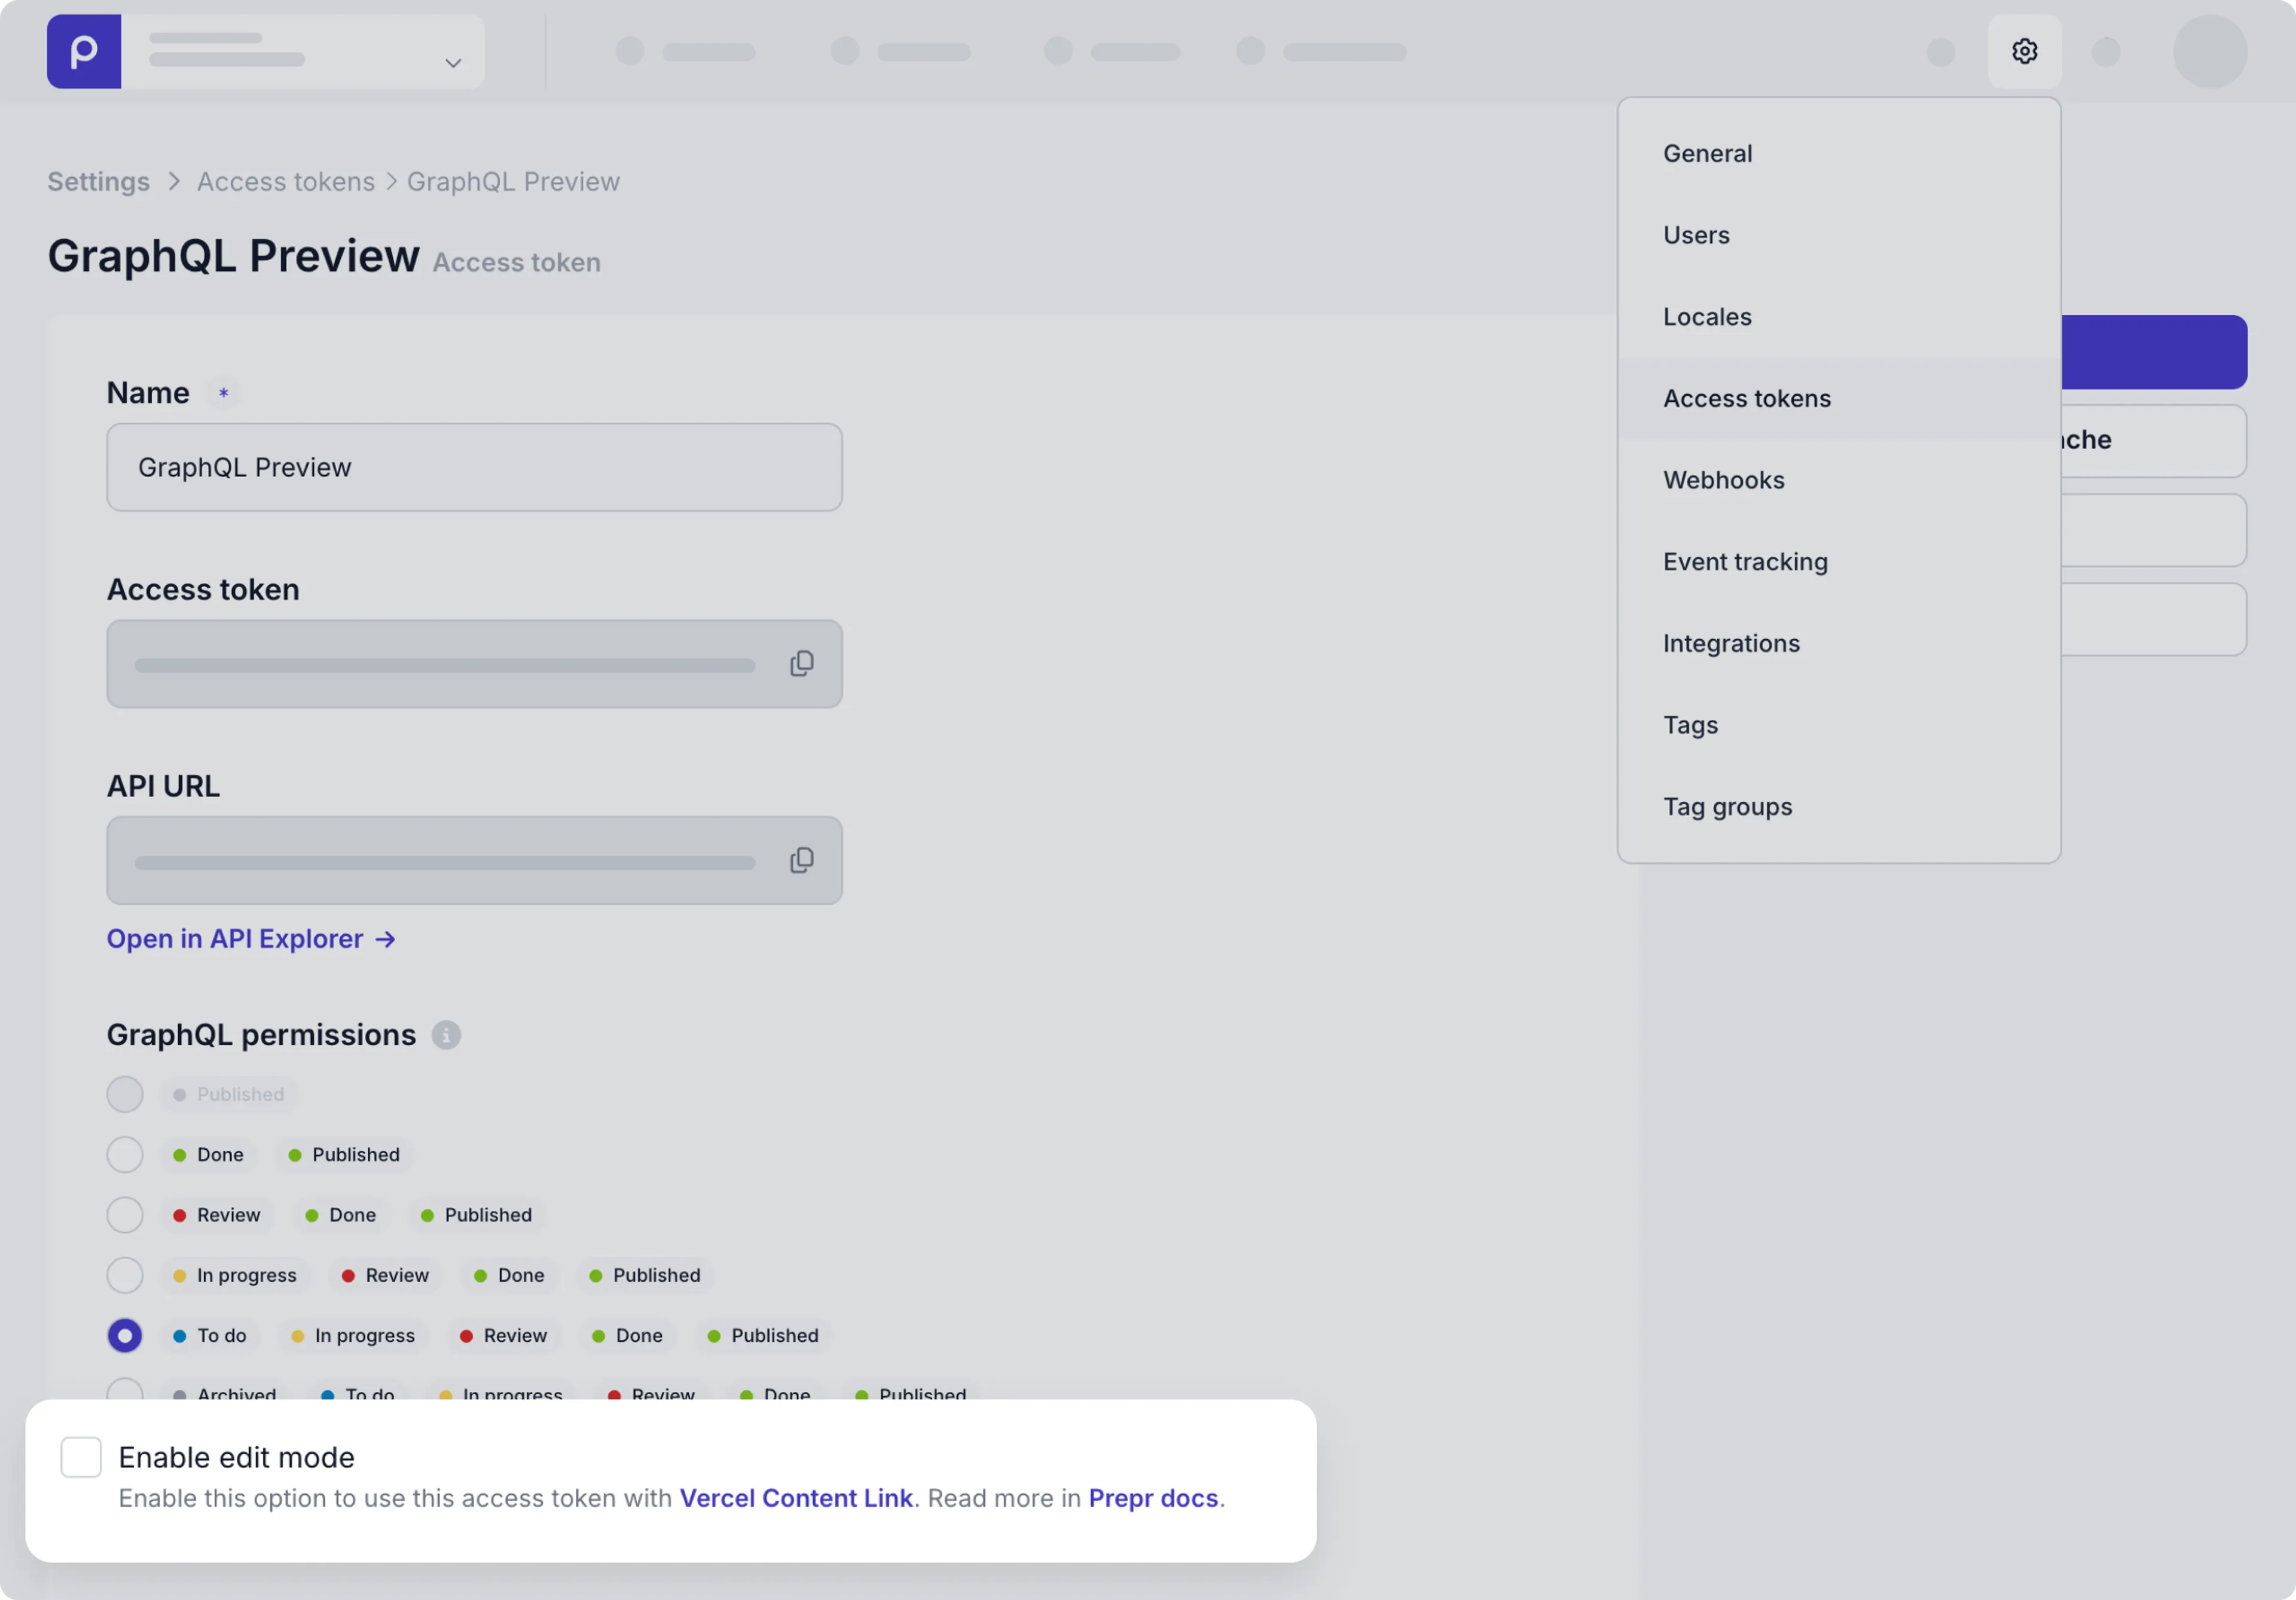
Once enabled, when content editors preview the web app, they can hover over an element and click the link to open the corresponding item for quick updates. The link takes them directly to the corresponding content item in their Prepr environment.
Invisible unicode characters
When using the preview access token, you’ll notice your query responses include additional unicode characters for the whitespace in the text fields. When you turn on edit mode in an access token, Stega-encoding serializes metadata into invisible UTF-8 encoded characters and appends them to string values.

Enable live preview in your front end
To make sure Visual Editing works in your Prepr environment, you need to make sure that inline frames (iframes) are allowed for all Prepr environments.
Visual editing uses iframes for this in-app preview alongside a specific content item. This means your HTTP server needs to allow iframes for the Prepr domain.
If you get a server error like: Refused to frame 'https://...' because an ancestor violates the following Content Security Policy directive...,
you can allow iframes by updating the Content-Security-Policy HTTP header in the web server configuration like in the code snippet below:
Content-Security-Policy: frame-ancestors <YOUR-PREPR-ENV-URLS>Replace <YOUR-PREPR-ENV-URLS> with your own Prepr environment URLs, for example: https://prod-acme-lease.prepr.io https://dev-acme-lease.prepr.io where each URL is separated by a space.
Brave browser
If content editors use the Brave browser, they need to toggle the Shields are UP button while using Visual editing in Prepr.
Vercel Deployment Protection
When you set up Visual Editing and you’re using Vercel Deployment Protection, you need to include additional URL parameters for Visual editing to work. Add the following parameters to the end of your preview URL.
x-vercel-protection-bypass=<your-secret>x-vercel-set-bypass-cookie=samesitenone
For example: https://yourprotectedverceldomain.com/{slug}?x-vercel-protection-bypass=<your-secret>&x-vercel-set-bypass-cookie=samesitenone
Enable Segment and A/B test switches
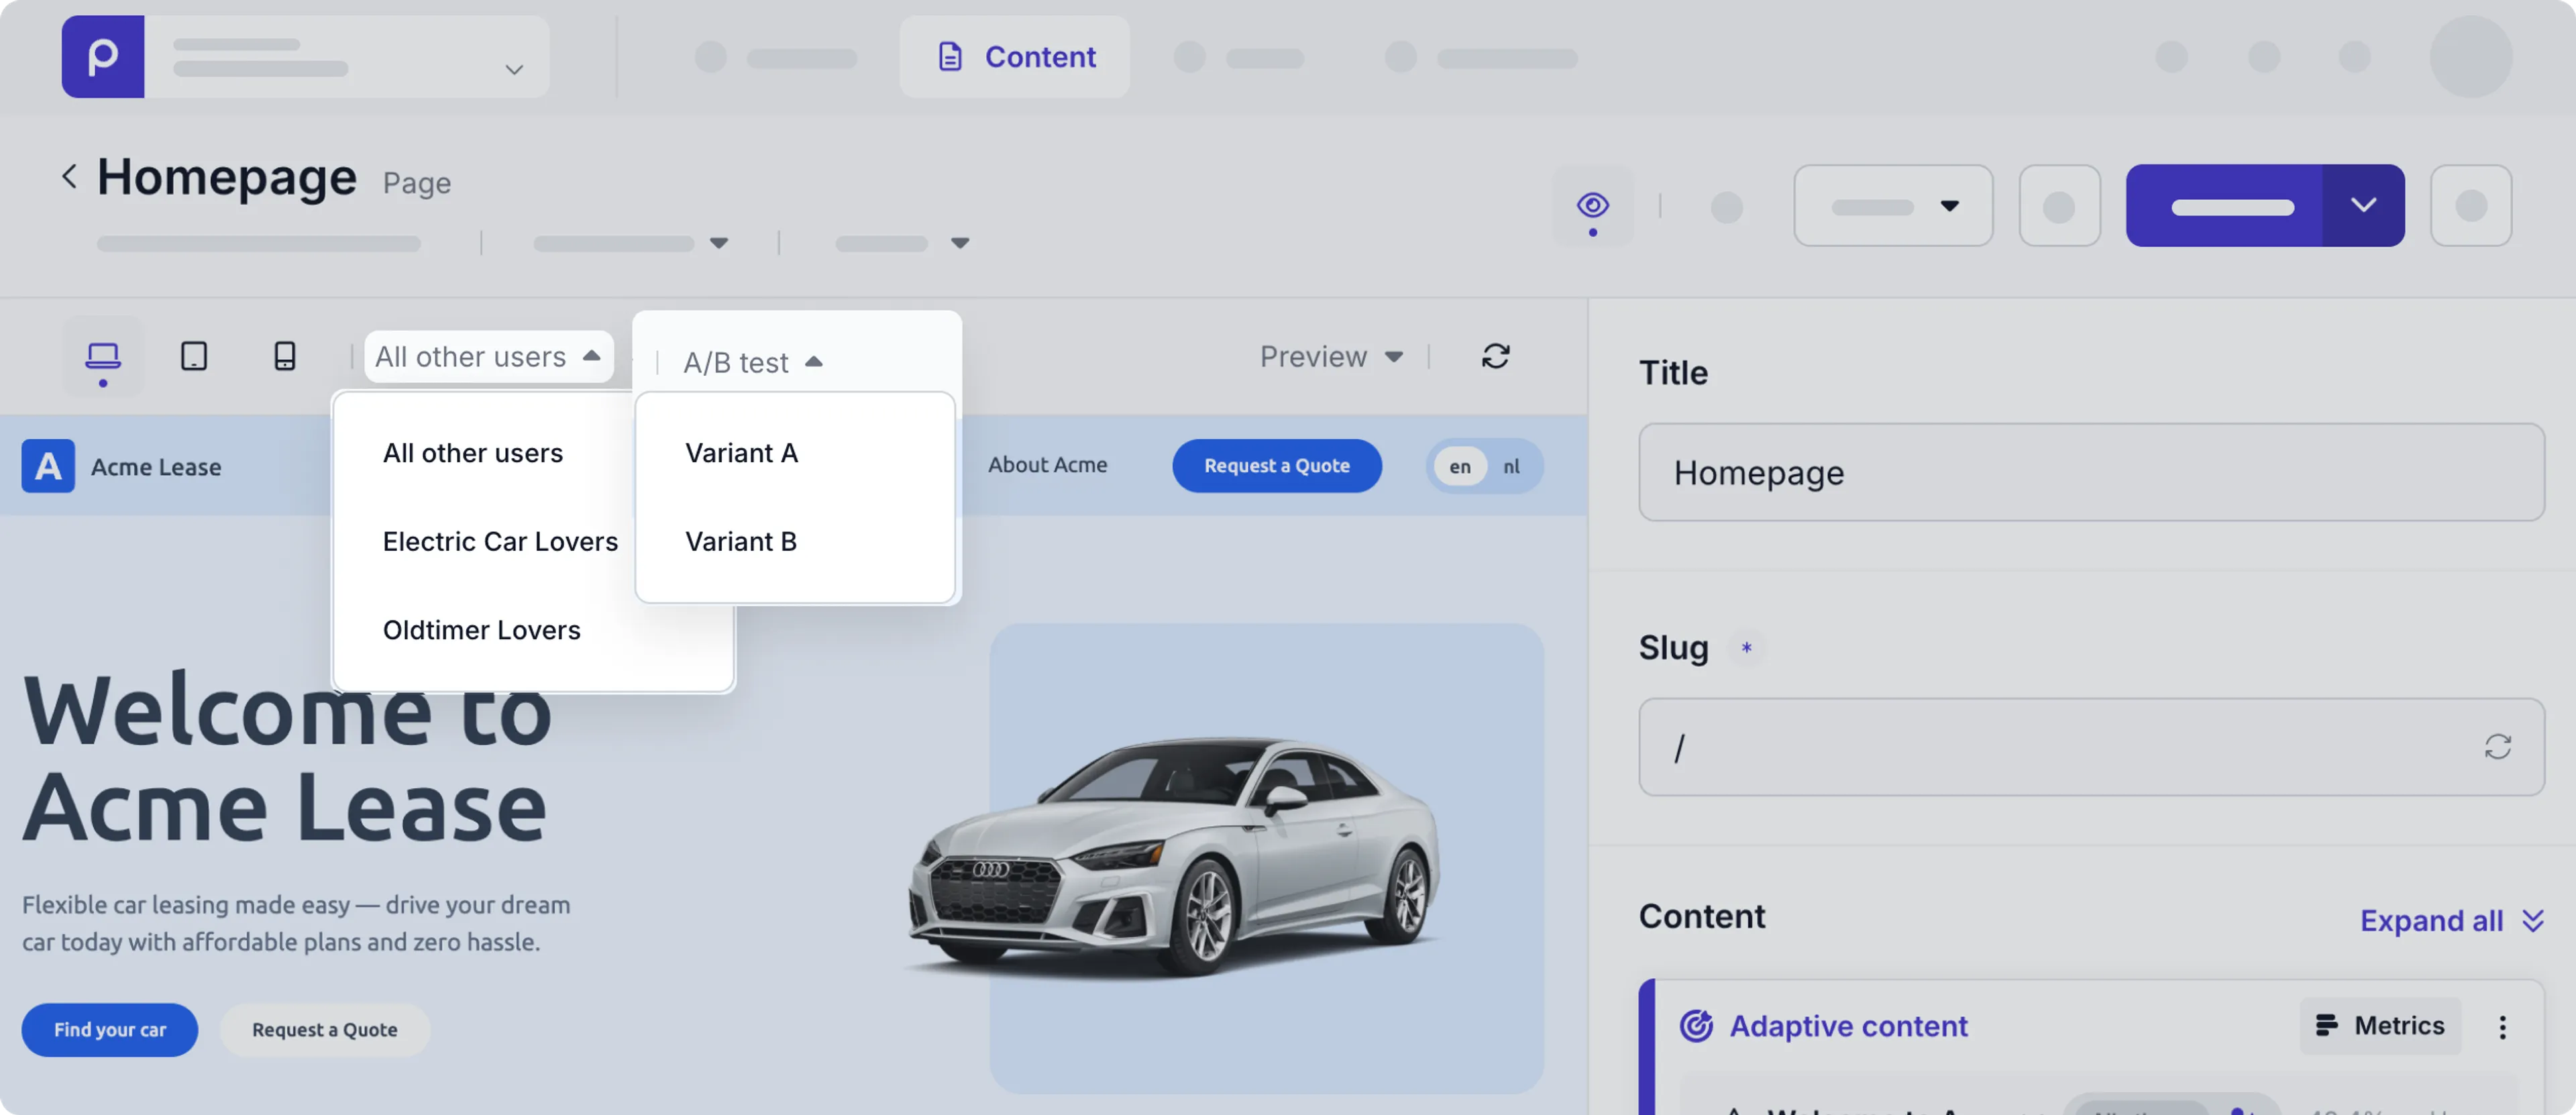
When content editors add personalized content and or A/B test content to content items, it’s useful for them to preview the content per segment and A/B variant before publishing the adaptive content.
They can use the Segment and A/B test switches to do this type of live preview. You can find these switches just above the preview next to the Screen size icons.
If you have a Next.js front end, the Segment and A/B test switches are available automatically after you install the Prepr Next.js package in your front end.
If you’re not building your front end with Next.js, you can enable the switches with the following steps:
-
Post a loaded event message like in the following code snippet:
if(window.parent !== self) {
  const message = { name: 'prepr_preview_bar', event: 'loaded' };
  window.parent.postMessage(message, '*');
}
When you post this message, Prepr enables the segment and A/B test switches.
-
When an editor changes the value of the switches, Prepr adds query parameters to the URL like in the example below:
https://acme-lease.prepr.io/?prepr_preview_ab=B&prepr_preview_segment=sgm_8ip8odwnmccThe
prepr_preview_abparameter will have a value ofAorB, while theprepr_preview_segmentcontains the_idvalue of the chosen segment. You can use these parameters to set the API headerPrepr-ABTestingandPrepr-Segmentsto their provided values.See an example code snippet on setting API headers using Apollo.
const { data } = await getClient().query<PageQuery>({
    query: PageDocument,
    variables: {
        slug: slug,
    },
    context: {
        headers: {
            'Prepr-Segments': <prepr_preview_segment value>,
            'Prepr-ABTesting': <prepr_preview_ab value>
        },
    },
})
By setting these headers, your query will retrieve specific personalized content and the specific content for the A or B variant. This means the editor sees the matching personalized content for the segment they chose and the matching A/B test content for the variant they chose.
At this point, your preview is ready for content editors. To complete the setup for Visual editing, the side-by-side live preview, continue with the steps below.
Maintain scroll position after refresh
When refreshing the live preview, it’s useful for editors if their last scroll position in the preview stays at the same place. If you have a Next.js front end, the scroll position is saved automatically if you install the Prepr Next.js package in your front end.
For other frameworks, check out the example code snippet below on how to set up the scrolling.
if(window.parent !== self) {
    let parentOrigin = null; //Get origin of parent outside iframe
    const message = { name: 'prepr_preview_bar', event: 'loaded' };
    window.parent.postMessage(message, '*');
    window.addEventListener("message", (evt) => {
        if(evt.data?.event === 'prepr:initVE' && !parentOrigin) {
            parentOrigin = evt.origin;

            if(evt.data?.scrollPosition) {
                //Timeout needed in order to scroll to position
                setTimeout(() => {
                    window.scrollTo(0, evt.data?.scrollPosition)
                }, 1)
            }
        }
        if(evt.origin !== parentOrigin) return;

        if(evt.data?.event === 'prepr:getScrollPosition') {
            const currentScrollY = window.scrollY || document.documentElement.scrollTop;
            window.parent.postMessage({
                ...message,
                event: "getScrollPosition",
                value: currentScrollY
            }, '*');
        }
    })
}
Prepr only sends the message prepr:initVE, if the front end sent a message first to trigger the preview like in the example above.
Prepr checks if the scroll position message you send is valid by comparing the URL with the Visual Editing preview URL set up on the corresponding model.
And that’s it. Whenever a content editor edits a content item for a model with visual editing enabled, they can see their changes real-time with the side-by-side view.
Troubleshooting
Answers to some common questions about Visual Editing.
Why do I see the “Visual Editing not available yet” screen instead of the live preview?
- This means the Visual Editing has not been enabled on the related model for this content item. To enable Visual Editing for this model, make sure to follow all steps when setting up the preview URL.
Why can’t I see my content item changes in the live preview?
- This could mean the preview URL points to a production web app. If you enable Visual Editing for a production preview URL, then changes will not be visible until the user publishes the content item. Update the preview URL to one for a staging web app that uses the GraphQL Preview access token to see any unpublished changes in the live preview.
Why do I get the server error Refused to frame 'https://...' because an ancestor violates the following Content Security Policy directive...?
- This error means that iframes are not allowed for the Prepr domain. To enable them, update the Content Security Policy in your web server.
Why are the Segment and A/B test switches not visible in Visual Editing?
- If you’ve already installed the Prepr Next.js package, reinstall it to get the latest version. If you don’t have a Next.js front end, follow the instructions above to activate the switches without using the Prepr Next.js package.
Why are there invisible unicode characters in the preview API response?
-
These are Stega-encoded strings which produce invisible output to allow content editors to use the Vercel Edit Mode. When you turn on edit mode in an access token, Stega-encoding serializes metadata into invisible UTF-8 encoded characters and appends them to string values.
Why does Visual Editing appear blank or load without styling when using Vercel Deployment Protection?
-
This happens because
x-vercel-protection-bypassonly applies to the initial page request. Follow-up requests for assets like CSS and JavaScript are still blocked, causing the preview to appear broken. -
To fix this, add both parameters to your preview URL so a bypass cookie is set and used for all requests:
?x-vercel-protection-bypass=<your-secret>&x-vercel-set-bypass-cookie=samesitenone -
The
samesitenonevalue is required when Visual Editing runs in an iframe, otherwise the cookie may not be sent, and assets will still fail to load. See the Vercel docs on Protection Bypass and Protection Bypass for Automation for more details.
If you have any other questions, don’t hesitate to contact our Support Team .