Make your Astro project dynamic
This guide shows you how to connect an existing Astro project to Prepr to retrieve and show Acme Lease demo content.
Connect your Astro website to Prepr
The steps below continue from the previous section, Set up an Astro project. If you don’t yet have an Astro website with static pages, follow the steps in this section first. Otherwise, let’s get started.
Connect to Prepr
To connect directly to Prepr CMS, add a fetch helper that sends GraphQL queries to the Prepr API.
-
Stop the localhost website server (
CTRL-C) if it’s running and execute the following command in the terminal to install GraphQL packages:npm add @graphql-typed-document-node/core graphql -
Create a
libfolder in thesrcdirectory. Then create a file calledprepr.tsin this folder. Copy the following code to this file to set up the fetch helper:./src/lib/prepr.tsimport { PREPR_GRAPHQL_URL } from 'astro:env/server'; import { print } from 'graphql'; import type { TypedDocumentNode } from '@graphql-typed-document-node/core'; export async function prepr<TResult, TVariables>( document: TypedDocumentNode<TResult, TVariables>, variables: TVariables, headers: Record<string, string> = {}, ): Promise<TResult> { const response = await fetch(PREPR_GRAPHQL_URL, { method: 'POST', headers: { 'Content-Type': 'application/json', ...headers }, body: JSON.stringify({ query: print(document), variables }), }); if (!response.ok) { throw new Error(`Prepr GraphQL request failed: ${response.status} ${response.statusText}`); } const { data, errors } = await response.json(); if (errors?.length) throw new Error(errors[0].message); return data; } -
We recommend using environment variables to store sensitive information like access tokens. To add environment variables, create a
.envfile in the root directory of your project and add the access token like this:./.envPREPR_GRAPHQL_URL=<YOUR-PREPR-GRAPHQL-URL> -
Replace the placeholder value
<YOUR-PREPR-GRAPHQL-URL>with the API URL of an access token from Prepr. Get an access token by logging into your Prepr account:
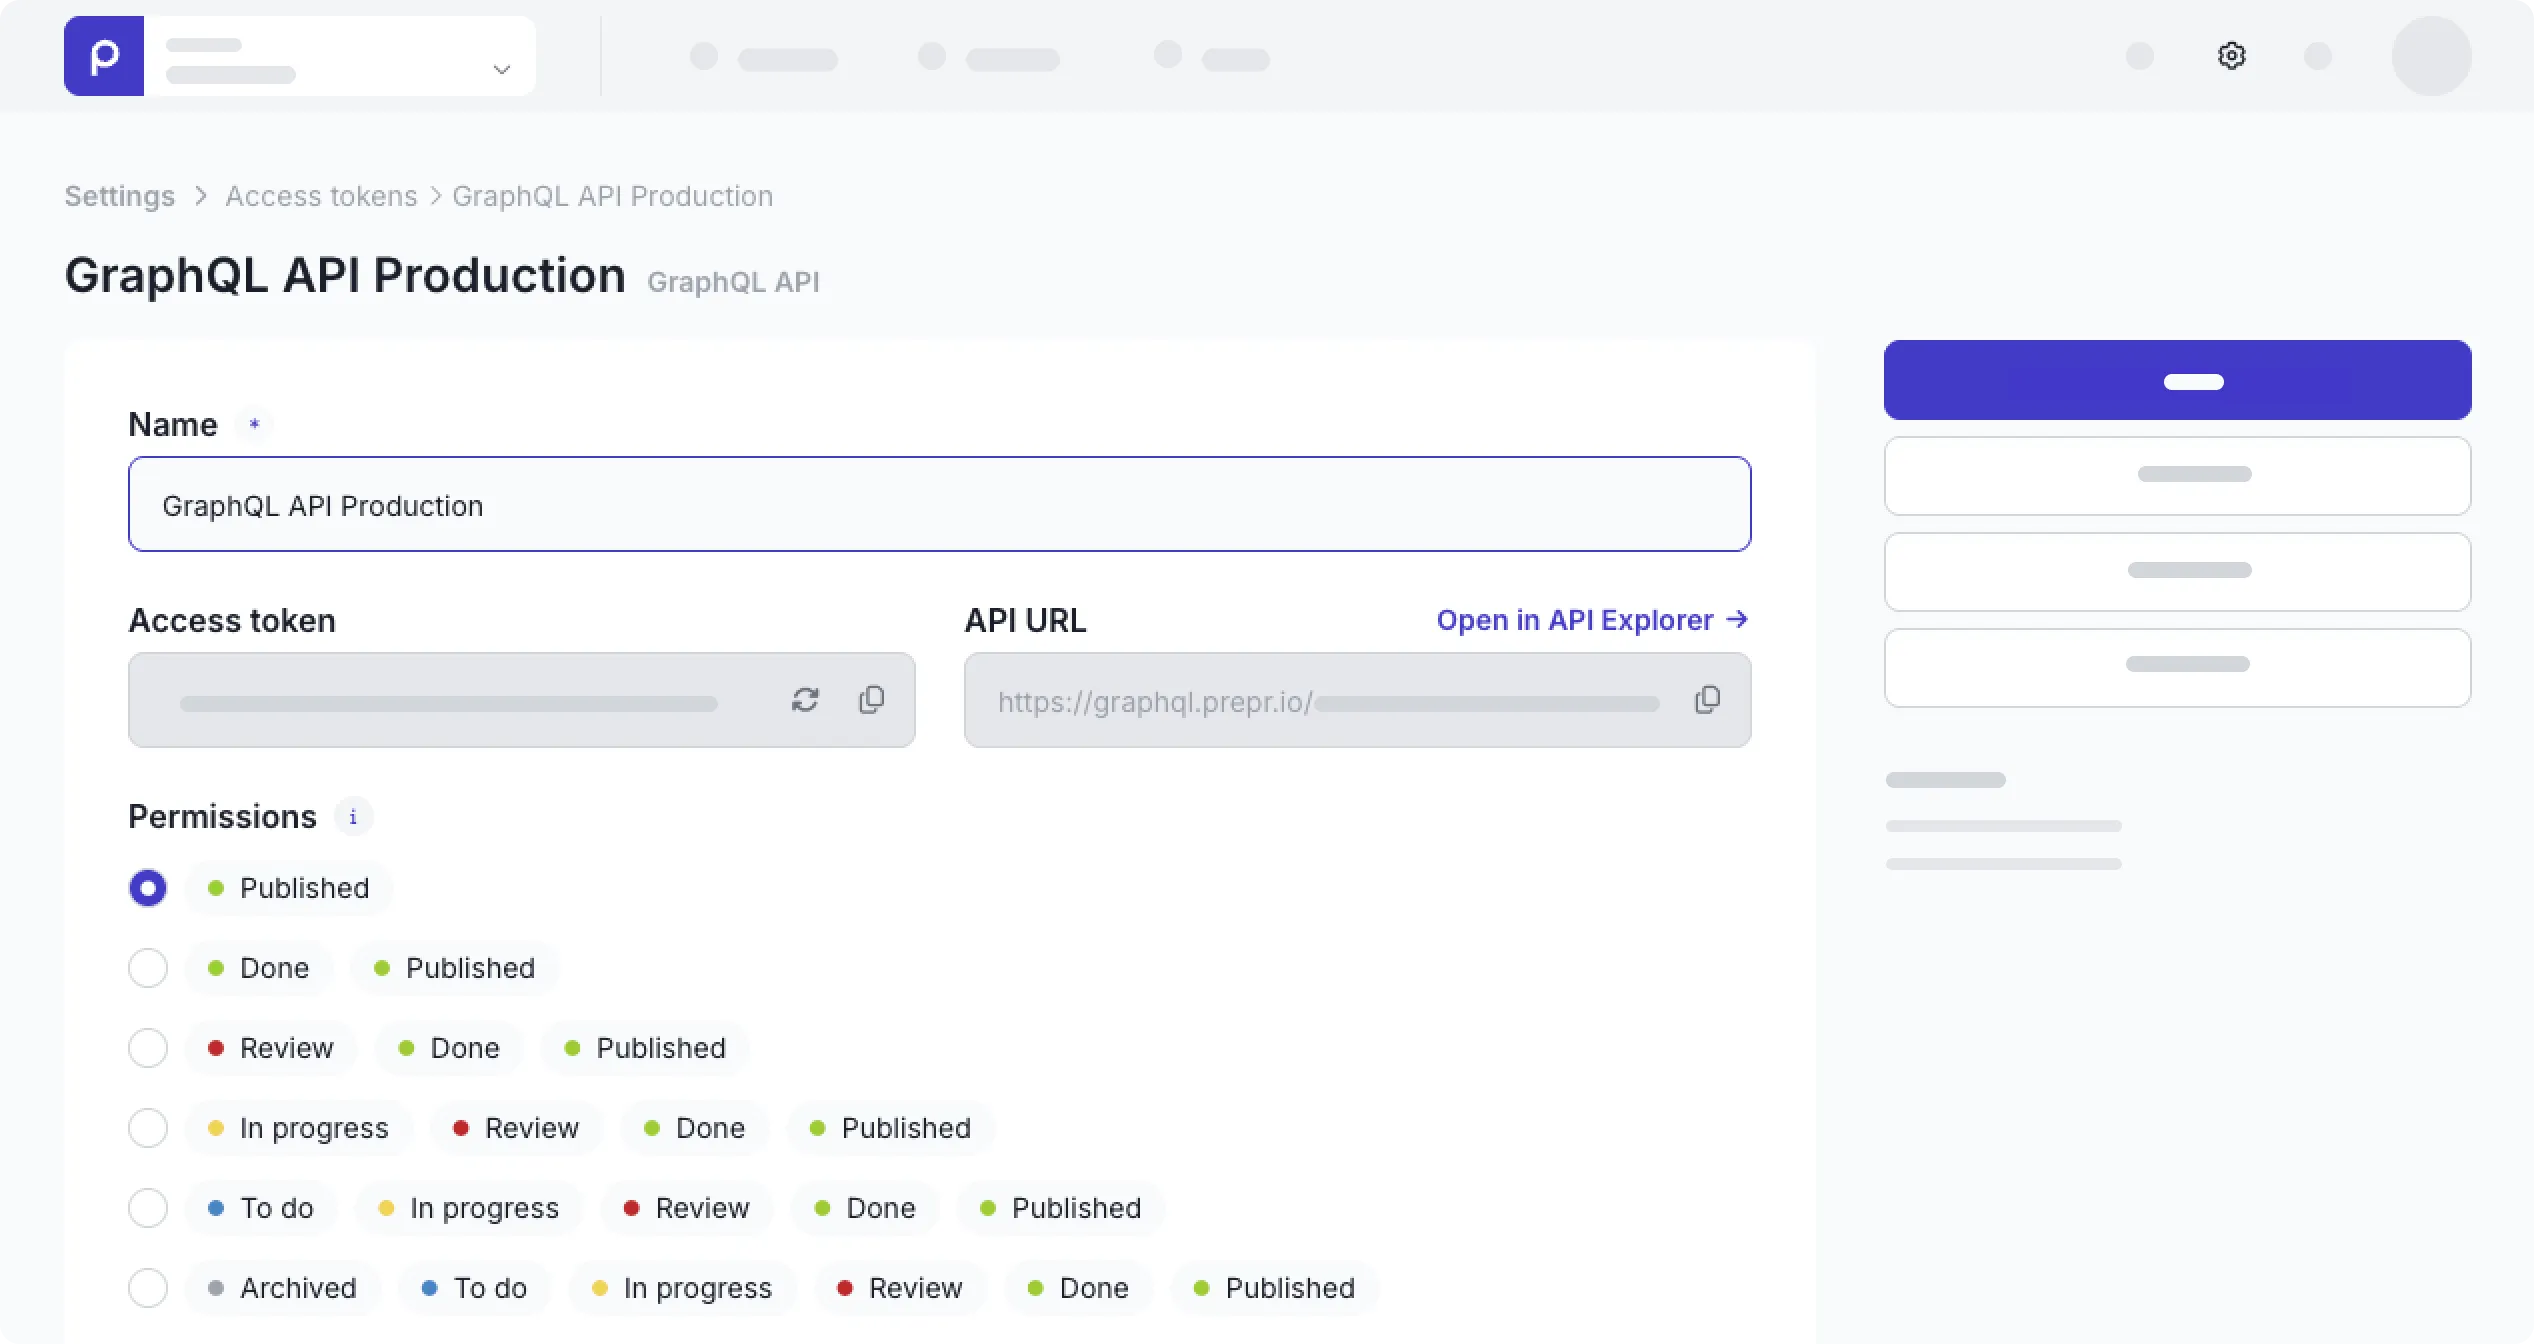
a. Click the icon and choose the Access tokens option to view all the access tokens.
b. Click to open the GraphQL Production access token, and copy the API URL to only retrieve published content items on your site for now. c. Paste the copied API URL in your.envfile.
Use the GraphQL Production access token to request published content items for your live app and use the GraphQL Preview token to make a preview of unpublished content items for your content editors.
-
Declare the
PREPR_GRAPHQL_URLvariable in yourastro.config.mjsso Astro validates and types it. At this stage, also add theimage.domainsentry to fetch page images from the Prepr demo environment../astro.config.mjs// @ts-check import { defineConfig, envField, fontProviders } from 'astro/config'; import node from '@astrojs/node'; import tailwindcss from '@tailwindcss/vite'; export default defineConfig({ // Render every request on the server: personalization and A/B testing // depend on per-visitor request headers. output: 'server', adapter: node({ mode: 'standalone' }), fonts: [ { provider: fontProviders.google(), name: 'Ubuntu', cssVariable: '--font-ubuntu', weights: [400, 700], subsets: ['latin'], }, ], vite: { plugins: [tailwindcss()], }, image: { // Domain of the Acme Lease demo images. Add your own asset domain here. domains: ['demo-patterns.stream.prepr.io'], }, env: { schema: { PREPR_GRAPHQL_URL: envField.string({ context: 'server', access: 'secret' }), }, }, }); -
Execute the following command to restart the server and refresh your page in the browser.
npm run dev
If your website runs without errors, then the setup above was done correctly. Now that Astro can reach the Prepr API, you can retrieve content from Prepr.
Before we create a query to retrieve content, let’s follow some best practices for TypeScript and install a GraphQL code generator.
Install a code generator
In this step, you’ll install a GraphQL code generator to generate TypeScript types automatically for your queries and keep these up to date with any schema changes. Check out the TypeScript best practices doc for more details. In the meantime, follow the steps below to install the GraphQL code generator.
-
Stop the localhost website server (
CTRL-C) if it’s running and execute the following commands in your terminal:npm add -D @graphql-codegen/cli @graphql-codegen/client-preset @graphql-codegen/introspection npm add -D dotenv npm add -D @astrojs/check typescriptWhen you run the
buildscript, it runsastro check, which needs@astrojs/checkandtypescriptinstalled -
Once done, create a new file,
codegen.tsin the root of your project. Update it with the code below../codegen.tsimport 'dotenv/config'; import type { CodegenConfig } from '@graphql-codegen/cli'; const config: CodegenConfig = { overwrite: true, schema: process.env.PREPR_GRAPHQL_URL, documents: ['src/queries/**/*.graphql'], generates: { 'src/gql/': { preset: 'client', presetConfig: { fragmentMasking: false }, // Astro's strict tsconfig enables verbatimModuleSyntax. config: { useTypeImports: true }, }, './graphql.schema.json': { plugins: ['introspection'] }, }, }; export default config; -
To complete the codegen installation, update the
scriptsblock in yourpackage.jsonsobuildruns codegen and a type check beforeastro build, and add acodegenscript. Leave the rest of yourpackage.json(name, version, dependencies) as-is — only thescriptsblock changes:./package.json{ ... "scripts": { "dev": "astro dev", "build": "npm run codegen && astro check && astro build", "start": "node --env-file-if-exists=.env ./dist/server/entry.mjs", "preview": "astro preview", "astro": "astro", "codegen": "graphql-codegen --config codegen.ts" } ... }The built server doesn’t load
.envon its own.--env-file-if-exists=.envtells Node to load it, soPREPR_GRAPHQL_URLand other secrets are available when you runnpm startafternpm run build.Host-provided environment variables, for example, in a deployment platform, still take precedence over
.env. -
Execute the following command to restart the server and refresh your page in the browser to make sure the fetch helper is set up correctly:
npm run dev
If your website runs without errors, then the setup above was done correctly. Now you can add a query to your project.
Add a GraphQL query
Once the GraphQL code generator is installed, you can add a query to get the content for your home page from Prepr.
If you’re using preloaded demo data in your Prepr environment as mentioned in the Prerequisites, you should have a Homepage content item like in the images below. The Homepage has all the elements of the page in a Stack field. The stack makes it easy for an editor to set up their page content in a flexible structure for the front end.
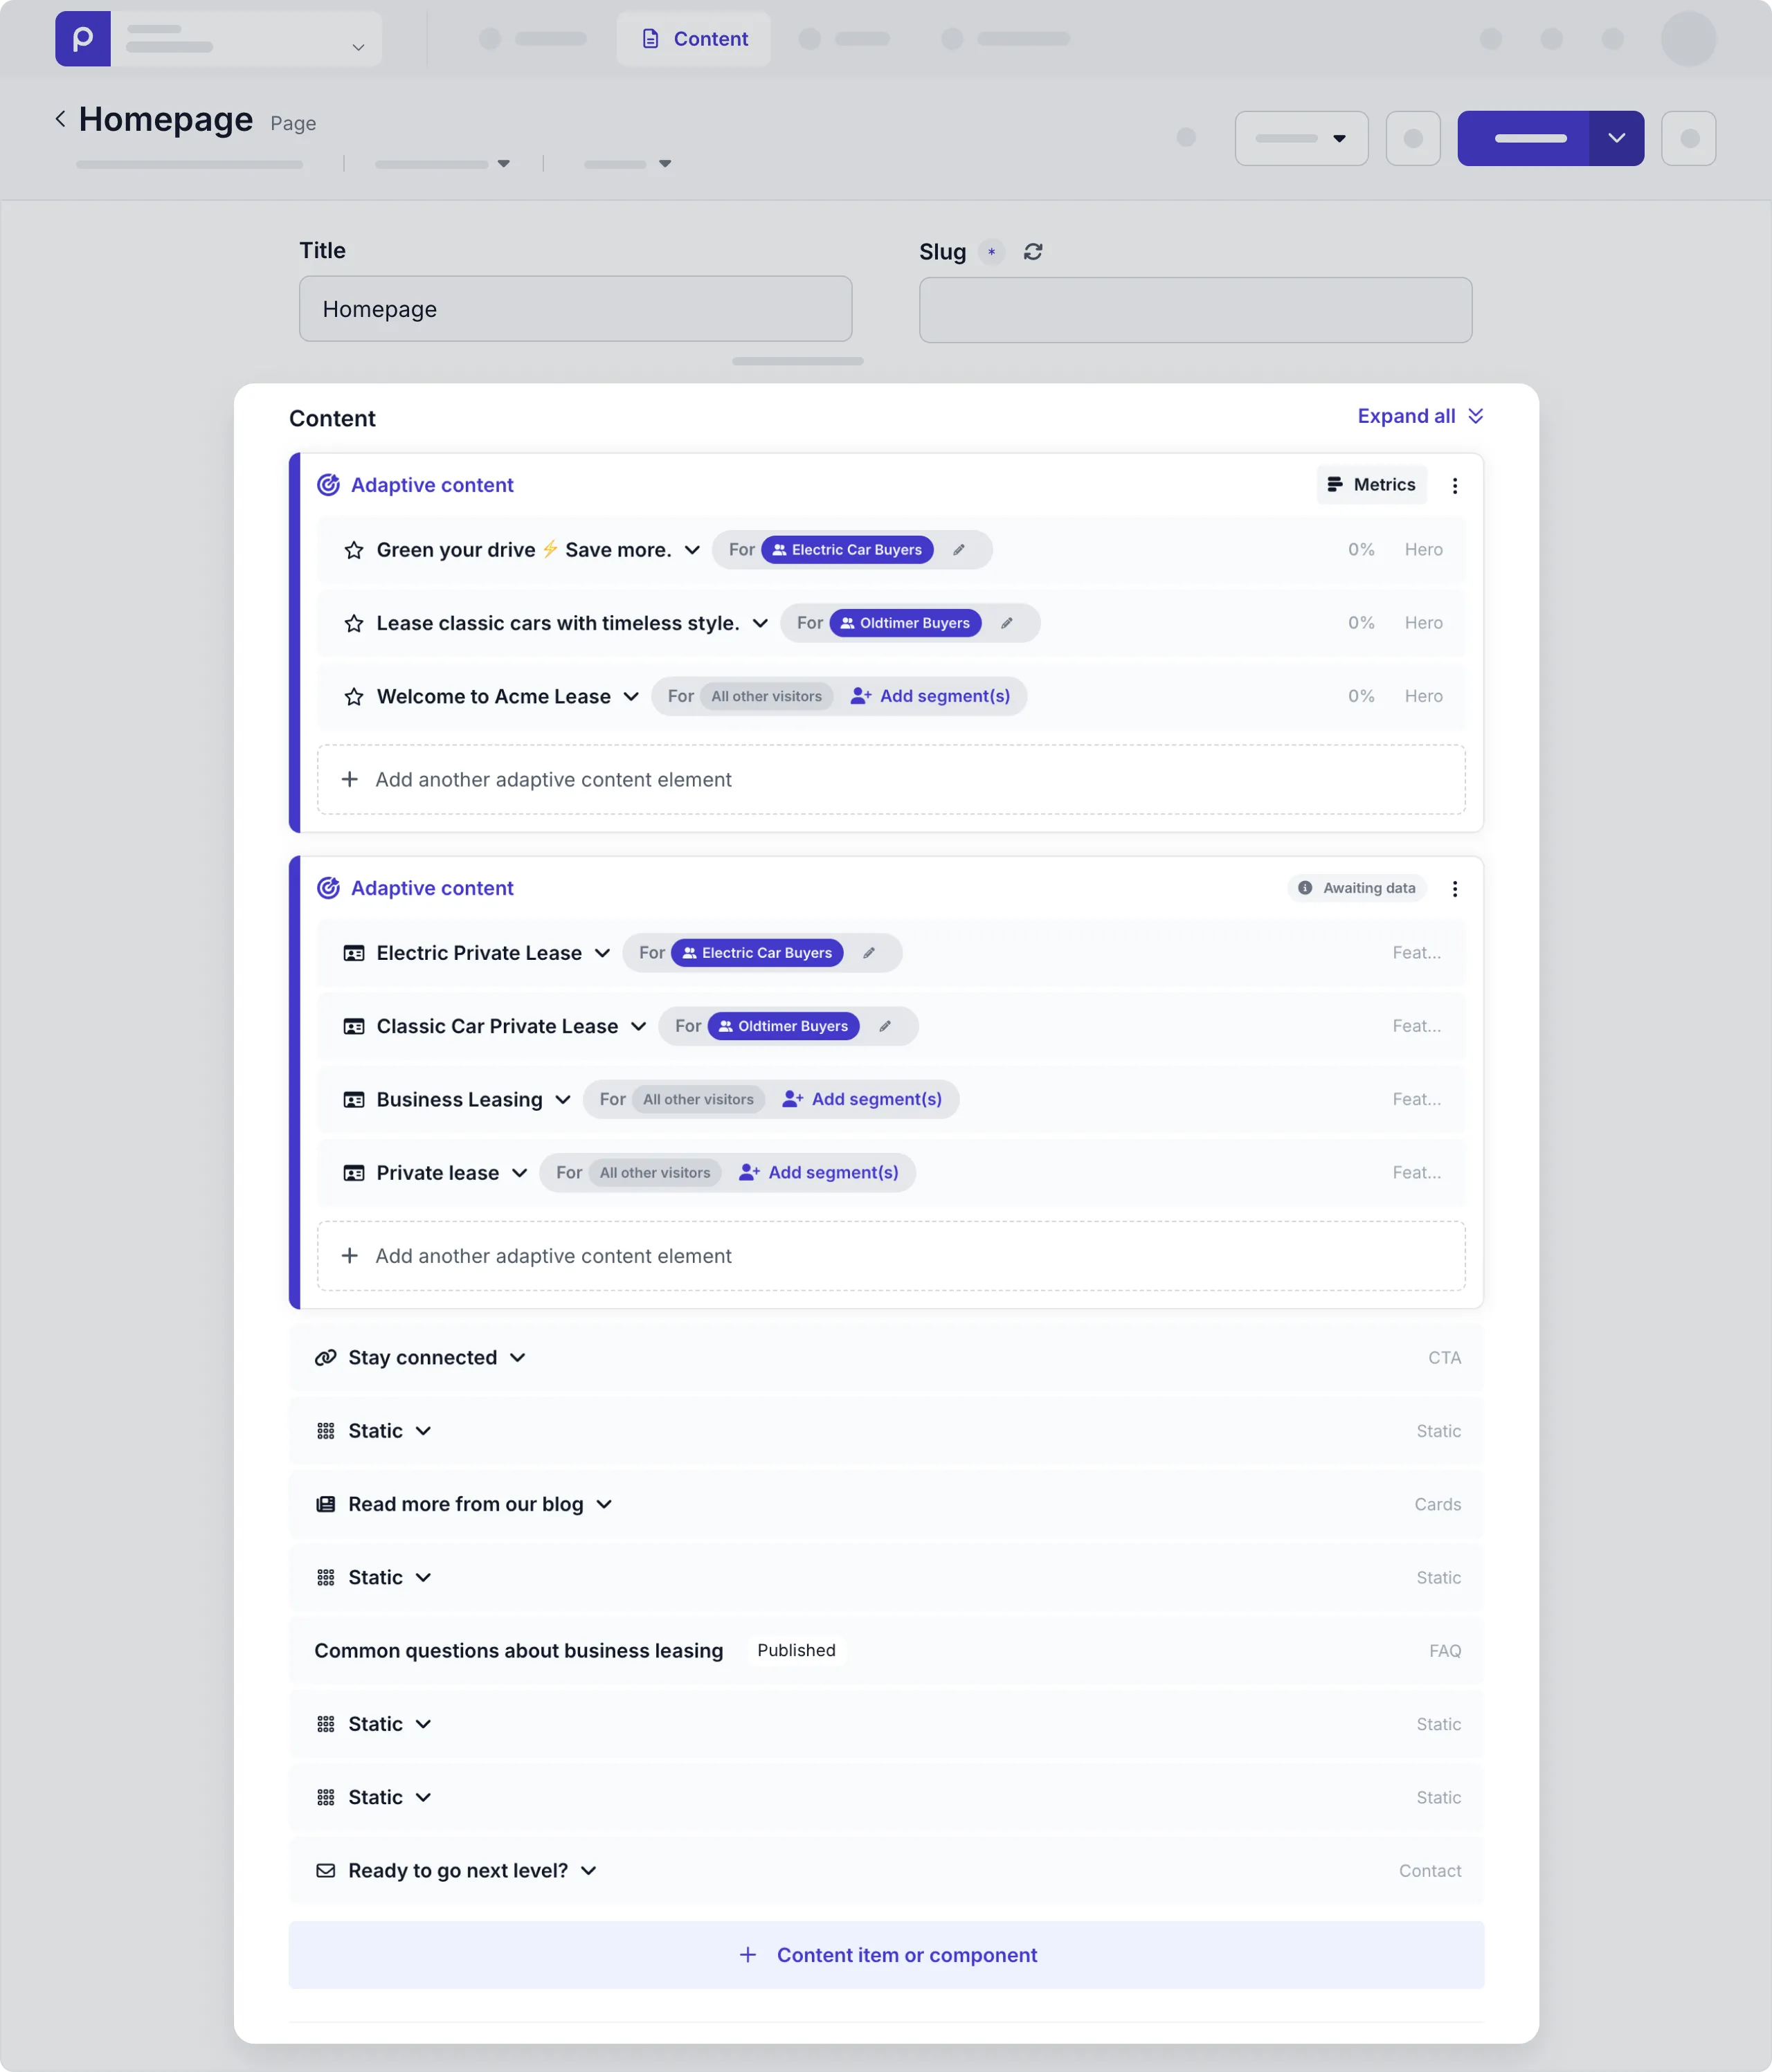
You can see that the hero and feature sections are in adaptive content blocks. We’ll explain that in more detail in the upcoming personalization chapter.
Follow the steps below to add a query to retrieve the id, title, slug, and a stack containing the hero and feature sections with their own fields:
- Create a
queriesfolder in thesrcdirectory of your project and create a file namedget-page-by-slug.graphql. - Add the following queries in the
queriesfolder to retrieve a page by its slug:
You’ll notice that we’ve created separate fragment queries for the button, hero and feature UI components in a fragments folder.
Fragments in GraphQL are a way to define a set of fields that can be reused.
Page query
# The GetPageBySlug query uses a slug value from the input parameter to retrieve a specific page
query GetPageBySlug($slug: String) {
    Page(slug: $slug) {
        title
        _id
        content {
            __typename
            ... on Hero {
                ...Hero
            }
            ... on Feature {
                ...Feature
            }
        }
    }
}You can create and test GraphQL queries using the Apollo explorer from Prepr. Open the API Explorer from the Homepage content item or from your access token page.
Generate TypeScript types
-
Now that the query is created, stop the localhost website server (
CTRL-C) and generate the TypeScript types by running the following command in the terminal:npm run codegen -
If the command is successful you’ll see new files in the
src/gqlfolder, includinggraphql.ts. Check out the TypeScript doc for more details. -
Test the query by updating the
[...slug].astrofile. The code below executes the query and returns early with a 404 rewrite if the page doesn’t exist../src/pages/[...slug].astro--- import Layout from '../layouts/Layout.astro'; import Hero from '../components/sections/Hero.astro'; import Feature from '../components/sections/Feature.astro'; import { prepr } from '../lib/prepr'; import { GetPageBySlugDocument } from '../gql/graphql'; // The home page has no slug in the URL; in Prepr its slug is '/'. const slug = Astro.params.slug ?? '/'; const data = await prepr(GetPageBySlugDocument, { slug }); if (!data.Page) return Astro.rewrite('/404'); const page = data.Page; --- <Layout> <Hero /> <Feature /> <Feature align="right" /> <Feature /> </Layout> -
You need a page to rewrite to when the slug isn’t found. Create a new page called
404.astro:
---
import Layout from '../layouts/Layout.astro';

Astro.response.status = 404;
---

<Layout>
  <div class="mx-auto max-w-8xl p-spacing py-20 text-center text-secondary-700">
    <h1 class="text-5xl font-medium">404</h1>
    <p class="mt-4">This page could not be found.</p>
  </div>
</Layout>
Now that the query has been created and retrieves the data successfully, fetch and show the specific page content from the query results.
Fetch page content
To view the Prepr content in your website, you need to fetch the page elements. As mentioned previously, the page has elements in a Stack field. You’ll fetch two components, a Hero section and Feature sections in the stack.
- Next, update your components to display data dynamically.
Hero section
---
import { Image } from 'astro:assets';
import type { HeroFragment } from '../../gql/graphql';
import Button from '../Button.astro';

interface Props {
  item: HeroFragment;
}

const { item } = Astro.props;
const image = item.image;
---

<section class="bg-primary-50">
  <div class="mx-auto max-w-8xl p-spacing flex flex-col items-center md:flex-row gap-8 py-10 lg:py-20">
    <div class="basis-6/12">
      <h1 class="text-mb-5xl lg:text-7xl text-secondary-700 font-medium break-words text-balance">{item.heading}</h1>
      <p class="text-secondary-500 lg:text-lg mt-4 lg:mt-6 text-balance">{item.sub_heading}</p>
      <div class="flex gap-4 mt-8 xl:mt-10">
        <div>
          <a href="#"><Button>{item.buttons[0]?.text}</Button></a>
        </div>
      </div>
    </div>
    <div class="basis-6/12 relative flex justify-end items-center">
      <div class="z-10 flex items-center aspect-[20/17] w-9/12 overflow-hidden justify-center absolute top-1/2 left-1/2 transform -translate-x-1/2 -translate-y-1/2">
        {image?.url && <Image src={image.url} alt="Hero Image" width={720} height={360} class="object-cover rounded-2xl" />}
      </div>
      <div class="w-9/12 aspect-[20/17] bg-primary-100 rounded-3xl right-0 top-0 z-0"></div>
    </div>
  </div>
</section>- Now update
[...slug].astroto fetch and render the elements from the stack:
---
import Layout from '../layouts/Layout.astro';
import Hero from '../components/sections/Hero.astro';
import Feature from '../components/sections/Feature.astro';
import { prepr } from '../lib/prepr';
import { GetPageBySlugDocument } from '../gql/graphql';

// The home page has no slug in the URL; in Prepr its slug is '/'.
const slug = Astro.params.slug ?? '/';
const data = await prepr(GetPageBySlugDocument, { slug });

if (!data.Page) return Astro.rewrite('/404');
const page = data.Page;
---

<Layout>
  {page.content.map((element) => {
    if (element.__typename === 'Hero') return <Hero item={element} />;
    if (element.__typename === 'Feature') return <Feature item={element} />;
  })}
</Layout>
In later chapters, this guide shows you how to implement Personalization and A/B testing which are dynamic features in Prepr.
These features work best with SSR (Server-side rendering).
The output: 'server' setting in astro.config.mjs renders every request on the server, so there’s no build-time cache to disable — Astro’s SSR mode always fetches fresh data per request.
Now when you view the website on your localhost, you’ll see something like the image below:

Troubleshooting
Runtime error: 500 response with Error: <error message from Prepr> in the terminal.
Cause: The PREPR_GRAPHQL_URL value is missing or incorrect, so the GraphQL API returns an error.
Solution: Check the Connect to Prepr section and confirm the API URL in your .env file matches an access token in your Prepr environment.
Congratulations! You have successfully connected your front end to Prepr to make your website dynamic. Continue your journey to the next section to set up data collection.